
Setup Locations
In this tutorial we cover how to setup sites, locations, and coordinates so you can keep track of contents through the restoration process. From trucks, to vaults, to cleaning room, and more, you can setup locations to map your facilities and operations.
What Are Locations?
Section titled “What Are Locations?”Locations let you digitally map out the physical spaces where your contents move during a job. Think of them as checkpoints in your chain of custody. By setting up locations, you can track every step of an item’s journey — from the customer’s home, to your facility, to the cleaning room, and back again. This ensures you always have a clear record of where each item is at any point in time. It keeps your team organized and makes your chain of custody airtight.
Sites vs. Locations vs. Coordinates
Section titled “Sites vs. Locations vs. Coordinates”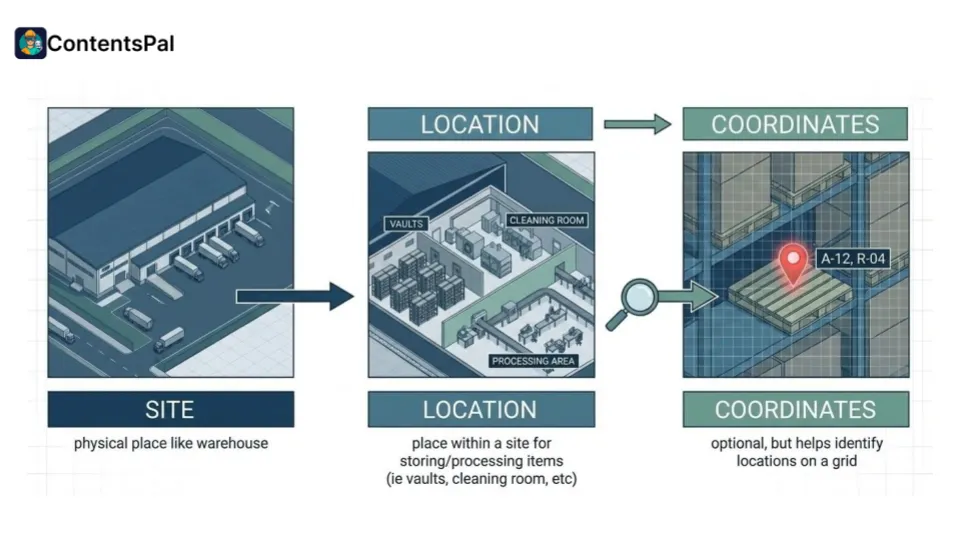
-
Sites are the larger containers, representing physical facilities like warehouses or offices.
-
Locations live inside sites and represent specific rooms or zones (e.g., Cleaning Room, Storage Bay, Vaults, Trucks).
-
Coordinates are optional but helpful if you have ‘locations’ that can move around, like vaults.
Any member of your organization can create, edit and delete sites and locations in the web app.
Big Picture: How They Fit Together
Section titled “Big Picture: How They Fit Together”Think of your storage setup like this:
-
Site → a physical facility
-
Location → a place within that facility
-
Coordinates → a visual way to map locations on a grid
Together, they let you model your real-world warehouse or yard directly inside ContentsPal.
Key Concepts Explained
Section titled “Key Concepts Explained”A site represents a physical place, such as:
-
A warehouse
-
A storage facility
-
A contents yard
If you have multiple warehouses or facilities, each one should be created as its own site.
Create one site per building, not one per kind of storage. If a single warehouse holds racks, rails, and vaults, keep them all in that warehouse’s site as locations, and set each location’s Type (Vault, Rack, Pallet, Rail, Bin, Vehicle, Cleaning, or Other). That way the whole building shares one grid, and you can see everything in it in one place.
Locations
Section titled “Locations”A location is where contents are actually stored or processed inside a site. Locations can include:
-
Vaults
-
Clean rooms
-
Trucks
-
Staging areas
-
Any other place where contents live
(Important: Locations do not have to be vaults.)
Coordinates
Section titled “Coordinates”Coordinates are optional—but very powerful. They allow you to:
-
Place locations on a visual grid
-
Use aisles, bays, and levels
-
See exactly where contents are stored
-
Find items faster in large facilities
You can choose to use coordinates only where they make sense.
How to Set Up a Site
Section titled “How to Set Up a Site”-
From the main navigation, click Sites.
-
On the site management screen, click Add Site. A short setup opens with four steps — Site, Locations, Layout, and Labels — and you move between them with Continue and Back.
-
Site: Enter a name (for example, Main Warehouse), and optionally an address and an image such as a photo or diagram of your warehouse.
-
Locations: Add a row for each kind of location, with a Name, a Type and How many. A row with a count of one keeps its name as typed (Cleaning Room); a larger count is numbered (Vault × 20 creates Vault-01 to Vault-20). Click Add another for more rows, then click Create N locations.
-
Layout: Set the number of aisles, bays, and levels to match your real-world layout, using the same tools as the Grid Editor. If you don’t need a grid, click Don’t use a grid — you can enable it later.
-
Labels: Print Location codes and, if you use a grid, Coordinate codes — or skip this and print them any time later.
-
Click Continue, review the summary, and click Done.
(Note: The site is saved as soon as you leave the first step, so if you close the setup early, what you’ve entered so far is kept. The setup never places locations on the grid — you assign coordinates afterwards, as described below.)
Customizing the Grid Layout
Section titled “Customizing the Grid Layout”Once your site is created with a grid, you can fine-tune it to match your exact facility layout using the Grid Editor. On your site’s page, click Configure (gear icon) at the top of the grid to open it.
The Grid Editor lets you:
-
Adjust aisles, bays, and levels directly from the toolbar
-
Add walkways between rows or columns to reflect physical aisles in your facility
-
Block cells that aren’t usable for storage (pillars, doorways, equipment areas)
All changes are previewed live and only saved when you click Save.
👉 For a full walkthrough, see the Grid Editor guide.
Edit a Site
Section titled “Edit a Site”You can change a site’s name, address, grid size and image at any time. Open the site’s settings in either of two ways:
-
On the Sites page, open the site’s ⋯ menu and choose Edit.
-
On the site’s page, click the pencil next to the site’s name.
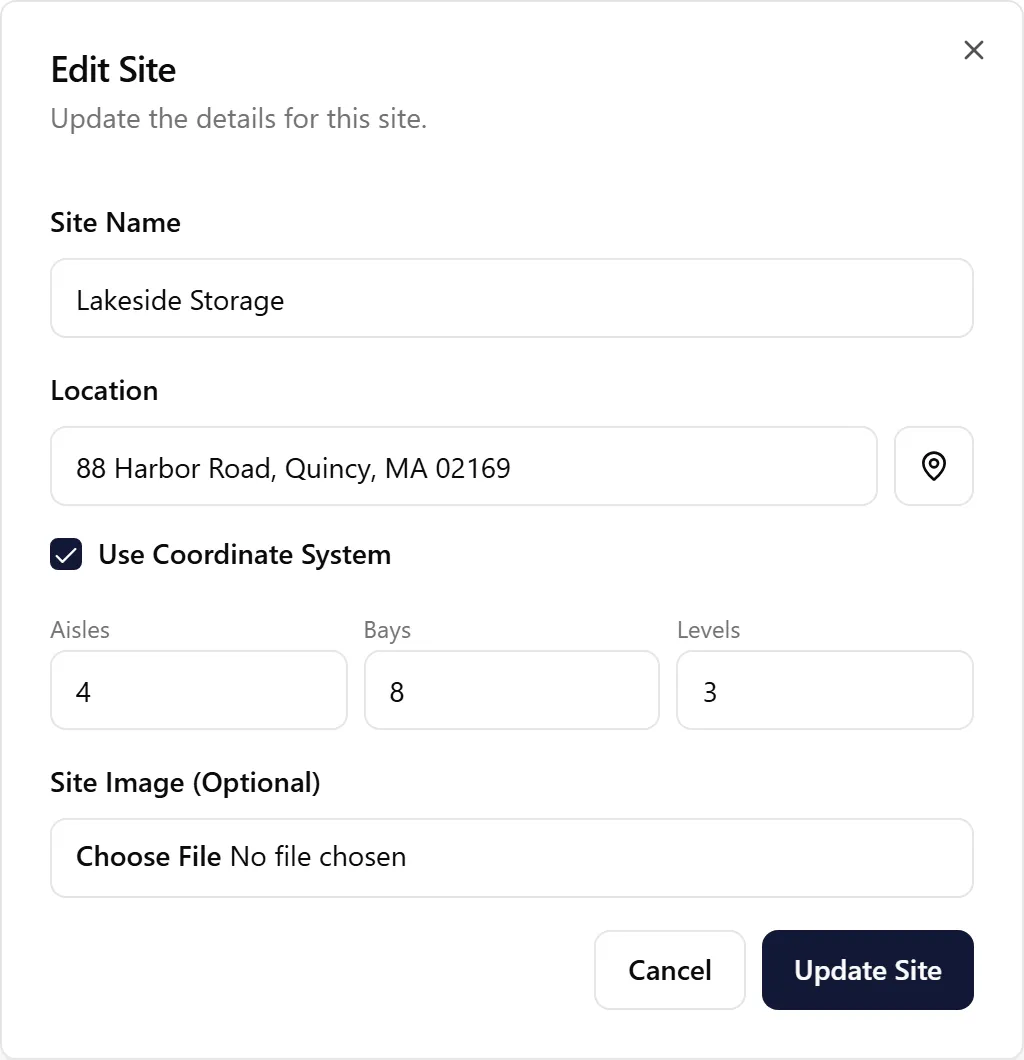
In Edit Site you can change:
-
Site Name.
-
Location: the site’s address. Start typing to pick an address, or click the pin button to use your current location.
-
Use Coordinate System: turns the site’s grid on or off. Turning it off hides the grid, but keeps its layout and your locations’ coordinates, so you can turn it back on later.
-
Aisles, Bays and Levels: the size of the grid. (Walkways and blocked cells are set in the Grid Editor.)
-
Site Image (Optional): a photo or diagram of the site.
Click Update Site to save.
(Note: If you make the grid smaller and some locations sit outside the new size, ContentsPal lists them under Locations will lose coordinates. Click Save Anyway to take those locations off the grid, or Cancel to keep the current size. The locations and their contents stay; they only lose their coordinates.)
How to Add Locations
Section titled “How to Add Locations”-
On the Sites page, click Manage Locations on your site.
-
Click Add Location.
-
Choose to add:
-
A Single Location, or
-
Multiple Locations at once
-
-
For multiple locations, enter a Prefix (for example, Vault) and the Number of Locations.
-
Choose the location’s Type (Vault, Rack, Pallet, Rail, Bin, Vehicle, Cleaning, or Other), and optionally a Status for contents (see Give a Location a Status below).
You’ll now see locations like Vault-01, Vault-02, and so on, each with its type’s icon next to its name.
(Tip: You can also bring in a whole list of locations from a CSV or Excel file with Import from spreadsheet. See the Import and Export Locations article.)
Assigning Coordinates to Locations
Section titled “Assigning Coordinates to Locations”At first, locations exist—but they won’t appear on the grid until coordinates are assigned.
Option 1: Assign from the Grid
Section titled “Option 1: Assign from the Grid”-
Click a specific spot on the grid.
-
Choose Assign existing location.
-
Select the location (for example, Vault 1).
Once assigned, the location appears visually on the grid. You can hover over it to see details.
Option 2: Assign from the Location Settings
Section titled “Option 2: Assign from the Location Settings”-
Click the location’s name in the table (or open its ⋯ menu and choose Edit Location).
-
Under Placement, click Place on the grid.
-
Enter the Aisle, Bay, and Level.
-
Click Save Changes.
The location will now appear on the grid.
Navigating Locations Visually
Section titled “Navigating Locations Visually”As you add more locations:
-
Click a location in the table to highlight it on the grid
-
Switch between levels to see vertical placement
-
Quickly understand where everything lives in the facility
This is especially helpful in larger warehouses.
What the Colors on the Grid Mean
Section titled “What the Colors on the Grid Mean”Each location on the grid is colored by the job whose contents are stored in it, so all of one job’s locations share a color. Empty locations are gray. Switch to the Grid view to see the Jobs legend under the grid, which names the job for each color. A location you click in the table is highlighted in yellow, and locations that don’t match your table filters are grayed out.
Locations Without Coordinates (That’s Okay!)
Section titled “Locations Without Coordinates (That’s Okay!)”Not every location needs coordinates. For example:
-
Clean rooms
-
Trucks
-
Temporary staging areas
If a location doesn’t have coordinates:
-
It won’t appear on the grid
-
It’s still fully usable
-
You can still assign contents to it
(Tip: This lets you mix structured storage with more flexible spaces.)
Delete a Location
Section titled “Delete a Location”You can delete a location from the table or from the grid:
-
From the table: open the location’s ⋯ menu and choose Delete Location.
-
From the grid: click the location to open it, then click Delete location under Manage.
-
Several at once: tick them in the table, then choose Edit Locations (N) → Delete Locations.
Confirm to finish. Deleting a location can’t be undone. If the location still holds contents, the confirmation warns you, so move those labels to another location first to keep their tracking accurate.
(Tip: To take a location off the grid without deleting it, choose Remove Coordinates from its ⋯ menu instead.)
Delete a Site
Section titled “Delete a Site”-
On the Sites page, open the site’s ⋯ menu and choose Delete.
-
Check the site’s name, address and number of locations.
-
Type the site’s name exactly as shown, then click Delete Site.
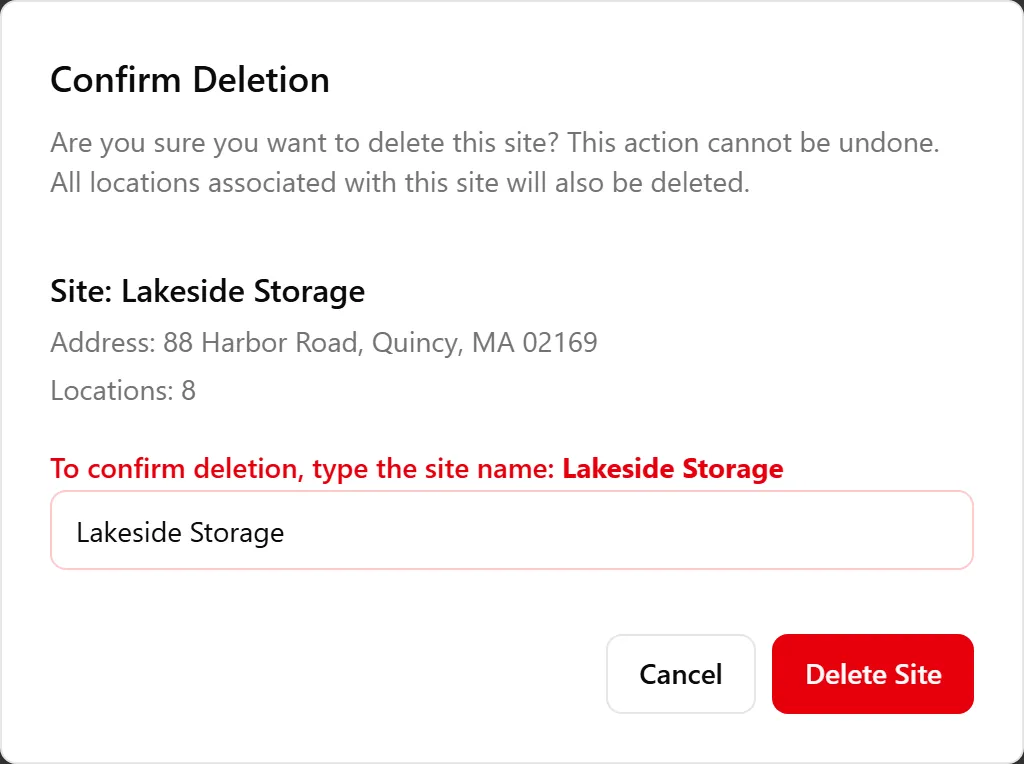
Deleting a site also deletes all of its locations. It can’t be undone from the app; if you delete a site by mistake, contact support.
(Tip: To keep some of the site’s locations, move them first: tick them in the site’s table and choose Edit Locations (N) → Move to Another Site. They keep their codes and contents.)
Give a Location a Status
Section titled “Give a Location a Status”A location can set the status of whatever is put in it. If your cleaning room only ever holds items being cleaned, tell the location that once — and every label moved there is marked Cleaning automatically, with no extra taps in the field.
-
Click the location’s name in the table (or open its ⋯ menu and choose Edit Location). You can also set it while creating the location.
-
Choose a status under Status for contents.
-
Click Save Changes.
From then on, moving a label into that location sets the label’s status, and the status flows down to everything under it:
-
A box or tag passes it to all of its items.
-
A group passes it to every label in the group, and to their items.
The app confirms the change with a message — it doesn’t stop to ask, so scanning stays fast.
Leave the status on No status and the location behaves exactly as before, changing nothing about what is put in it.
(Note: If someone picks a status by hand in the same edit, their choice wins — the location won’t override it.)
Applying it to what’s already there
Section titled “Applying it to what’s already there”A location’s status normally only affects things moved in after you set it. When you save a status on a location that already holds labels, the app asks whether to apply it to those too. Choose Apply to all to catch everything up, or Leave them as they are to affect only future arrivals.
Using QR Codes
Section titled “Using QR Codes”QR codes let you run your warehouse by scanning instead of typing. There are two kinds, and setting each up is a one-time print-and-post job. You print both from a site’s locations in the web app using the Print QR Codes button.

Label your vaults — Location QR codes
Section titled “Label your vaults — Location QR codes”Every location (vault) you create automatically has its own QR code. Scanning it in the mobile app opens that vault, so anyone can check items in and out or see what’s inside.
-
Open the site’s locations in the web app.
-
Click Print QR Codes and choose All Locations, Selected Locations (the ones you’ve ticked in the table), or Location Range….
-
Pick a sticker layout and print.
-
Stick each code onto its vault — on the front face, roughly at eye level, where it’s easy to see and reach. The code stays with the vault wherever it goes.
Label the grid — Coordinate QR codes
Section titled “Label the grid — Coordinate QR codes”If you’ve set up a grid for your site, you can also give every spot on it its own code. Unlike a vault code, a coordinate code marks a place, not a vault — it stays put while vaults come and go, so you always have something to scan for “put a vault here.”
-
Open the site’s locations and click Print QR Codes → Coordinate QR codes.
-
Print the sheet. Each label shows its coordinate, like
A2-B5(Aisle 2, Bay 5), so they’re easy to tell apart. They print in aisle order (A1, A2, A3…), so they come off the sheet in the order you’ll place them. -
Post each label at its spot on the grid. Walk the aisle and put the
A2-B5label at the front of Aisle 2, Bay 5 — on the rack upright, the shelf edge, or an end-of-bay marker — at a consistent, reachable height, so you can scan it standing there without climbing. -
Post one label per aisle-and-bay column — you don’t need one per level. You choose the level in the app when you scan, so a single label at the base of the column covers every level stacked above it.
Put them to work
Section titled “Put them to work”Once your vaults and coordinates are labeled, relocating a vault is just two scans in Warehouse Mode on your phone: scan the vault, then scan the coordinate where it’s going — no typing coordinates, no menus. See Warehouse Mode for the full workflow.
Recap ✅
Section titled “Recap ✅”-
Sites = physical facilities
-
Locations = places within those facilities
-
Coordinates = a visual grid using aisles, bays, and levels
-
Grid Editor = customize walkways, block cells, and adjust dimensions to match your real layout (learn more)
You can use coordinates where they add value—and skip them where they don’t.
Once this setup is complete, managing and finding contents becomes dramatically faster and more organized 🚀
Next Steps
Section titled “Next Steps”Once locations are set up, you’ll be able to:
-
Scan items into and out of locations.
-
View the full history of contents within each location.
-
Track jobs seamlessly across your chain of custody.
👉 In later tutorials, we’ll cover how to use locations during active jobs to scan items, move them, and view full histories.