
Location (Vault) Photos
Document what’s stored in a location — a vault, rack, pallet or cleaning room — with photos taken from the mobile app or uploaded on the web.
What are Location Photos?
Section titled “What are Location Photos?”Location photos (called Vault Photos in the mobile app) are pictures of a storage location that you attach to a job. They’re visual proof of where the job’s contents are stored and what condition they were in, which helps with chain of custody.
Location photos are:
-
Linked to the location: Each photo is saved with the location it was taken for
-
Part of the job: Photos belong to the job you have open, so each job keeps its own photos of a shared location
-
Timestamped: Each photo records when it was taken
-
Easy to capture: Take them from the location’s screen in Custody, or right after moving a label into a location
When to Use Location Photos
Section titled “When to Use Location Photos”Best for:
-
Documenting that a job’s contents have been moved into storage
-
Chain of custody verification
-
Insurance or compliance documentation
-
Before/after photos of storage areas
-
Proof of item condition at time of storage
Examples:
-
Taking a photo after loading boxes into a vault
-
Documenting the arrangement of boxes on a rack or pallet
-
Showing that labels are visible and facing out
How to Take Location Photos
Section titled “How to Take Location Photos”From the Mobile App
Section titled “From the Mobile App”-
Open your job in the mobile app
-
Open the Job Report, tap Custody, then tap the Locations tab
-
Open the location:
-
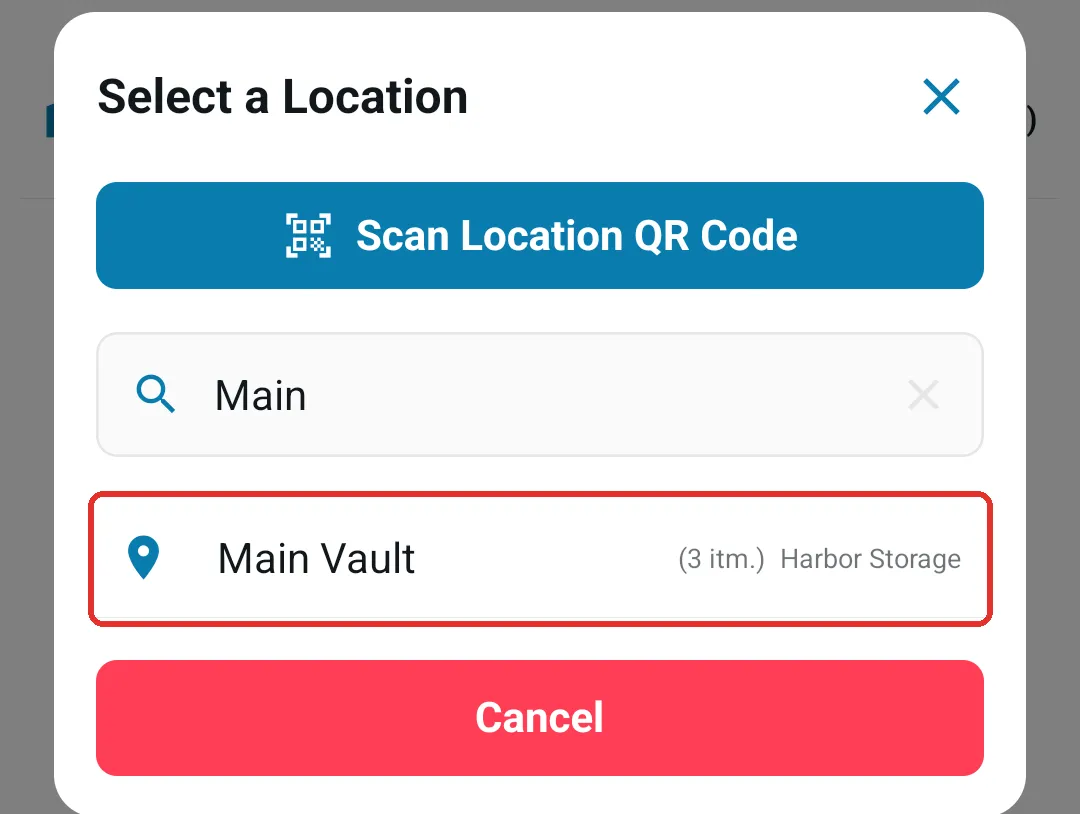
Tap Scan Location to scan the location’s QR code, OR
-
Tap Select Location and choose the location from the Select a Location list
-
-
On the location’s screen, tap the Add Photo tile under Vault Photos
-
Capture one or more photos with your device camera
-
Tap the back arrow when finished
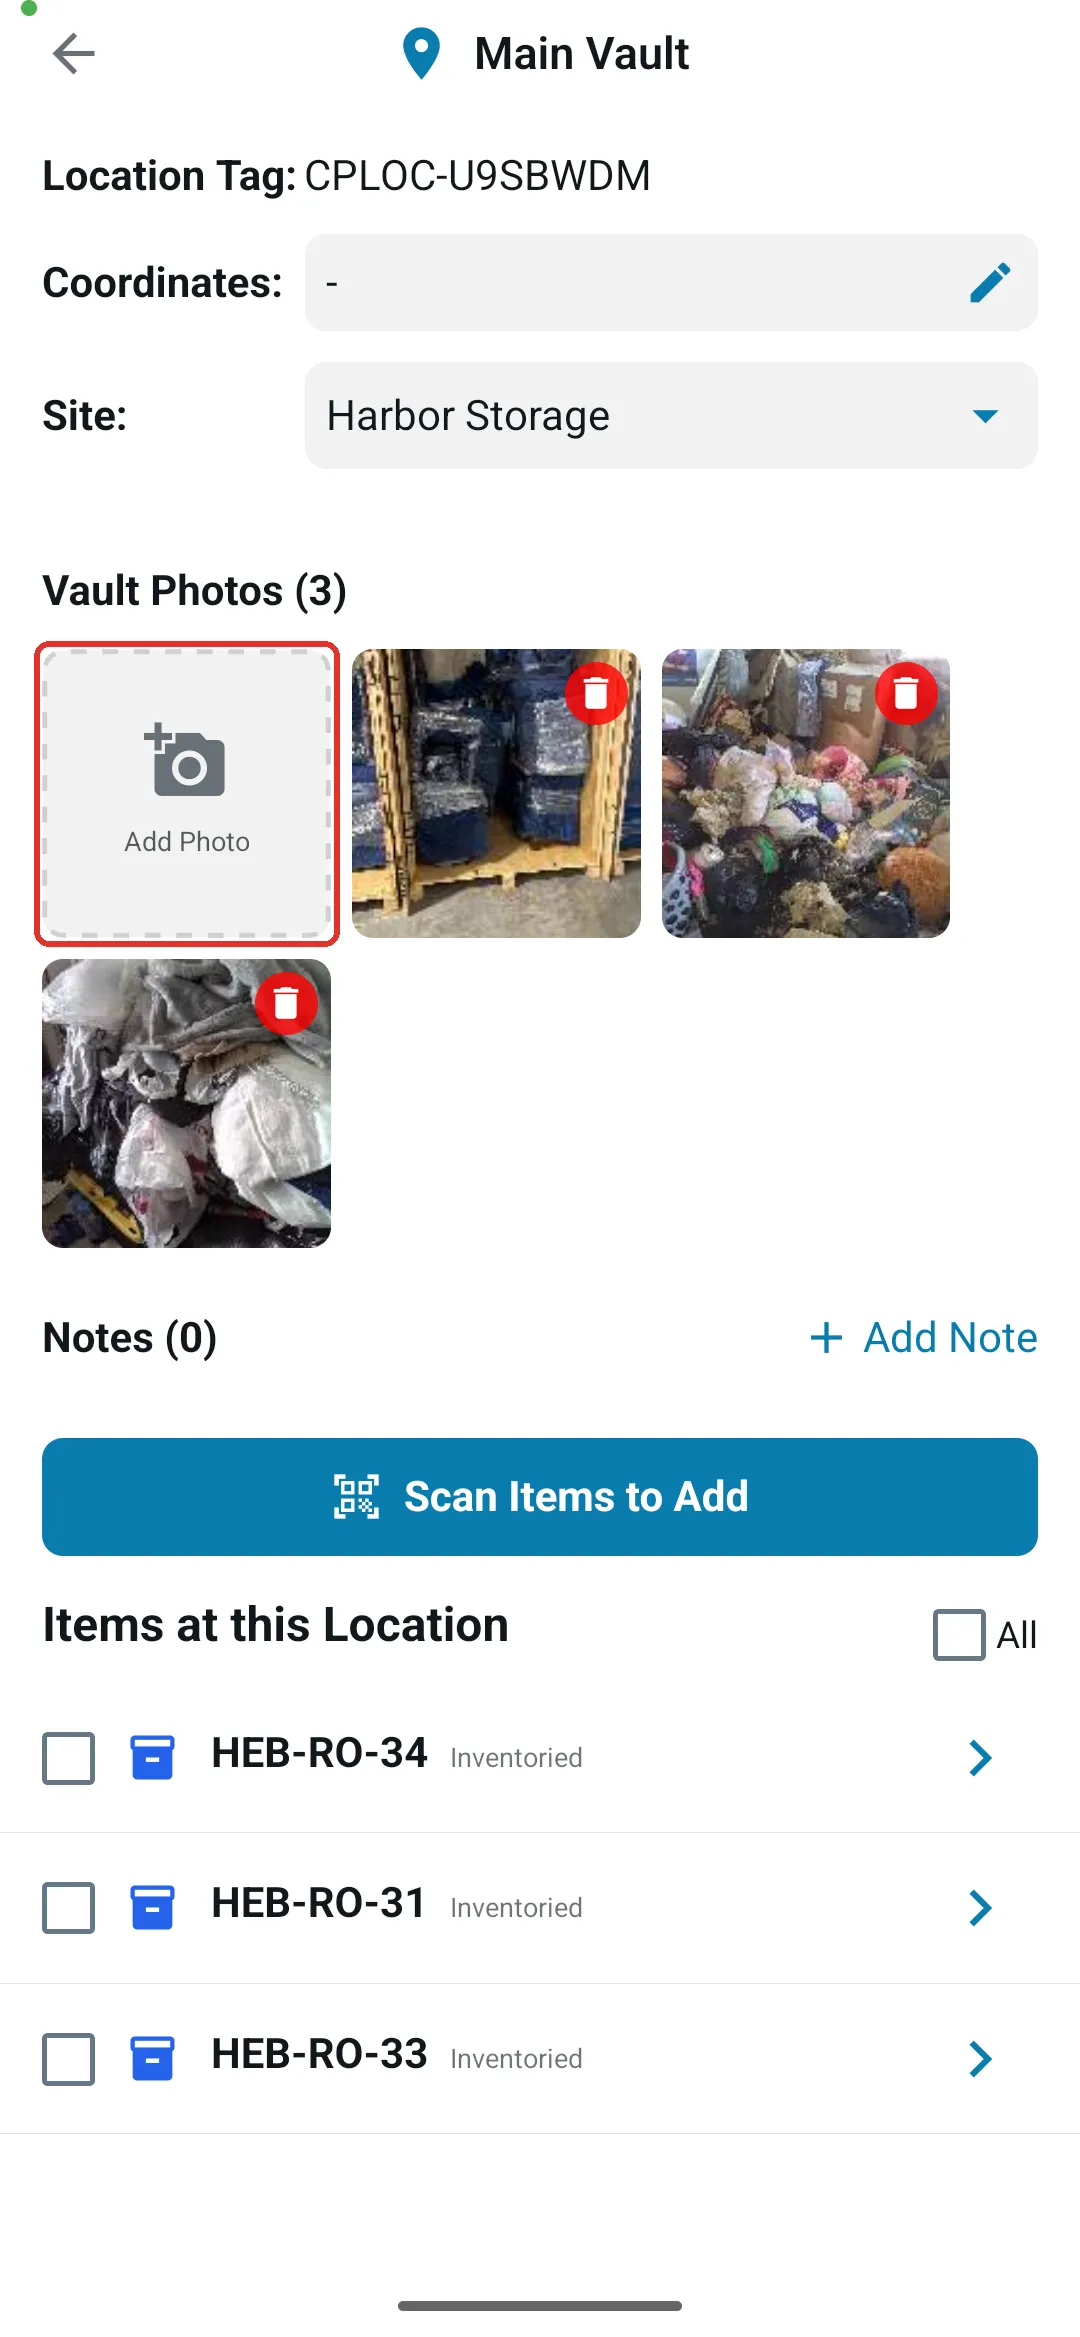
The photos are linked to the location and saved with the job. New photos show a spinner on the location’s screen until they finish uploading in the background.
Right After Moving a Label Into a Location
Section titled “Right After Moving a Label Into a Location”You don’t have to go looking for the location to document a move. When you move a label from the Custody tab:
-
Open your job in the mobile app
-
Open the Job Report, tap Custody, then scan or tap the label you are moving
-
Tap Move and pick the location under Change location (or tap Scan Location QR Code and scan it)
-
Tap Move in the confirmation
The app then asks Take a photo to document this location change?, with Not Now and Add Photo. Tapping Add Photo opens the camera for the location you just moved the label into — so you can document the box in place while you are still standing in front of it.
This prompt appears only when the label is moved into a location. Clearing a label’s location or marking it delivered saves with no photo prompt, since there is no destination location to attach the photo to. See Moving Labels Between Locations (Mobile).
From the Web App
Section titled “From the Web App”-
Open the job and go to its Documentation tab
-
In the sidebar, switch from Rooms to Locations. The tab lists the locations the job’s labels are stored in (or have been), plus any location that already has photos or notes for this job — it appears once the job has at least one
-
Select the location and click Add Location Media (or the + next to the location in the list), then choose your photos or videos
The location’s view in Documentation also has Add Note, for notes about this job at this location.
Connection Needed
Section titled “Connection Needed”Location photos are taken from screens that need an internet connection: the Locations tab in Custody is hidden while you’re offline, and scanning a location’s QR code says “Scanning a location requires an internet connection”. Once you’ve taken photos, they upload in the background — if the connection drops, they wait in the upload queue and send when you’re back online.
Location Notes
Section titled “Location Notes”Next to the photos, the location’s screen has Notes — notes this job keeps about the location (for example, “two boxes on the top shelf are fragile”). Tap Add Note to write one. These are separate from the location’s own note (access instructions and the like), which is shown read-only as Note at the top of the screen and is edited in the web app or in Warehouse Mode.
Where Location Photos Appear
Section titled “Where Location Photos Appear”In the Mobile App
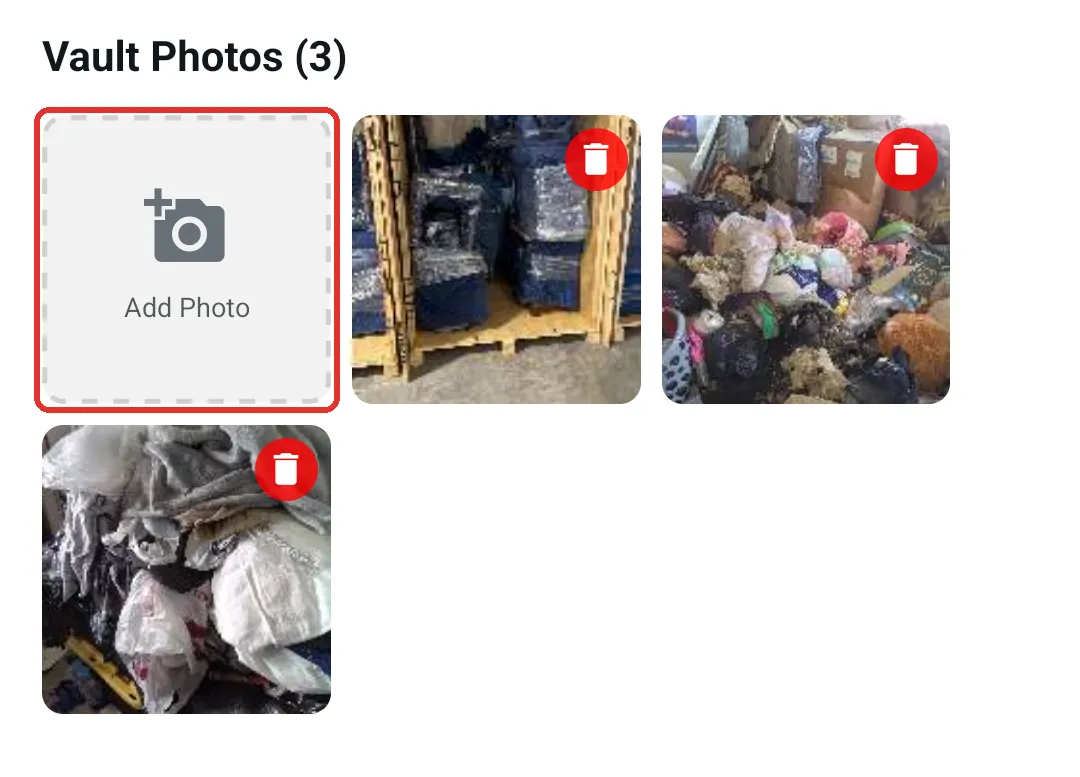
Section titled “In the Mobile App”- The location’s screen: The open job’s photos of the location appear as thumbnails under Vault Photos. Tap one to view them full screen.
- The job’s photo gallery: Location photos appear after the job’s other photos, grouped under the location’s name
In the Web App
Section titled “In the Web App”-
Documentation → Locations: Each location’s photos and notes for the job
-
Custody → Locations: Each location the job uses shows its photos and notes
-
Sites: A location’s Activity shows photos and notes from every job that has used it
In Reports
Section titled “In Reports”Location photos are saved as job photos, so reports that include job photos include them too, alongside the job’s other photos.
Q: How are location photos different from regular job photos?
Section titled “Q: How are location photos different from regular job photos?”A: Location photos are linked to a storage location. They’re for documenting where and how a job’s contents are stored, while job photos document the job site and the items themselves.
Q: Why can’t I see another job’s photos of the same location?
Section titled “Q: Why can’t I see another job’s photos of the same location?”A: Location photos belong to the job they were taken for. The mobile location screen shows only the photos of the job you have open. To see every job’s photos of a location, open the location from Sites in the web app and look at its Activity.
Q: How many photos can I take?
Section titled “Q: How many photos can I take?”A: There’s no specific limit per location. Take as many as you need to document it.
Q: Can I delete location photos?
Section titled “Q: Can I delete location photos?”A: Yes. On the location’s screen, tap the red trash icon on a photo and confirm. Photos can’t be deleted while the job is locked. You can also delete them from the location’s view in the job’s Documentation on the web.
Q: Will location photos appear on customer-facing reports?
Section titled “Q: Will location photos appear on customer-facing reports?”A: This depends on your report settings. If you choose to share Job Photos, the location photos are shared as well.
For Storage Facilities
Section titled “For Storage Facilities”-
Take photos when items arrive at the facility
-
Capture wide shots showing overall organization
-
Photograph labels and location markers for easy retrieval
For Insurance Documentation
Section titled “For Insurance Documentation”-
Include photos from multiple angles
-
Make sure item labels and tags are visible
-
Take photos as soon as items are stored, so the timestamps match
For Chain of Custody
Section titled “For Chain of Custody”-
Take photos at every storage transition — the photo prompt after a move makes this quick
-
Document the condition of packaging
-
Show the storage environment
Troubleshooting
Section titled “Troubleshooting”Photos not appearing after upload
-
Check your internet connection
-
Wait a few moments for the upload to finish (the spinner on the thumbnail goes away)
-
Make sure you’re viewing the right location, with the right job open
Camera won’t open
-
Grant camera permissions in device settings
-
Restart the app
-
Check that your device has available storage
-
Update to the latest app version
Can’t find the Add Photo tile
-
Make sure you’re online — the Locations tab in Custody is hidden while you’re offline
-
Open a specific location (not the list of locations)
-
Update to the latest app version
Related Articles
Section titled “Related Articles”-
Moving Labels Between Locations (Mobile) - Move labels into and out of locations
-
Custody Report - Generate reports on where a job’s contents are stored
-
Add job images - General guide to adding photos
-
Reports Overview - Include photos in exported documentation