
The Definitive Getting Started Guide
New to ContentsPal? This guide takes your restoration company from a brand-new account to a finished job: setting up your account and warehouse, packing out a home, moving and cleaning contents, delivering them back, and sending the reports. Each step is short and links to the full article when you need more detail.
🧭 Summary
Section titled “🧭 Summary”-
Set up once (web app): create your account, finish the setup guide, invite your team, and set up your warehouse.
-
Run every job (web + mobile): create the job, get an instant estimate, print labels, pack out on site with the mobile app, move labels into your truck, cleaning room and vaults, then pack back, deliver and send the reports.
-
The setup checklist on your dashboard tracks your progress until your account is ready.
⚙️ Prerequisites
Section titled “⚙️ Prerequisites”-
A computer with a web browser, for the ContentsPal web app.
-
An iPhone or Android phone or tablet, for the ContentsPal mobile app.
-
A label printer or a regular printer with sticker sheets, for custody labels (see step 9 for printers you can use).
🚀 Step-by-Step Instructions
Section titled “🚀 Step-by-Step Instructions”1. How ContentsPal Fits Together
Section titled “1. How ContentsPal Fits Together”ContentsPal has two apps that share the same data:
-
The web app is for the office: account and team setup, jobs, sites and locations, labels, reports and sharing.
-
The mobile app is for the field and the warehouse: photographing contents, scanning labels, and moving labels between locations.
Every job follows the same chain. A job holds the items your crew photographs. Items are packed under custody labels: a box label for a box of items, or a tag for a single large item. Labels are scanned into locations (your truck, the cleaning room, a vault), and each scan is recorded. At the end, reports turn all of this into documents for your customer and the carrier.
Learn more: What are Inventory Items and Custody Labels?
2. Create Your Account
Section titled “2. Create Your Account”-
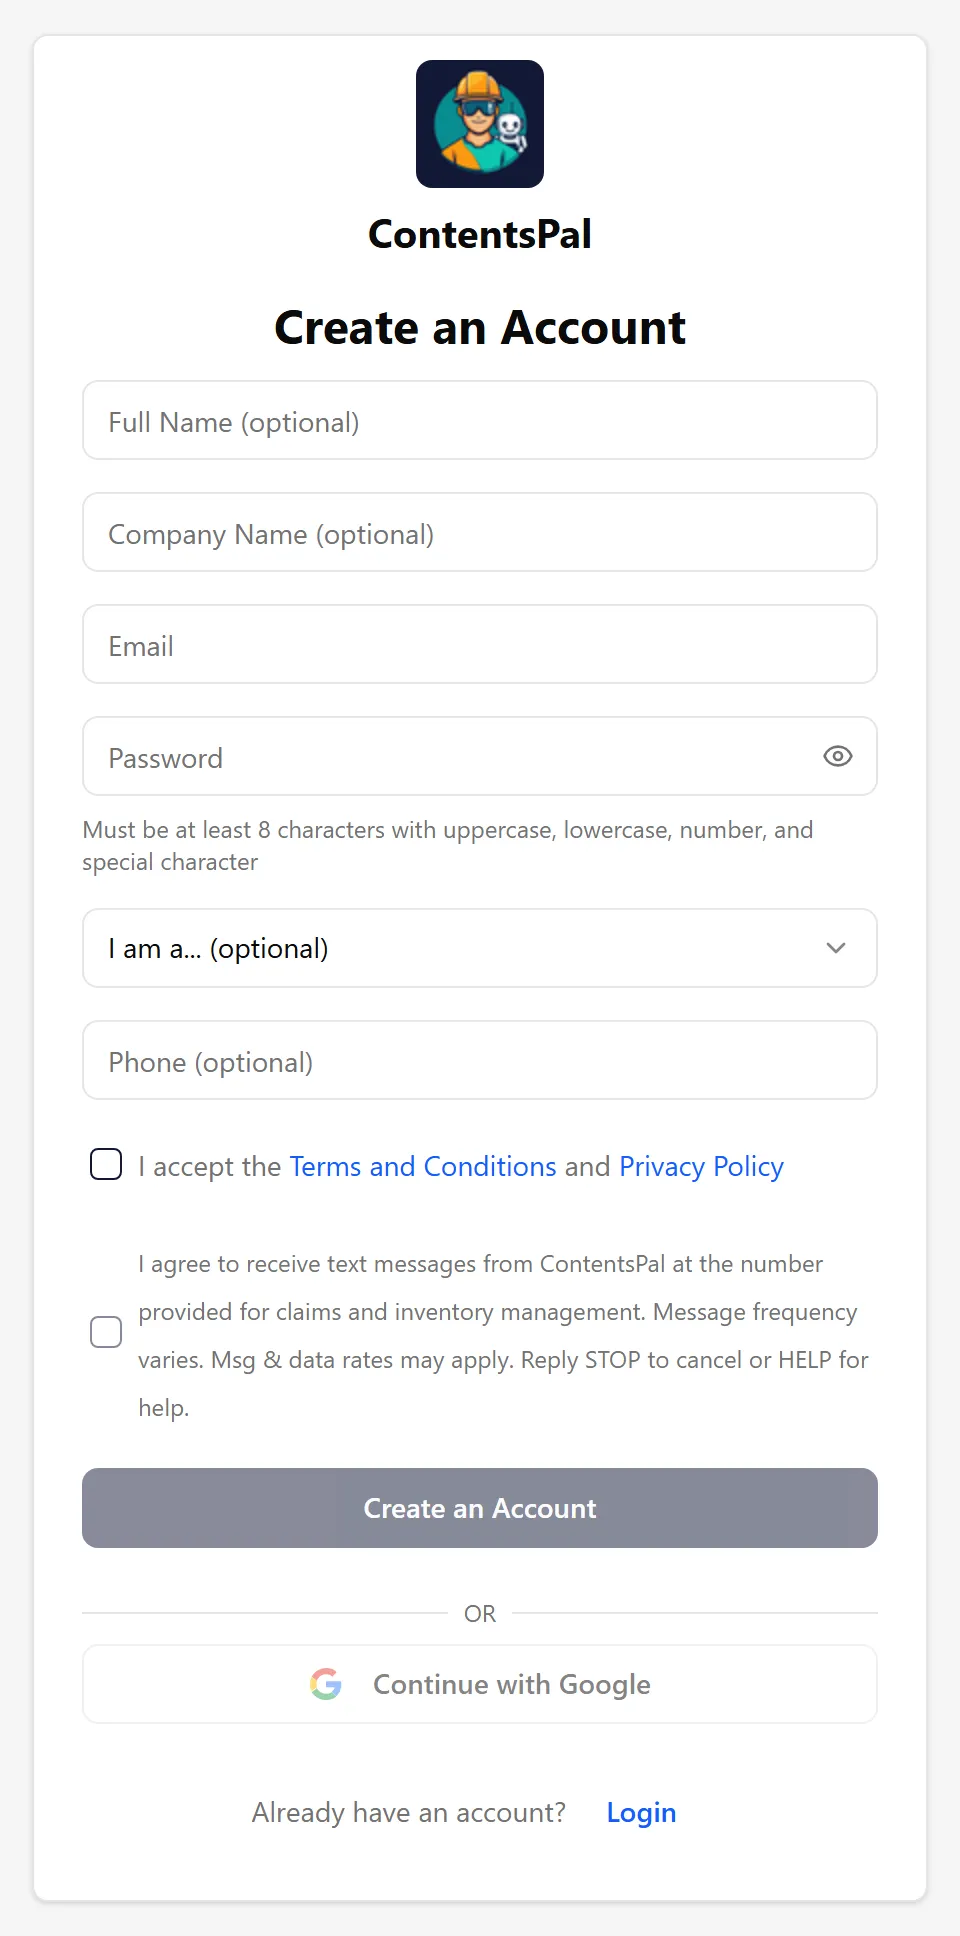
Go to contentspal.com and click Try it out.
-
Enter your email and a password. Add your name and company name, and pick Restoration Company under I am a….
-
Accept the Terms and Conditions and Privacy Policy, then click Create an Account.
-
Enter the 6-digit code we email you and click Verify & Create Account.
ContentsPal creates your organization automatically, named after your company, with you as its Owner. It also adds a sample job called My First Job so you can practice right away.
Learn more: Creating your account
3. The Setup Guide
Section titled “3. The Setup Guide”Right after you sign up, the web app opens a short setup guide. You can skip any step and come back to it later; the guide reopens each time you sign in until you finish it.
-
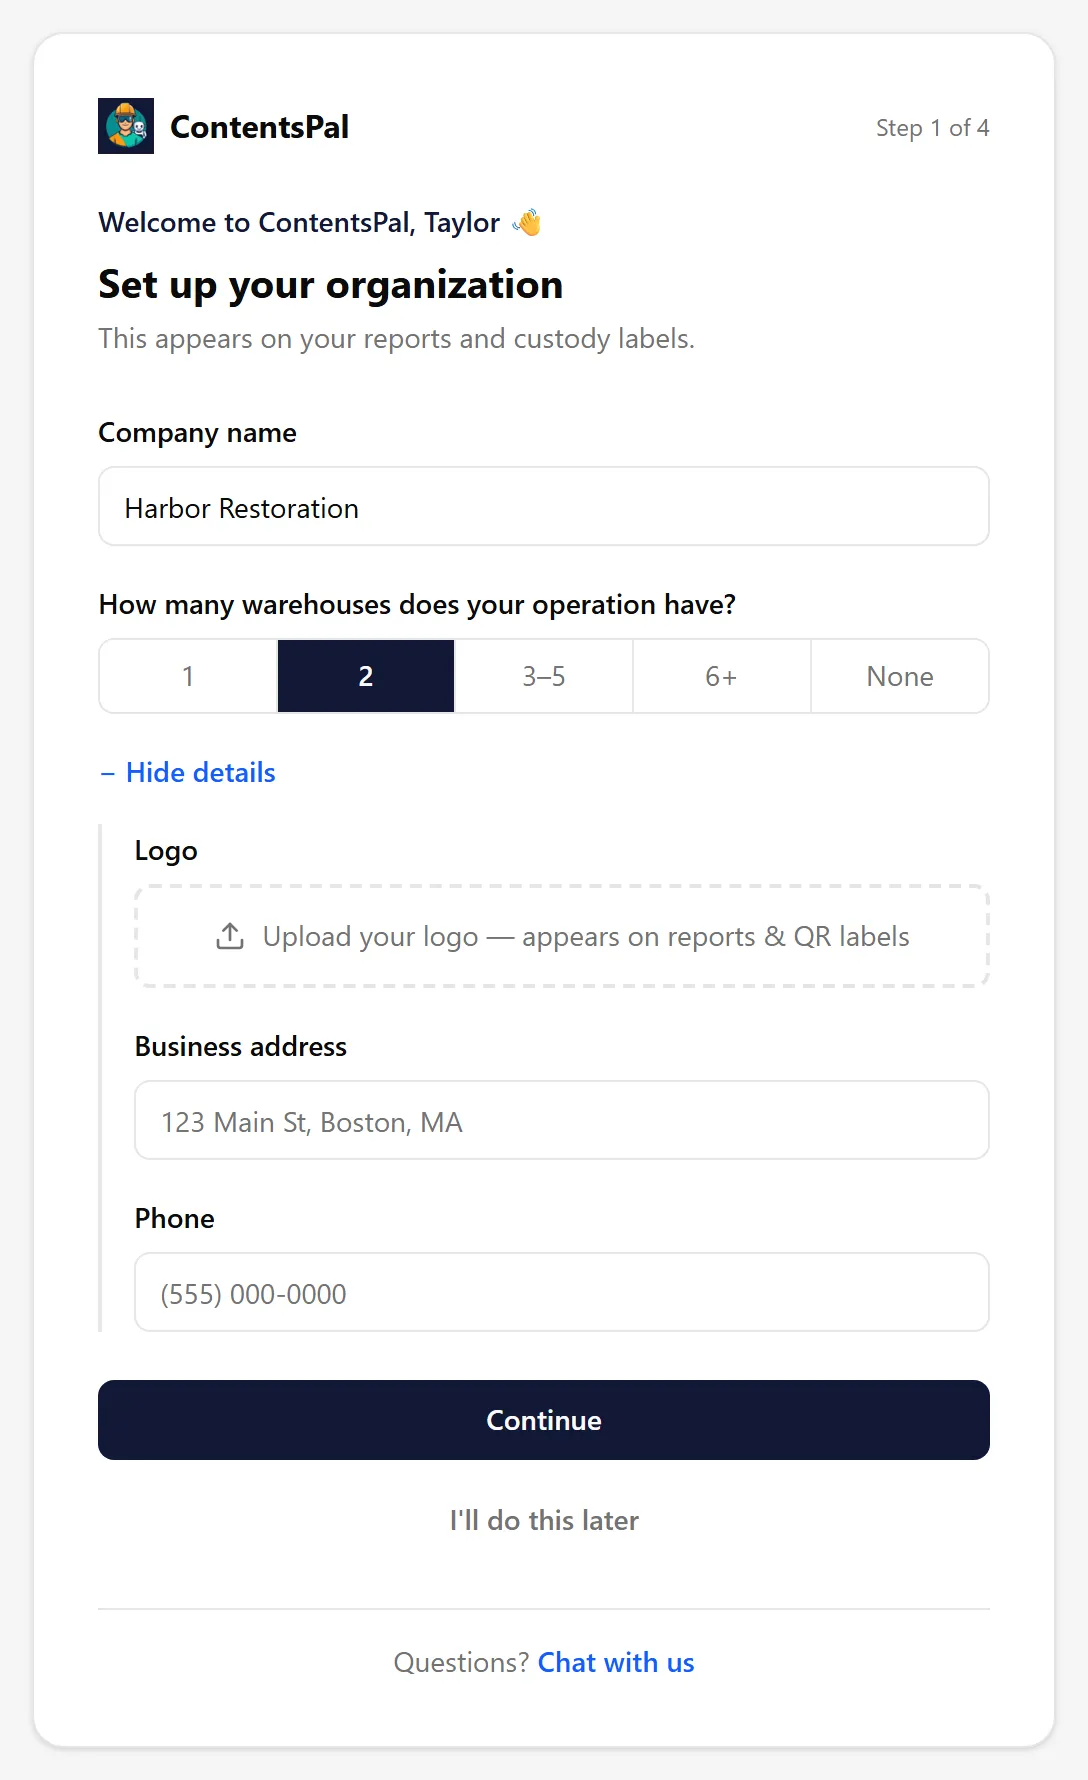
Set up your organization: Confirm your company name and how many warehouses you run. Click + Add details (optional) to upload your logo and add your business address and phone. Your company name and logo appear on your reports and custody labels.
-
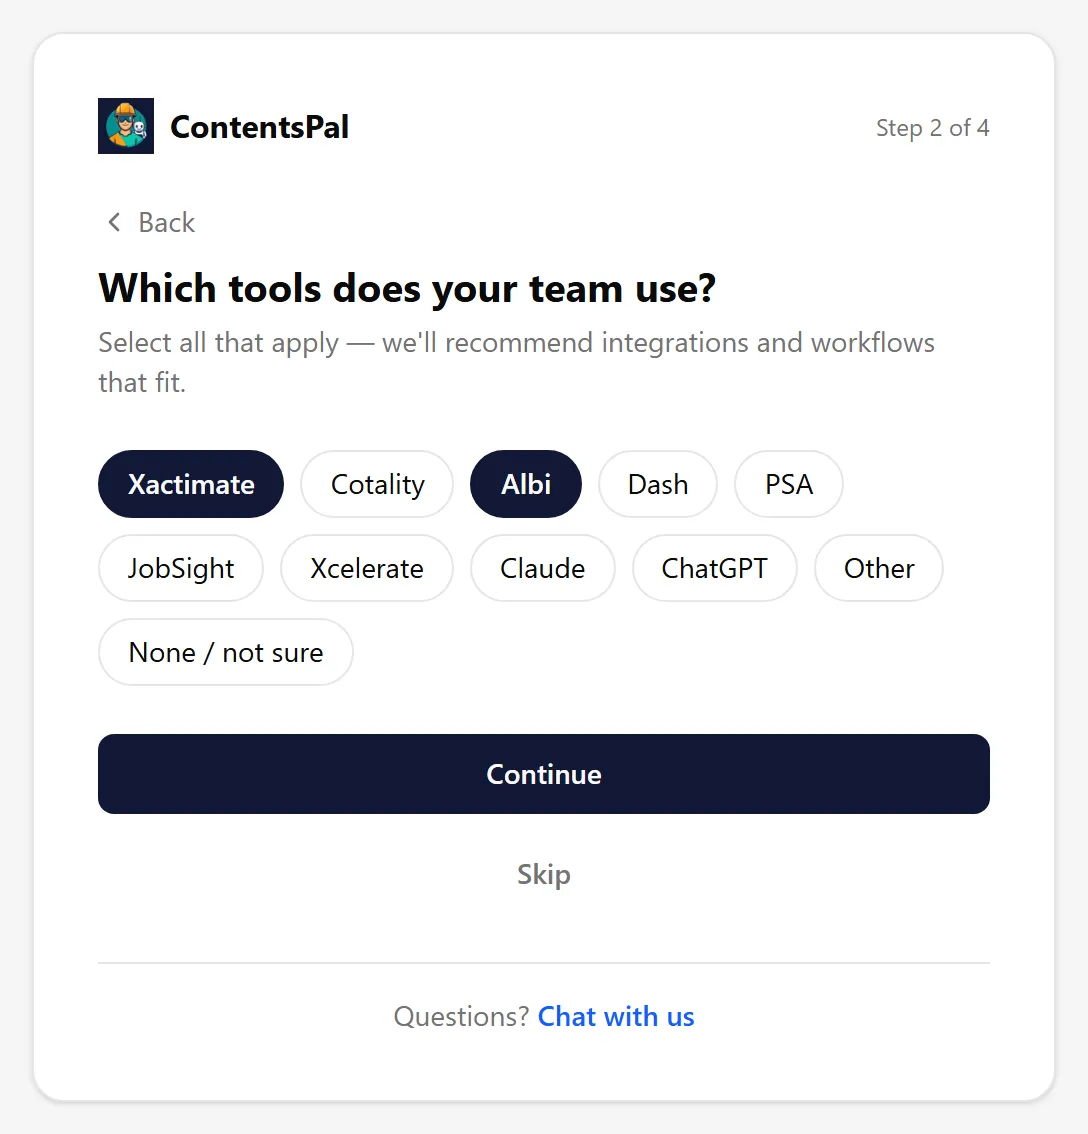
Which tools does your team use? Pick the software your team already uses, so we can recommend integrations and workflows.
-
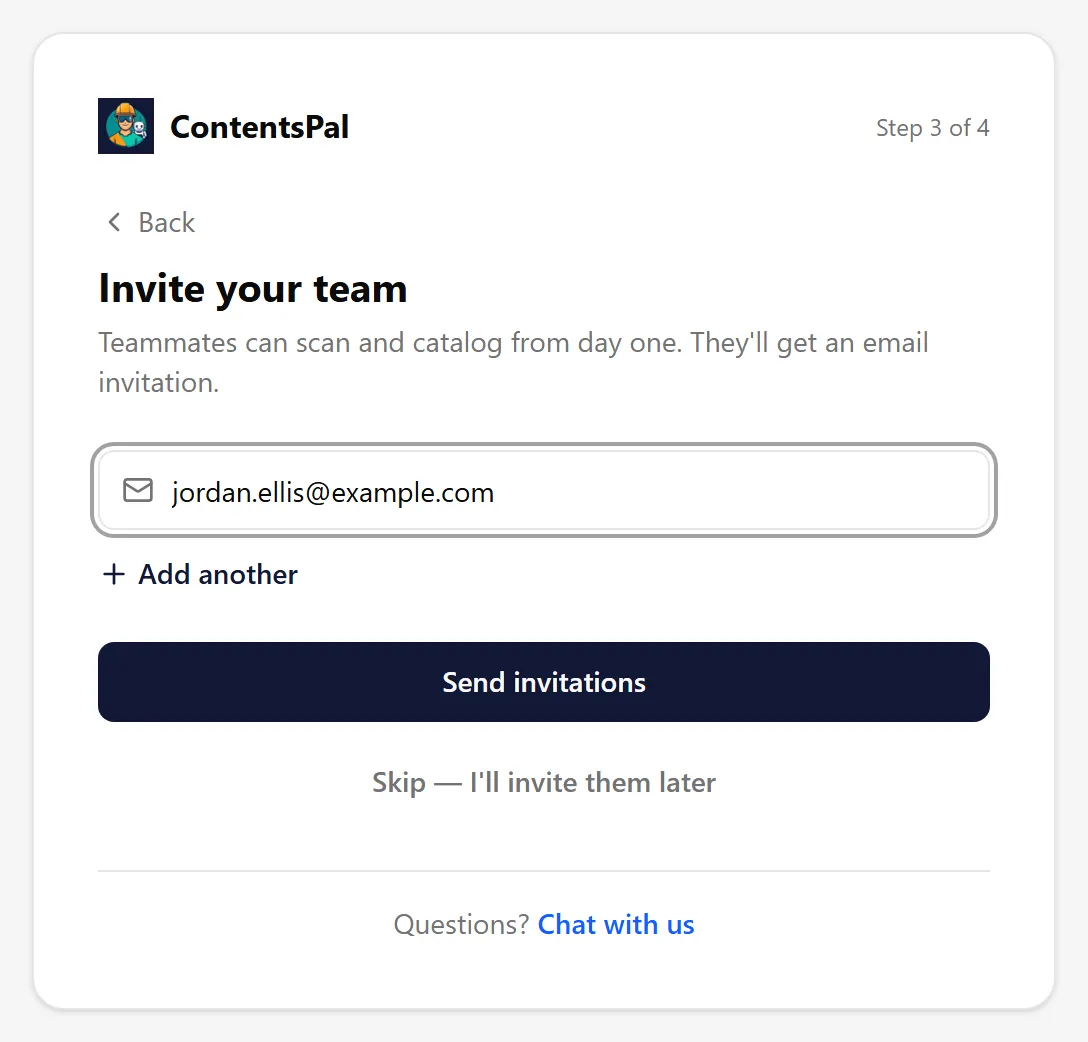
Invite your team: Enter your teammates’ emails and click Send invitations. They get an email and join as Members.
-
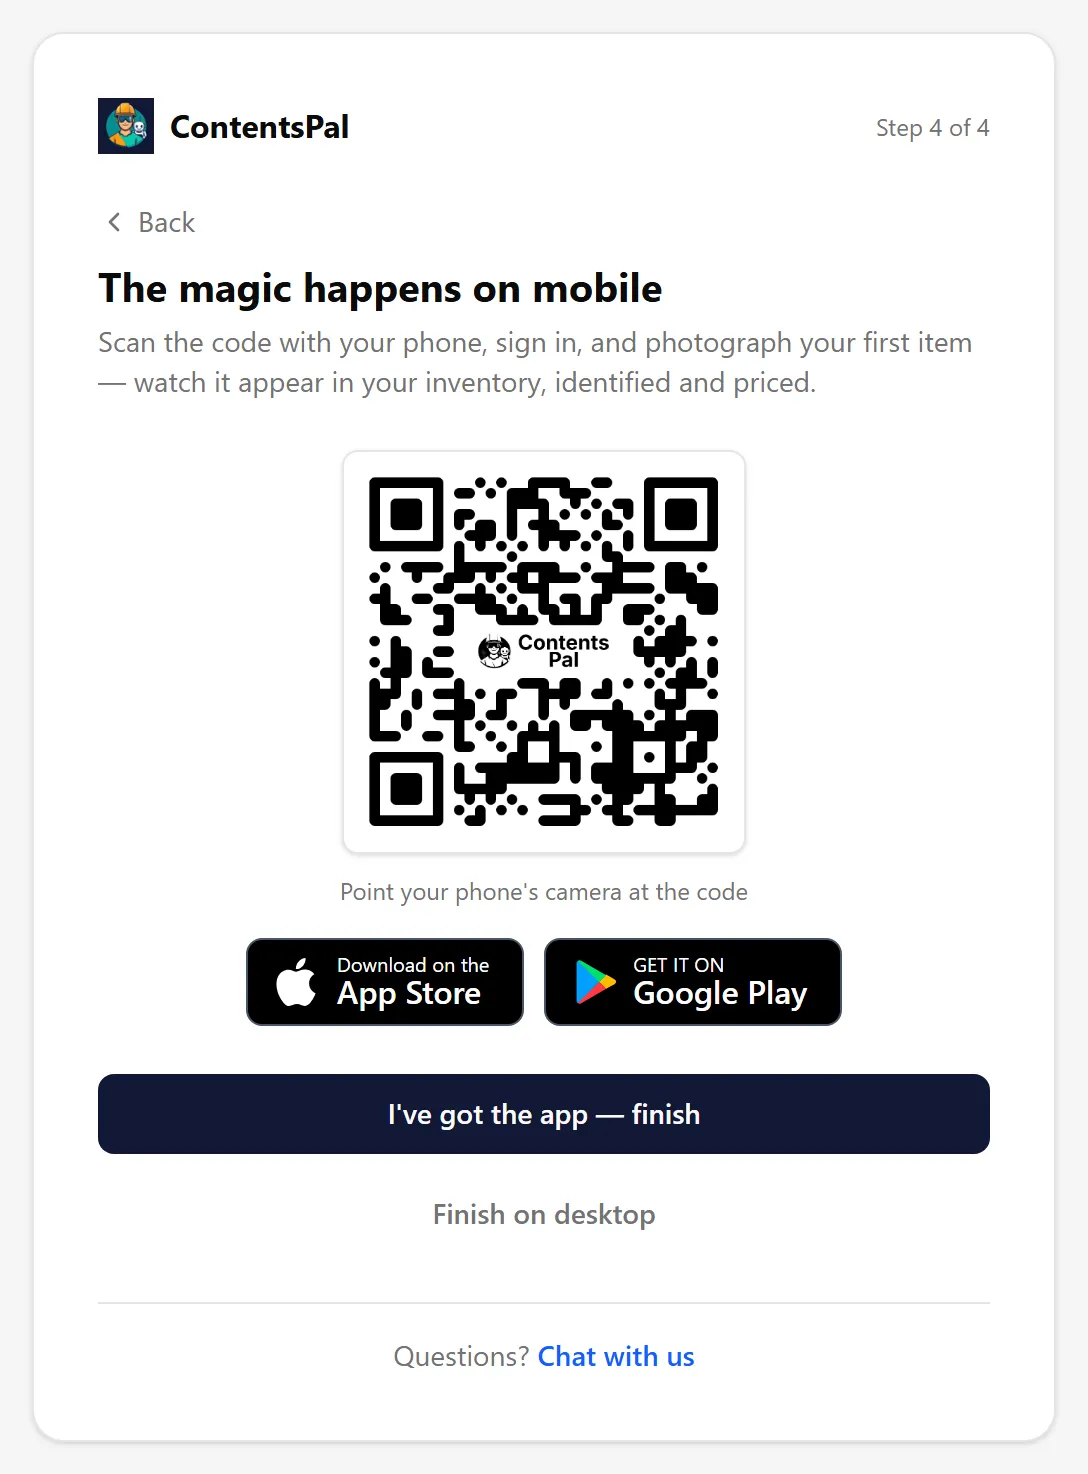
The magic happens on mobile: Scan the QR code with your phone to download the app, then click I’ve got the app — finish (or Finish on desktop).
Learn more: Personalize your account · Inviting team members
4. The Setup Checklist
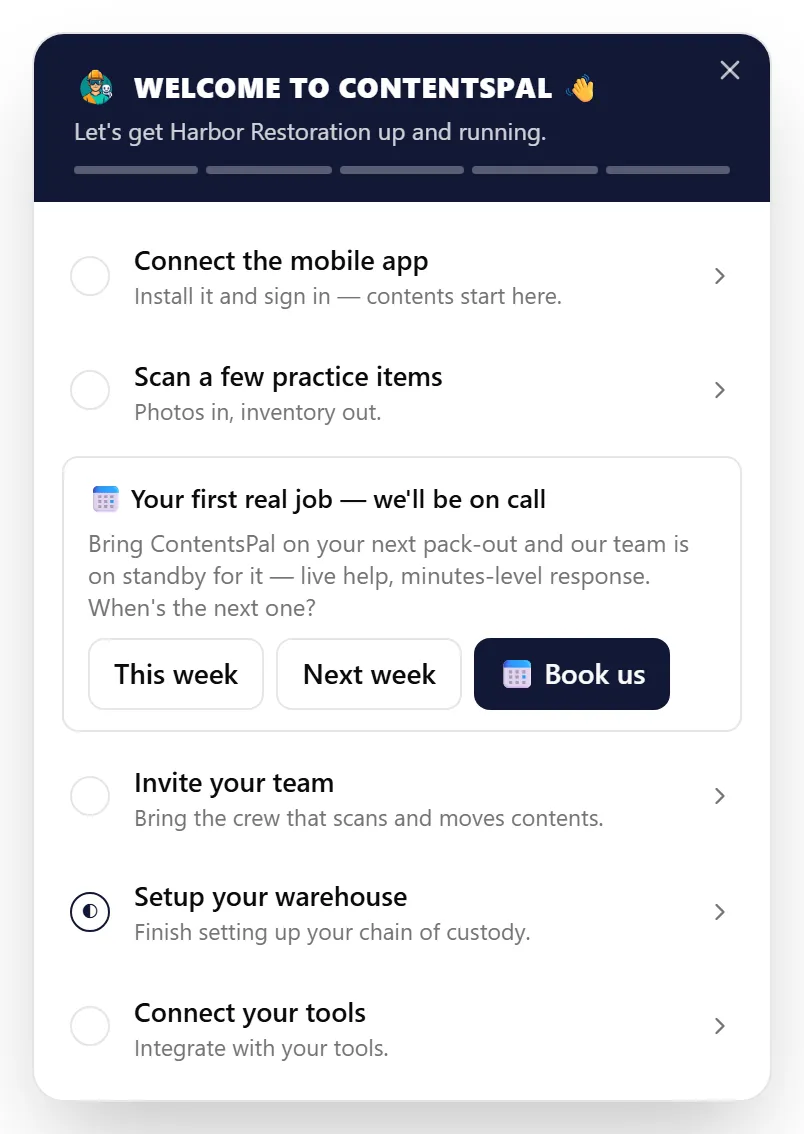
Section titled “4. The Setup Checklist”After the setup guide, a Welcome to ContentsPal checklist sits in the bottom-left corner of your dashboard. Owners and admins see it. Each row ticks itself off when ContentsPal sees the work done:
-
Connect the mobile app: done when someone in your organization signs in on the mobile app.
-
Scan a few practice items: done when any job has an item. Practicing in My First Job counts.
-
Invite your team: done when your organization has more than one member.
-
Set up your warehouse: done when you rename Main Warehouse or add a site of your own (see step 6).
-
Connect your tools: done when you connect a partner integration or turn on a webhook.
-
Export your first job report: appears once a real job reaches 20 items, and is done when you generate a report.
The Your first real job — we’ll be on call card lets you tell us when your first real pack-out is. Click This week or Next week, or Book us to pick a day. ContentsPal then creates a job for it with 20 QR labels ready to print, and our team is on standby to help.
Click X to shrink the checklist to a small progress circle. Once every row is done, you can dismiss it for good.
5. Get the Mobile App and Sign In
Section titled “5. Get the Mobile App and Sign In”-
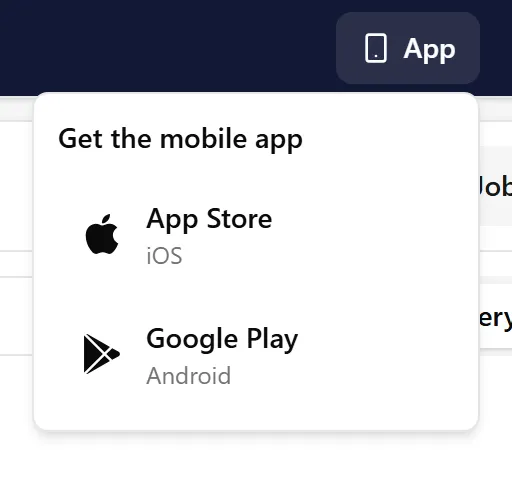
Download ContentsPal from the App Store or Google Play. In the web app you can also click App in the top bar, or scan the QR code in the setup guide or checklist.
-
Open the app and sign in with the same email and password (or Continue with Google). Don’t create a second account.
-
The first time you open Capture, a Welcome to ContentsPal! window offers a short video and a guided tour. Tap Start Tour to learn how to add a non-salvageable item and a tagged item, step by step.
Missed the tour? Turn on Settings > Guidance > Show Orientation Guide, and it starts the next time you open Capture.
Learn more: Creating your account
6. Set Up Your Warehouse
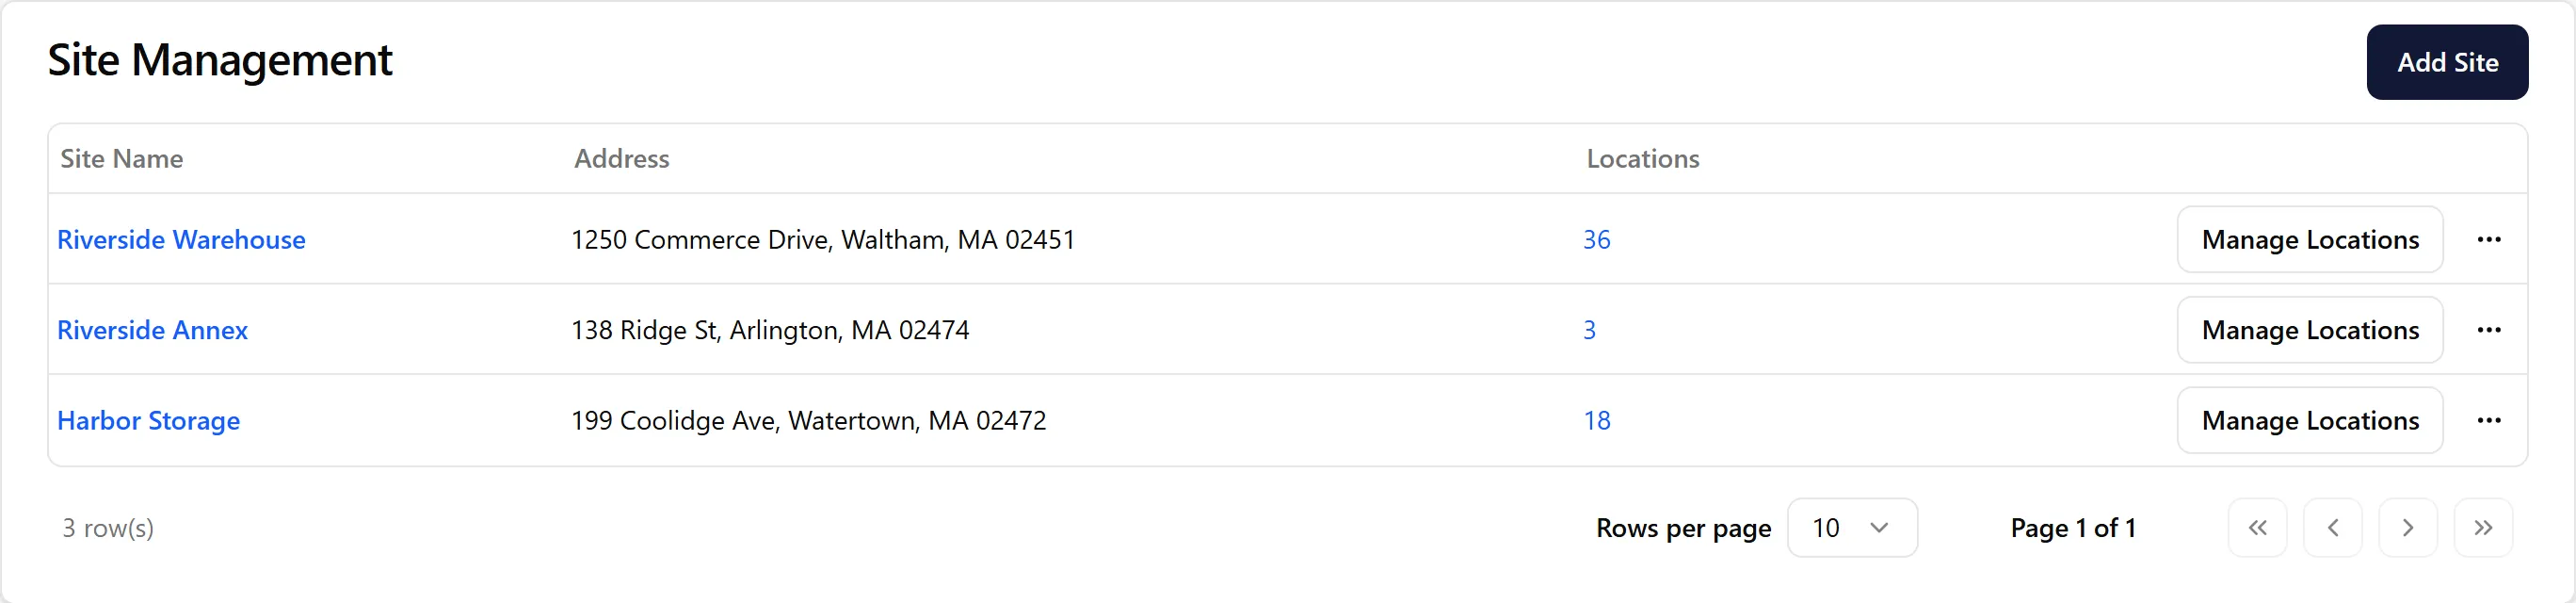
Section titled “6. Set Up Your Warehouse”Your organization starts with a site called Main Warehouse that has one location, Vault 1. In the web app, click Sites in the side menu to rename it to match your building, and click Manage Locations to add the places your contents go:
-
your vaults, racks and pallets,
-
your truck (a location of type Vehicle),
-
your cleaning room (a location of type Cleaning).
Open a location to set its Status for contents: every label moved into it gets that status. For example, set your cleaning room to Needs Cleaning and your vaults to Storage. Then click Print QR Codes and post each code on its vault, truck or room.
Learn more: Warehousing with ContentsPal · Setup Locations · Location Details · How to Print Vault Labels
7. Create a Job and Its Rooms
Section titled “7. Create a Job and Its Rooms”On the web: on the Jobs page, click New Job. Enter the Job Name and Carrier (both required), and the address. Under More details you can add the claim number, the adjuster’s and policyholder’s emails, and tick Add Default Rooms to start with nine common rooms. Click Create Job.
On mobile: tap New job on Home, or Add on the Jobs tab.
To add rooms, open the job and choose Job Settings > Rooms > Add Room on the web. On mobile, tap the room button above the shutter on Capture, then New Room. The camera asks for a room before the first photo, so set up the rooms before you start.
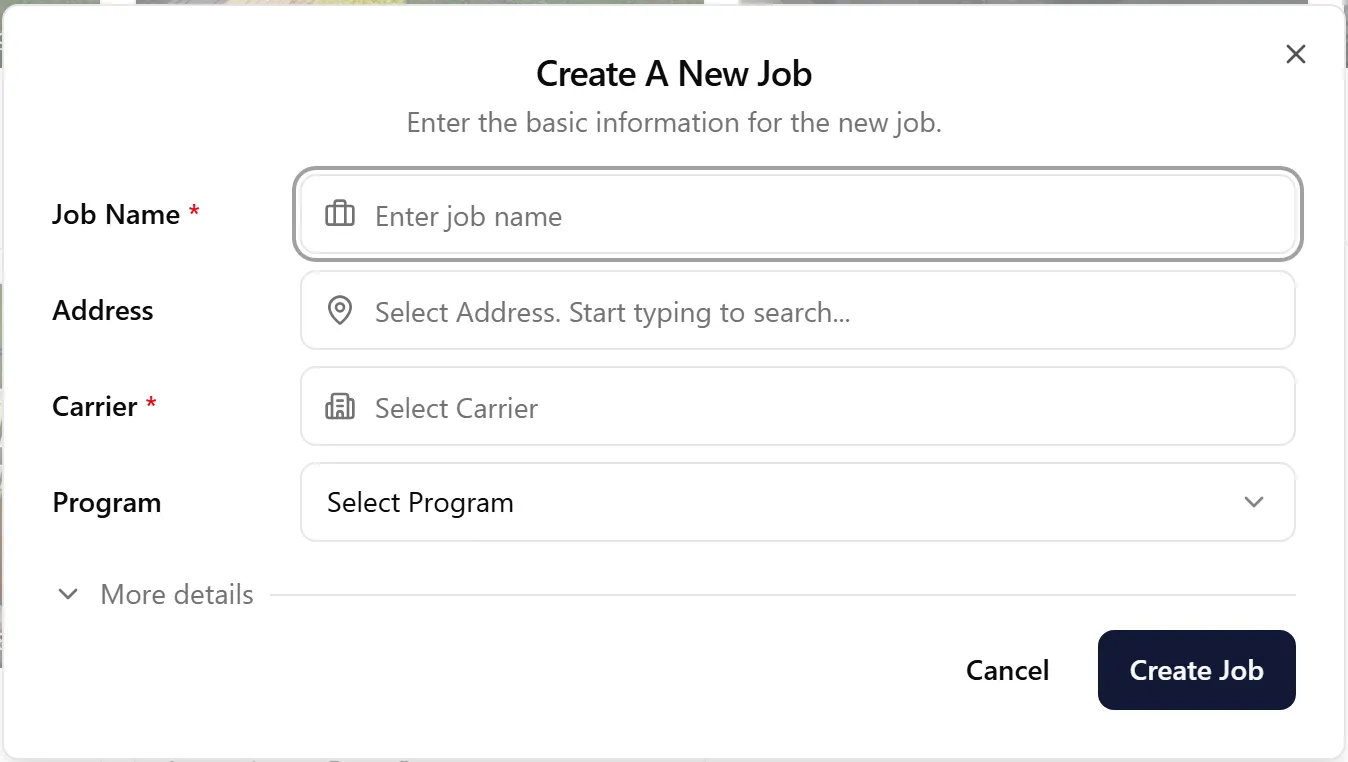
Learn more: Creating a Job · Create Rooms
8. Get an Instant Estimate
Section titled “8. Get an Instant Estimate”Before the pack-out, get a quick idea of how big the job is. Take a few photos in each room, and Instant Estimate uses AI to count the boxes, large items and small items room by room. You can adjust the numbers and share the estimate as a PDF. It also tells you roughly how many box labels to print.
-
On mobile: turn it on once under Settings > Other > Enable Instant Estimate (Beta), then open the job’s Job Report and tap the Estimate tile.
-
On the web: open the job’s Estimate tab and choose Initial Scope.
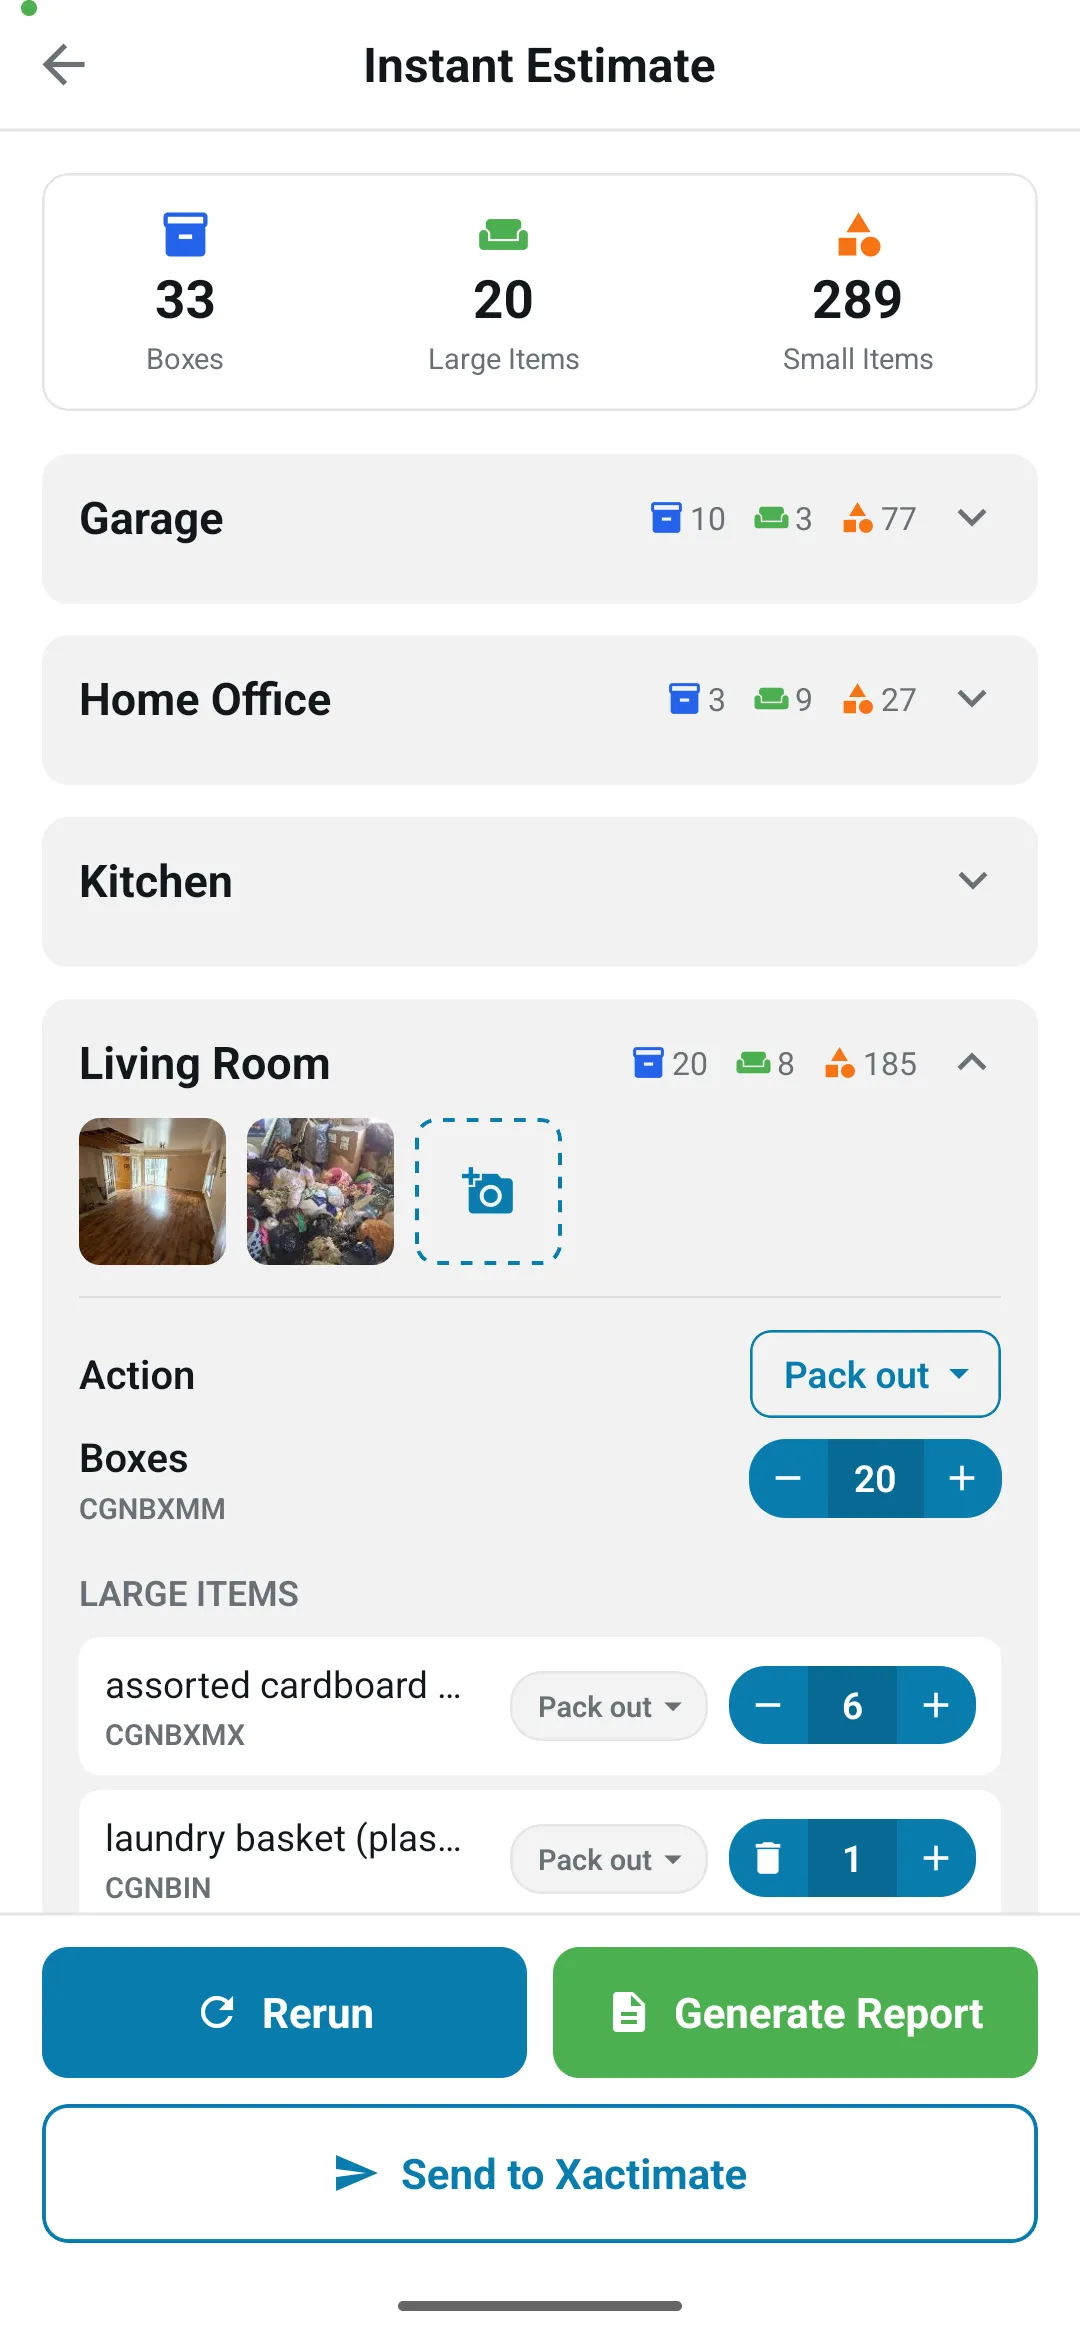
Learn more: Instant Estimate
9. Print Your Labels
Section titled “9. Print Your Labels”Print a stack of labels before you go on site:
-
Open the job in the web app and go to the Custody tab.
-
Click Create. Choose a Quantity and a Type (Box or Tag), and optionally a Room.
-
Click Create & Print, pick your sticker layout, and print.
You can also print labels from the mobile app, or label as you go: when you close a box on mobile, tick Print label after closing.
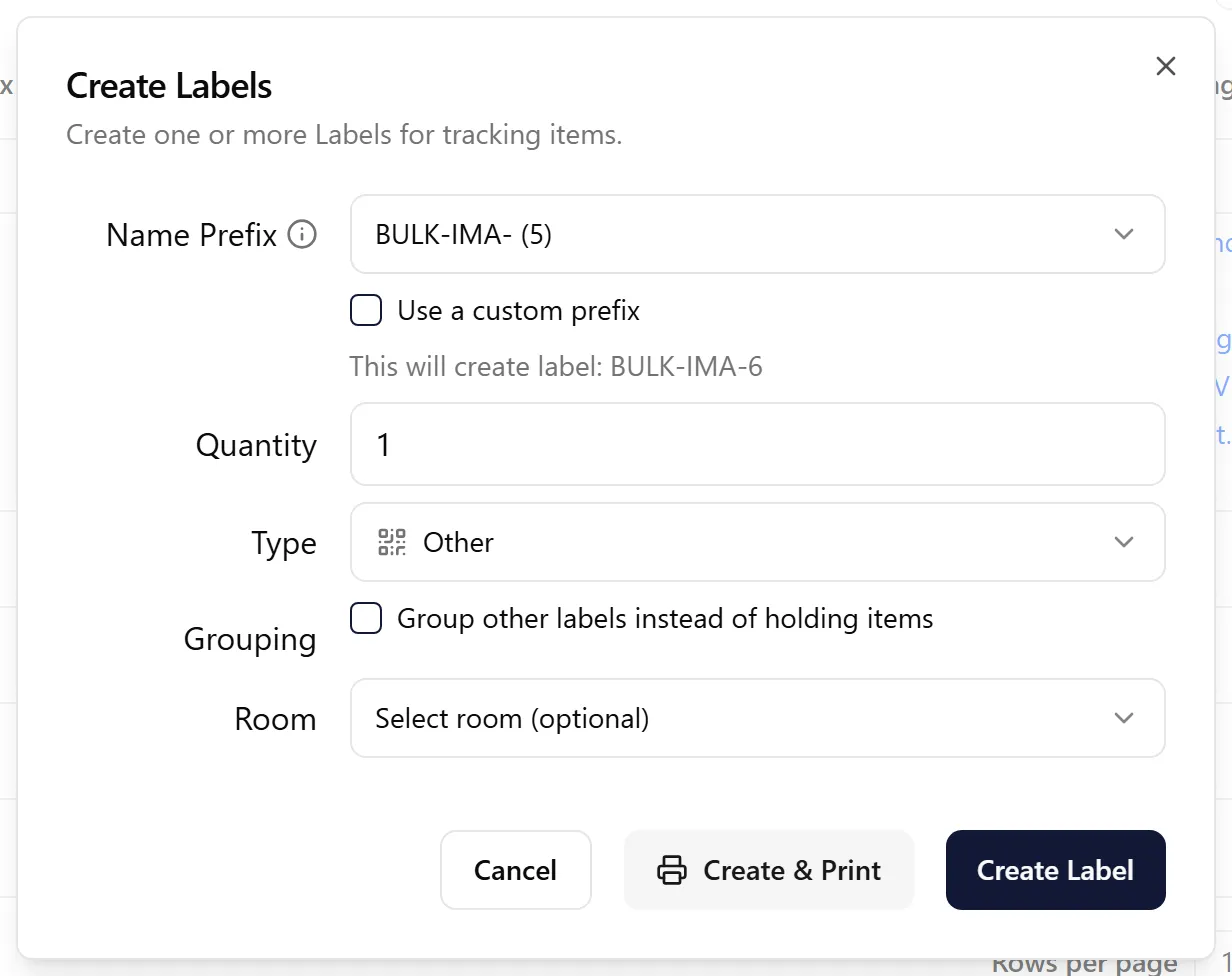
Which printer? Any label printer works, as long as it takes a sheet or roll size ContentsPal prints. Printers our customers use include:
-
Brother QL-810W
-
Zebra ZSB DP14 or Zebra GK420D
-
Jadens JD268BT
-
Westinghouse WHTP203e
A regular office printer with Avery or ULINE sticker sheets works too. To print from the mobile app as well as the web, pick a Wi‑Fi printer: the app prints through your phone’s print dialog (AirPrint on iPhone and iPad, the default print service on Android), so the printer needs to be on the same network.
Learn more: How to Print Labels · What are Inventory Items and Custody Labels?
10. Pack Out on Site
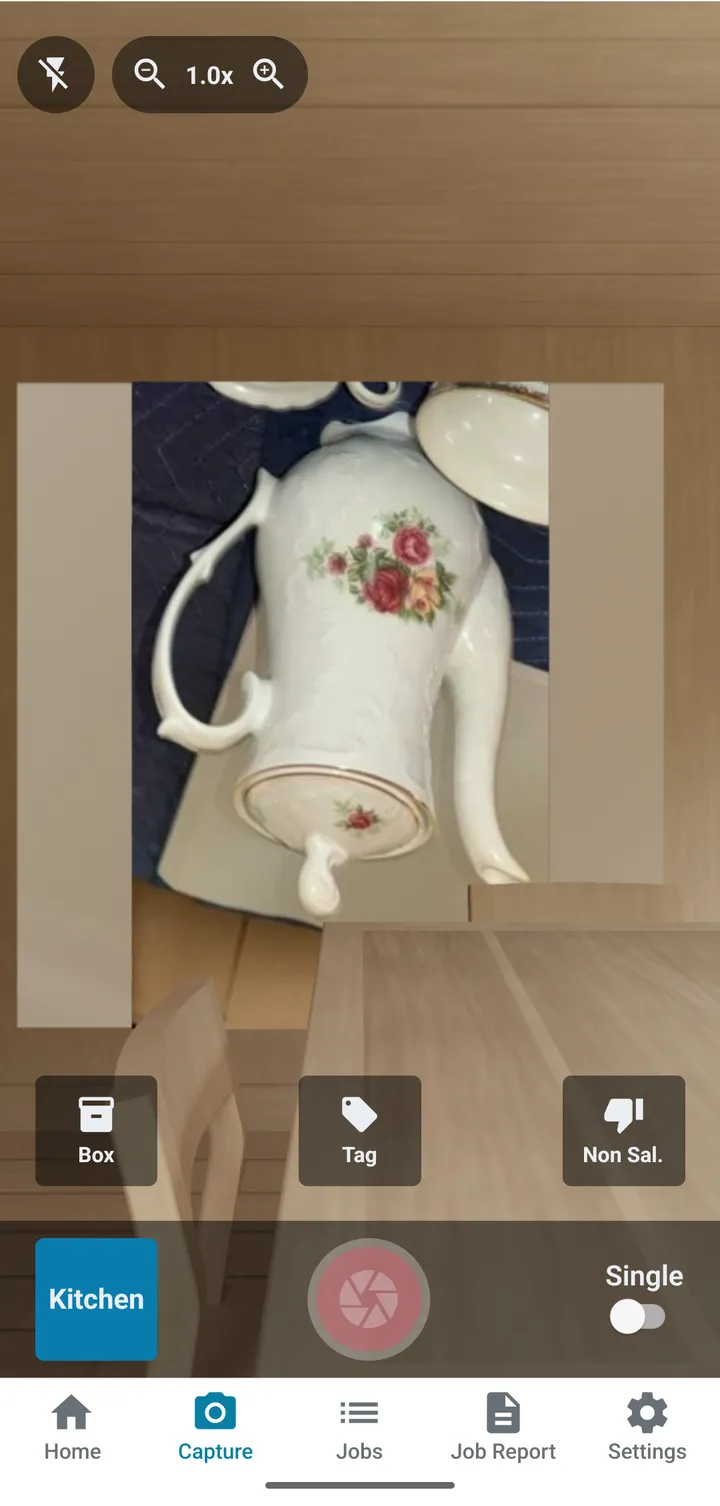
Section titled “10. Pack Out on Site”On the mobile app, open the job and go to Capture. Pick the room, then pick a mode:
-
Box: choose a box size, photograph each item that goes in, tap Label to scan the box’s label, then tap Close Box.
-
Tag: scan the tag, photograph the item (tap Add Pic. for more angles), then tap Done.
-
Non Sal.: photograph items that can’t be saved. They’re recorded for the claim but not packed out.
The Single / Multi switch sets whether each photo becomes one item, or one item per object in the photo. AI names, describes and categorizes each item. To check or correct one, open Job Report > Inventory and tap the item.
Learn more: Add boxed items · Add Tagged Item · Add Non-Salvageable Items · Edit item details
11. Bring Contents to the Warehouse
Section titled “11. Bring Contents to the Warehouse”Every move is a scan, so the chain of custody builds itself:
-
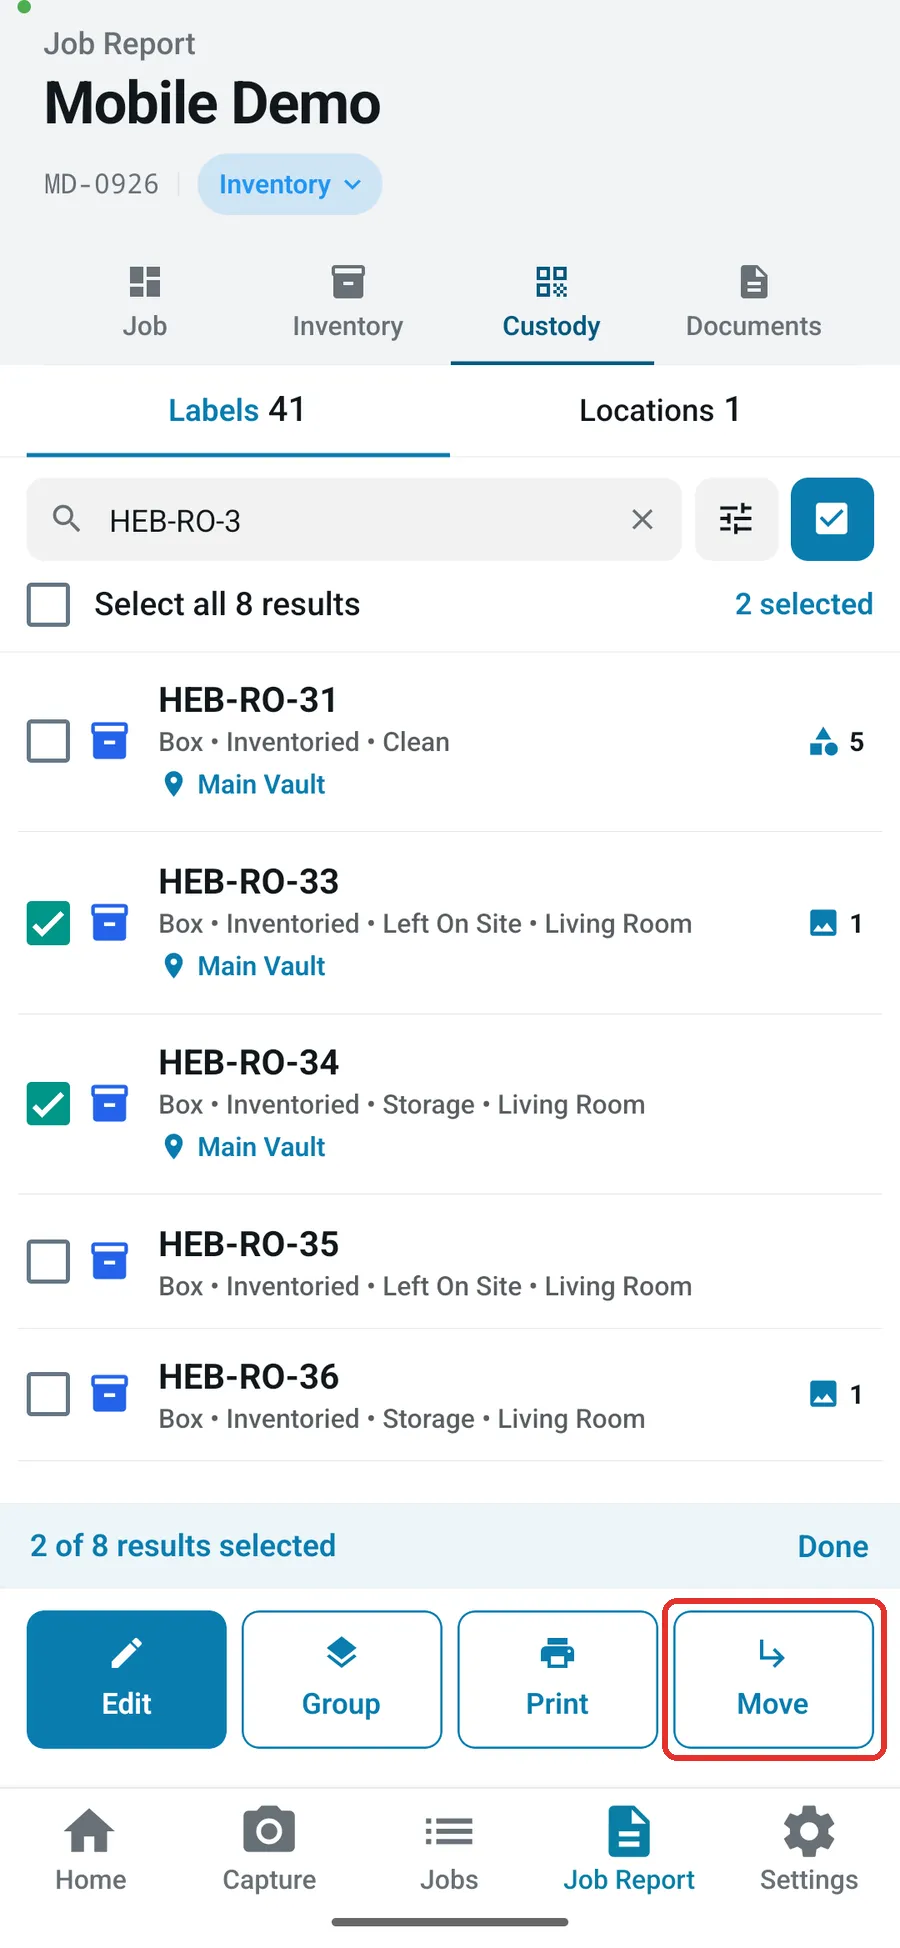
At the house, open Job Report > Custody, select the labels going on the truck, tap Move, and choose your truck.
-
At the warehouse, move them again into the cleaning room or straight into a vault. A location with a Status for contents updates the labels and their items as they arrive.
-
Take location photos of each vault after loading it, so you have a record of how it was packed.
Running the warehouse floor all day? Switch the app to Warehouse mode (Settings > Mode) to scan a vault, see what’s inside, and scan labels in and out.
Learn more: Moving Labels Between Locations · Warehouse Mode · Location (Vault) Photos
12. Clean the Contents
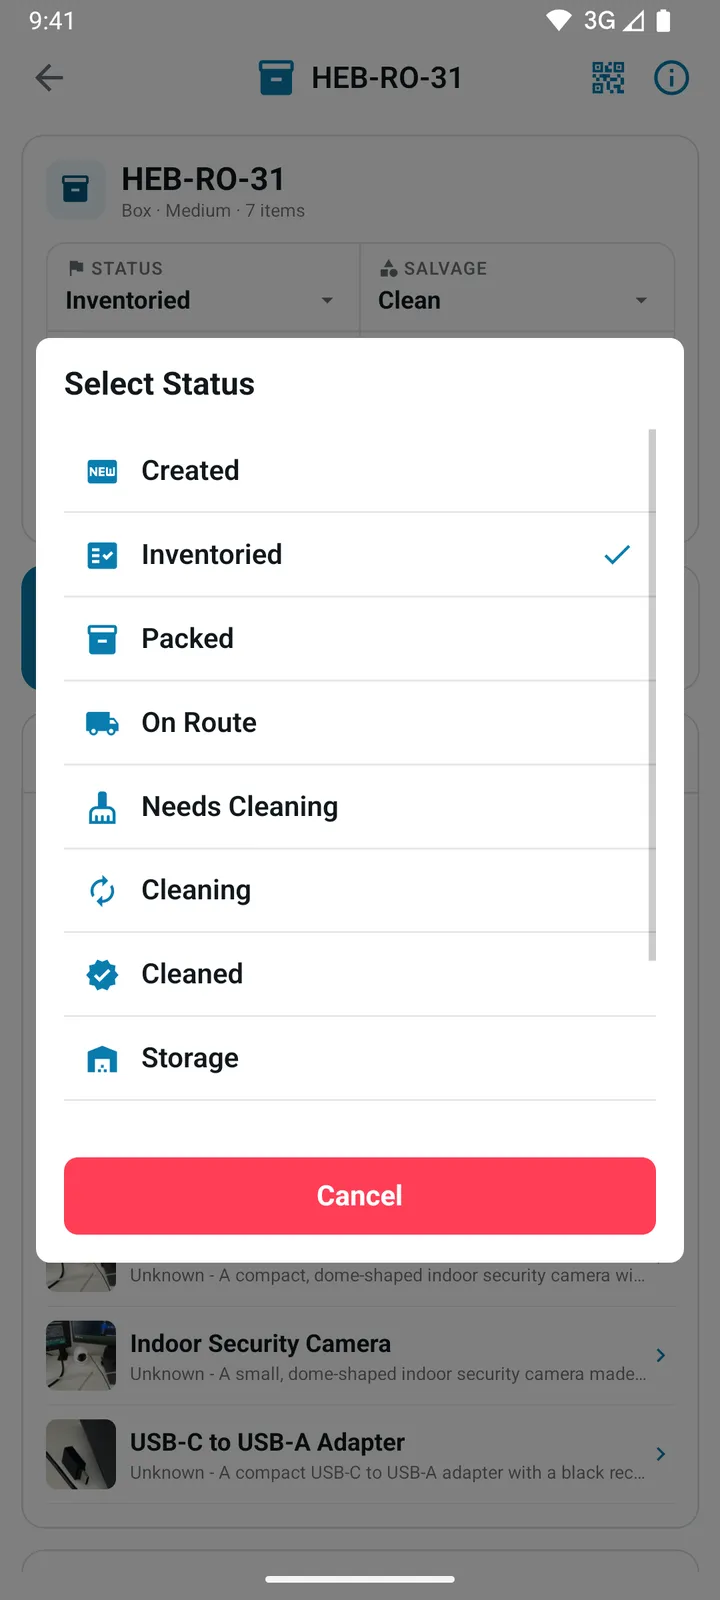
Section titled “12. Clean the Contents”Cleaning moves each label through Needs Cleaning → Cleaning → Cleaned:
-
Needs Cleaning is set when you tick Cleaning while packing, or when a label is moved into a location set to that status.
-
To change it by hand, open the label (scan it, or find it on the Custody tab), tap Status, and pick the new one. To update a whole batch, open the location and use Set Status.
-
For timed cleaning processes, use Restore mode (Beta): scan a label, start a process such as Ultrasonic or Ozone Chamber, and tap Mark as Restored when it’s done. The label becomes Cleaned.
-
For clothing and fabrics, Textiles mode (Beta) adds wash, dry and fold and specialty workflows.
Learn more: Update an Item’s Status and Location During Cleaning · Restore Mode · Textiles Mode Overview
13. Pack Back and Deliver
Section titled “13. Pack Back and Deliver”When the customer is ready to take their contents back:
-
Set the labels to Pack Back as you pull them from the vaults: open a label and pick Pack Back under Status, or use Set Status on a location. You can also set up a staging location whose status for contents is Pack Back.
-
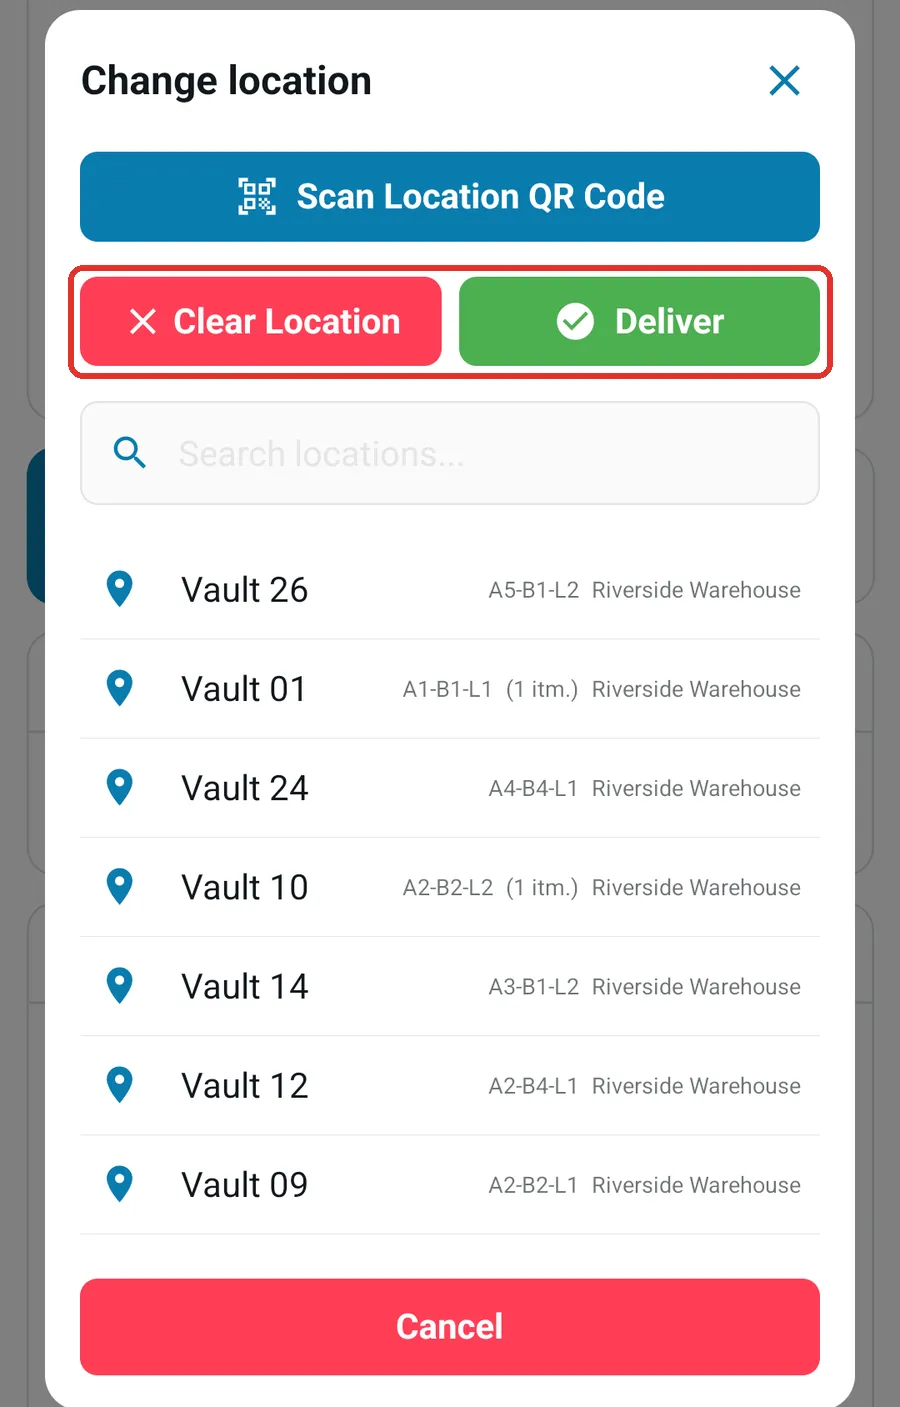
At the customer’s home, open each label, tap Move, then Deliver. This clears the label’s location and sets it and its items to Delivered. To deliver a whole truckload at once, open the truck’s location, select the labels, tap Set Location, and choose Deliver.
Learn more: Moving Labels Between Locations · Custody Locations Tab
14. Create Reports and Share the Job
Section titled “14. Create Reports and Share the Job”-
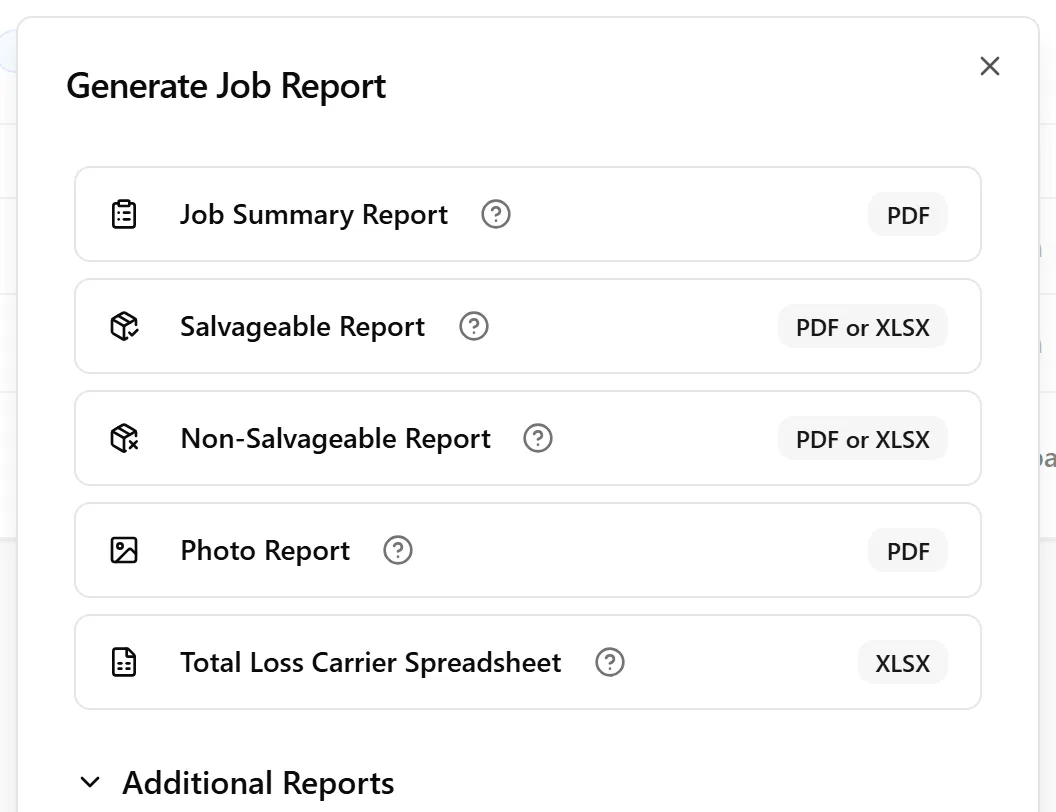
Open the job in the web app, go to the Reports tab, and click Generate Report.
-
Pick a report, set its options, and click Generate Report. Finished reports are listed on the Reports tab.
The reports you’ll use most:
-
Job Summary Report: an overview of the whole job, room by room.
-
Salvageable Report and Non-Salvageable Report: the inventory, split by salvage status.
-
Photo Report: every item with its photos.
-
Custody Report (under Additional Reports): every box and tag, with its contents, status and location.
To give your customer or the adjuster live, view-only access, open Job Settings > Share, turn on Enable View-Only Link Sharing, and copy the link.
Learn more: Reports Overview · Job Summary Report · Custody Report · Sharing Jobs and Public View
15. Next Steps
Section titled “15. Next Steps”-
Manage your team: go to Organization > Members to invite more people with Invite Members and to change roles (Owner, Admin, Editor, Member). See Managing organization members.
-
Work without signal: the mobile app keeps capturing offline and uploads when you’re back online. Make the job available offline before you leave. See Getting Started with Offline Mode.
-
Connect your tools: go to Organization > Settings > Integrations for partner integrations, webhooks, API keys and AI assistants. See Albi Integration and Connect to AI Assistants with MCP.
-
Brand your reports: add your logo and a cover page. See Customizing Reports for Your Organization.
-
Get help: click the chat bubble in the web app, or Settings > Help & Support > Contact Support on mobile, to talk to our team. Help & Support in the web app’s side menu opens this help center.
✅ Best Practices
Section titled “✅ Best Practices”-
Practice on My First Job before your first real pack-out, then delete or archive it.
-
Set up your sites, locations and their Status for contents before your first job, so every scan updates statuses for you.
-
Run an Instant Estimate on the walkthrough, then print more labels than it suggests and keep the extras in the truck.
-
Create the rooms before you start capturing, and photograph each room before packing it.
-
Scan labels at every move. A skipped scan is a gap in your chain of custody.
🧩 Troubleshooting
Section titled “🧩 Troubleshooting”The setup guide keeps coming back: it reopens each time you sign in until you finish it. Click Finish on desktop on the last step to close it for good.
I don’t see the setup checklist: it’s shown only to owners and admins of restoration companies, and only until it’s dismissed.
My teammate can’t see our jobs: make sure they accepted your invitation and signed in with the invited email, rather than creating a separate account.
The camera shutter is grey: choose a room and a mode (Box, Tag or Non Sal.) first.
A label won’t scan: moving labels between locations needs a connection. Check that you’re online, and that the QR code is clean and well lit.