
Import Inventory from a File
This guide explains how to use Batch Item Upload to import inventory items into a job. Upload a CSV, Excel, Word, text, or PDF file — or an image (a receipt, invoice, or a photographed/handwritten list) — and ContentsPal pulls the items out for you. Spreadsheets (CSV/Excel) are imported by mapping their columns; every other file type is read automatically by AI, which extracts the items for you to review before importing.
When to Use This
Section titled “When to Use This”Use Batch Item Upload when you:
-
Already have an item list in a spreadsheet (CSV or Excel) that you want to bring into ContentsPal
-
Have an inventory list in a document or image — a Word/text/PDF file, or a photo of a receipt, invoice, or handwritten list — that you want ContentsPal to read and turn into items automatically
-
Need to add many items with detailed information (name, brand, description, cost, etc.) without typing each one manually
-
Are migrating data from another system or a pre-existing inventory list
Step 1: Open the Import Dialog
Section titled “Step 1: Open the Import Dialog”-
Open your job in the web app
-
Click the Job Settings button (gear icon) in the top-right corner
-
Select Import from document from the menu
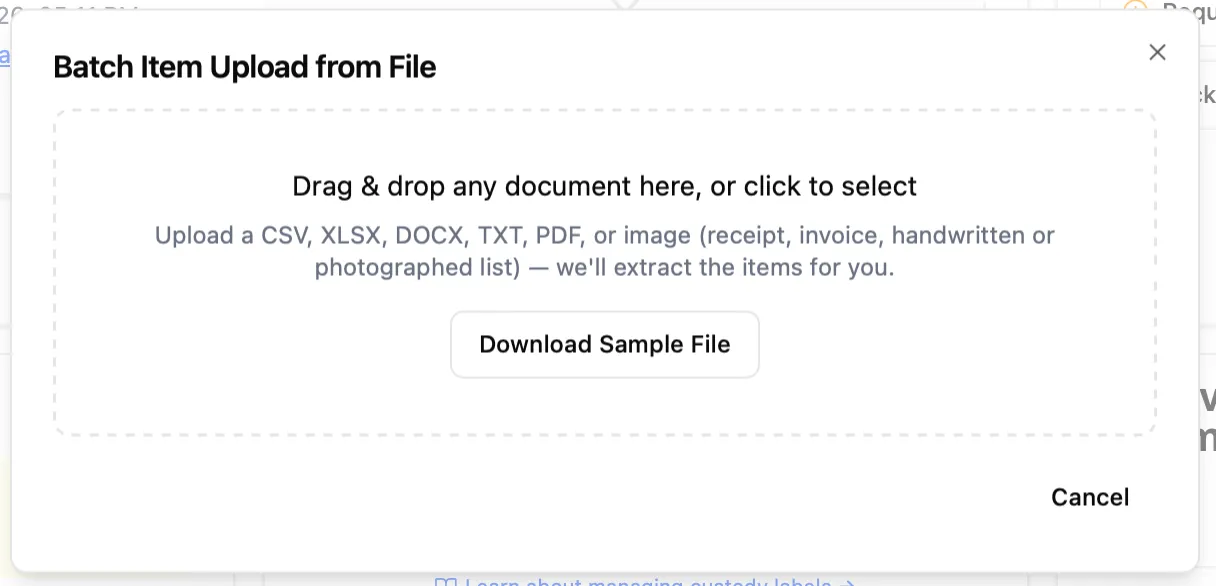
This opens the Batch Item Upload from File dialog. (The job must be unlocked — if it’s locked, unlock it first and the option will appear.)
Step 2: Prepare Your Spreadsheet
Section titled “Step 2: Prepare Your Spreadsheet”If you don’t already have a spreadsheet ready, you can download a sample file to use as a template:
-
In the import dialog, click Download Sample File
-
Open the downloaded file in your spreadsheet software (Excel, Google Sheets, etc.)
The sample file includes the following columns:
| Column | Required | Description |
|---|---|---|
| Name | Yes | The name of the item |
| Brand | No | Item brand or manufacturer |
| Description | No | What the item is — material, colour, size, features |
| Comments / Notes | No | Notes about the claim rather than the product, such as the damage or cause of loss |
| Condition | No | Item condition — imported as New, Above Average, Average, or Below Average (for example, “Excellent” becomes Above Average and “Fair” becomes Below Average) |
| Cost | No | Item cost or value |
| Room | No | Room to assign the item to |
| Box | No | Box or container the item is in |
| Quantity | No | Number of this item (defaults to 1) |
Additional optional columns include: Item Number, Model, Age, Size, Value Classification, Category, Place of Purchase, and Vendor.
Description vs. Comments: ContentsPal prices each item by searching for a new equivalent, and it uses the description to do it. Keep the description to what the item is; put damage or cause-of-loss wording (“fire damaged”, “water”, “smoke”) in Comments. A column of damage wording is mapped to Comments automatically, even when its header says “Description”, so a price is never based on the damage instead of the item.
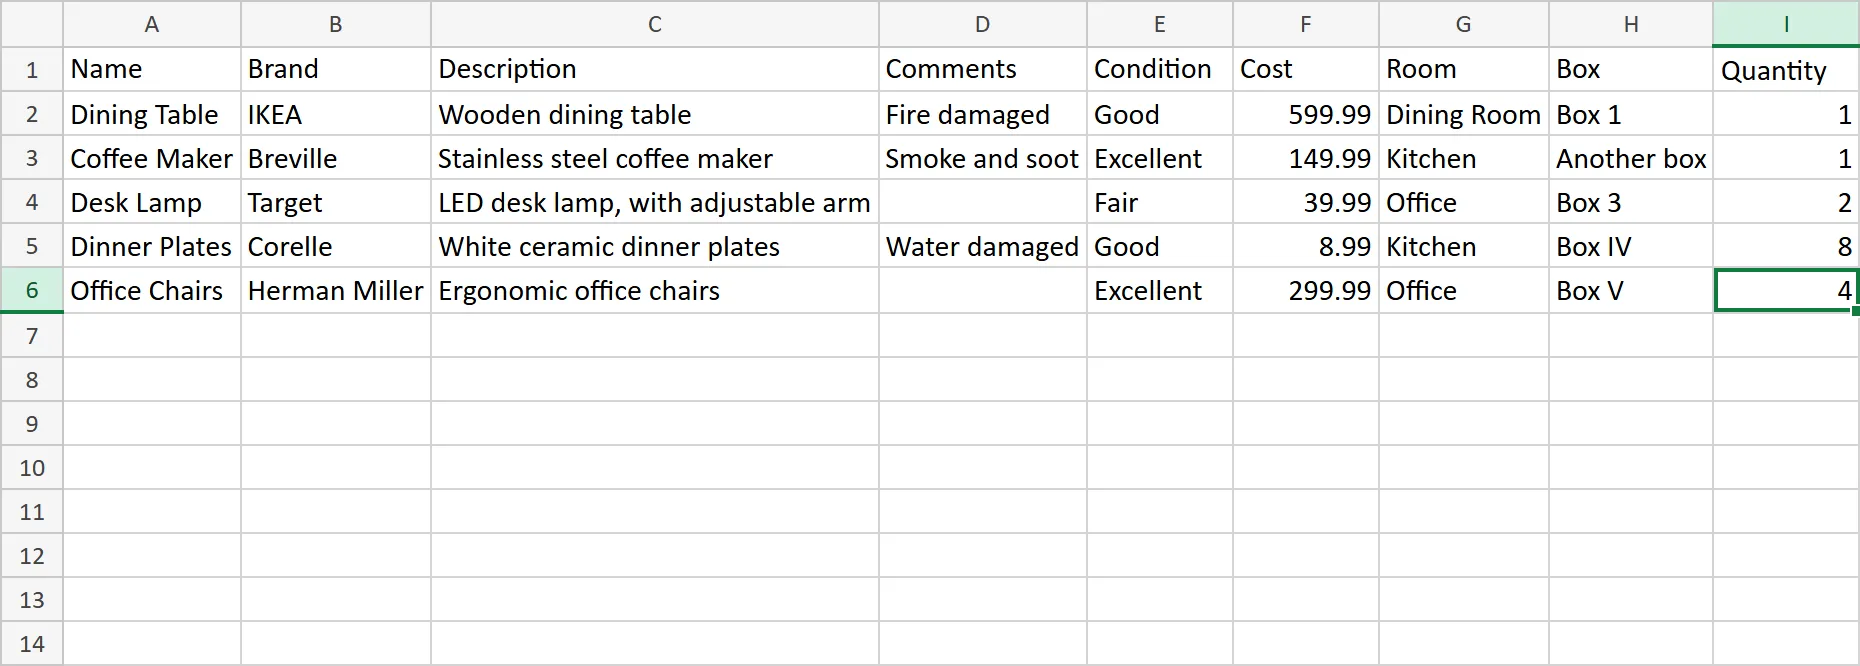
Fill in your item data, then save the file as CSV or Excel (.xlsx).
Step 3: Upload Your File
Section titled “Step 3: Upload Your File”-
Drag and drop your file into the upload area, or click it to browse your computer
-
Only one file can be uploaded at a time
Supported formats: CSV, XLSX, DOCX, TXT, PDF, or an image (receipt, invoice, handwritten or photographed list).
Spreadsheets vs. everything else: Spreadsheets (CSV/Excel) use the header-row and column-mapping steps below. Every other file — Word, text, PDF, and images — is read automatically: ContentsPal’s AI extracts the items and takes you straight to the preview, so the header-row and column-mapping steps (Steps 4–5a) don’t apply — except for the PDF inventory tables and reports described below.
PDF inventory tables: When a PDF is a printed table — for example an inventory report exported from a spreadsheet, with columns like Age, Qty, Item, and Value — ContentsPal reads the table directly and runs it through the same header-row and column-mapping steps as a spreadsheet. Column headings that wrap onto two lines (for example “Quantity” over “Lost”) are read as one heading. Room headings above each group of rows become a Room column. This is fast even for reports with thousands of items.
Photo inventory reports: ContentsPal supports the most common contents inventory report formats in the industry — the PDF photo reports and item lists that contents and restoration software produces, including reports printed straight from a web page. These are read item by item, and every photo in the report is attached to the item it belongs to, even when an item’s photos continue onto the next page. You get the item details the report carries — such as item number, name, description, quantity, room, box, brand, and model — and anything else it lists, like status, condition, storage location, the report’s own item ID or barcode, and notes, goes into the item’s comments. Notes someone typed onto the PDF (for example a repair estimate next to an item) are added to the item they sit beside. A notice shows how many items and photos were read, and the report then goes through the same steps as a spreadsheet. Photos come in at the size they were saved in the PDF, so a report that only prints thumbnails brings in thumbnails.
When a report lists several identical items without their own ID (for example three “Chair” rows) and doesn’t say which photos belong to which, they come in as one item with the combined quantity and all their photos. Split it in ContentsPal if needed.
Item reports with labeled fields: Reports that list each item as a block of labeled fields (for example “Name:”, “Brand:”, “Quantity:”) with its photos beside it are read field by field, and each field becomes a column you can map. When a pack-out report lists each item’s box and disposition (for example Discard or Retained by Insured), those come across too.
Long documents: Other large files are read in sections, with a progress bar showing how many sections are done. A PDF of up to 300 pages (100 pages for a scanned PDF) is read in one upload, and a long inventory report can take several minutes — keep the window open until the preview appears. Room headings carry over from one page to the next, so items keep their room even when a room’s list spans several pages.
Which files bring photos across: Photos are imported only from spreadsheets that contain photos (Step 5a), and from photo inventory reports and item reports with labeled fields — the notice for those reports says how many photos were read. Every other file — a PDF table, other text or scanned PDFs, Word and text files, and images of a list — brings in the item details only, without photos. The photo or scan of a list itself isn’t attached to the items.
Step 4: Select the Header Row
Section titled “Step 4: Select the Header Row”After uploading, ContentsPal automatically tries to find your header row and match your columns. When it can map at least the Name column, it skips ahead — to the preview, or to the Photos step if your file has photos — and you can still review the mapping with Change Column Mapping. Otherwise, the dialog displays the first rows of your file in a table so you can pick the header row yourself.
-
Click on the row that contains your column headers (e.g., the row with “Name”, “Brand”, “Description”, etc.)
-
The selected row will be highlighted
-
This tells ContentsPal which row defines your column names so that the data rows below it are imported as items
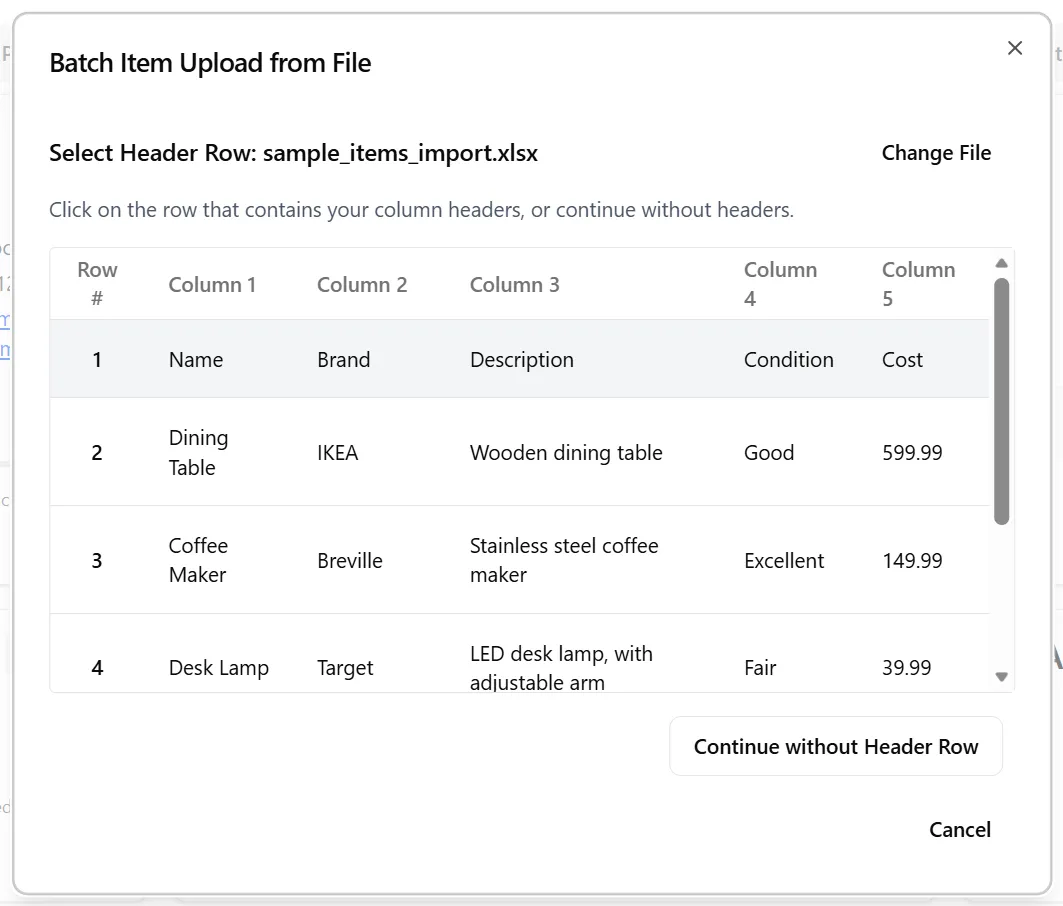
If your file doesn’t have a header row, click Continue without Header Row and columns will be labeled generically (Column 1, Column 2, etc.).
Adjuster and public-adjuster reports: these often start with a letterhead and a claim-info block (insured, loss location, claim number) before the real column headings. Scroll the table down and pick the row with the headings — the rows above it are ignored.
Step 5: Map Your Columns
Section titled “Step 5: Map Your Columns”After selecting the header row, the column mapping screen appears. Here you tell ContentsPal which columns in your file correspond to which item fields.
-
Use the Auto Map button to let ContentsPal automatically match your columns — it will recognize common names like “Name”, “Brand”, “Cost”, etc.
-
Review the mappings and adjust any that weren’t matched correctly by selecting the right column from each dropdown
-
If Auto Map didn’t pick up a column, manually select it from the dropdown
-
The Name field is required (marked with *) — all other fields are optional
-
If you selected the wrong header row, click Change Header Selection to go back
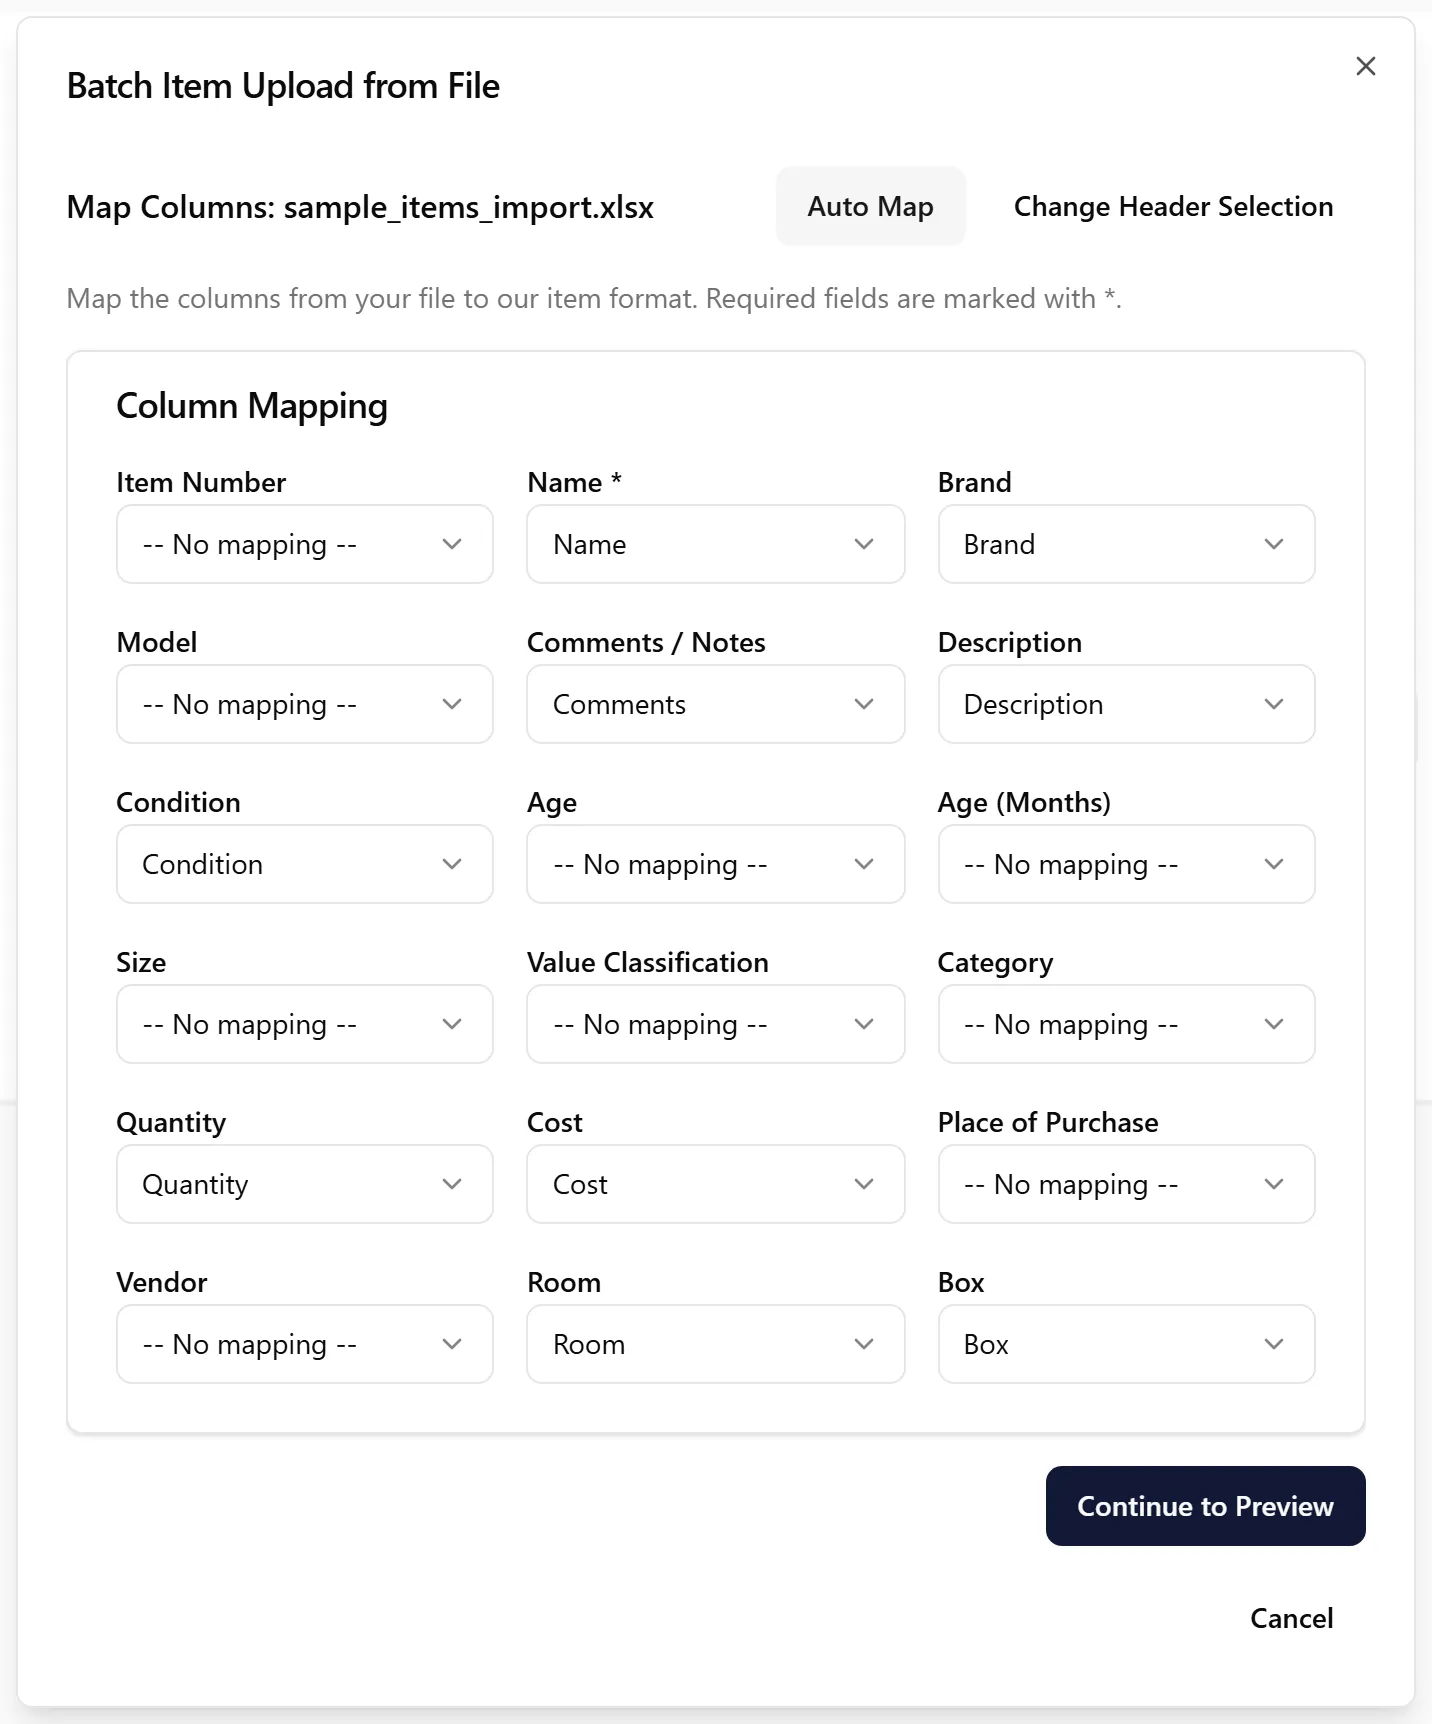
Auto Map also recognises the headings adjuster inventory reports use: “Description of Property” as the item name, “Room/Area”, “Qty.”, “Replacement Cost”, “Model #”, “Comments”, and a “Link” column as the vendor. A separate Age (Months) field is available for forms that split age into “Age Years” and “Age Mons” columns — both are combined into the item’s age, and a range such as “1-2” in a years column is kept as “1-2 years”. Where a Link column holds real hyperlinks, the product URL is saved with the item alongside the displayed store name.
Once all desired columns are mapped, click Continue to Preview.
Step 5a: Photos (if your file has them)
Section titled “Step 5a: Photos (if your file has them)”If your spreadsheet contains photos — either images embedded in cells (common in exports from other inventory tools) or columns of photo links — the button on the mapping screen reads Continue to Photos, and a Photos step appears before the preview.
-
Item Photo (main): choose which photo column becomes each item’s primary image. ContentsPal pre-selects the most likely one (e.g. a column named “Item Photo” or “Photo”).
-
Additional photos: any other detected photo columns (e.g. “Data Tag Photo”, “Receipt Photo”) are listed with checkboxes and attached as extra images. Uncheck any you don’t want to import.
-
If a column isn’t a photo, set the main photo to None and uncheck it under additional photos.
Photos embedded in cells are imported and attached to your items during import. Columns that hold direct image links are attached using those links.
Click Continue to Preview when you’re done, or Back to Mapping to adjust the columns.
Step 6: Preview and Process
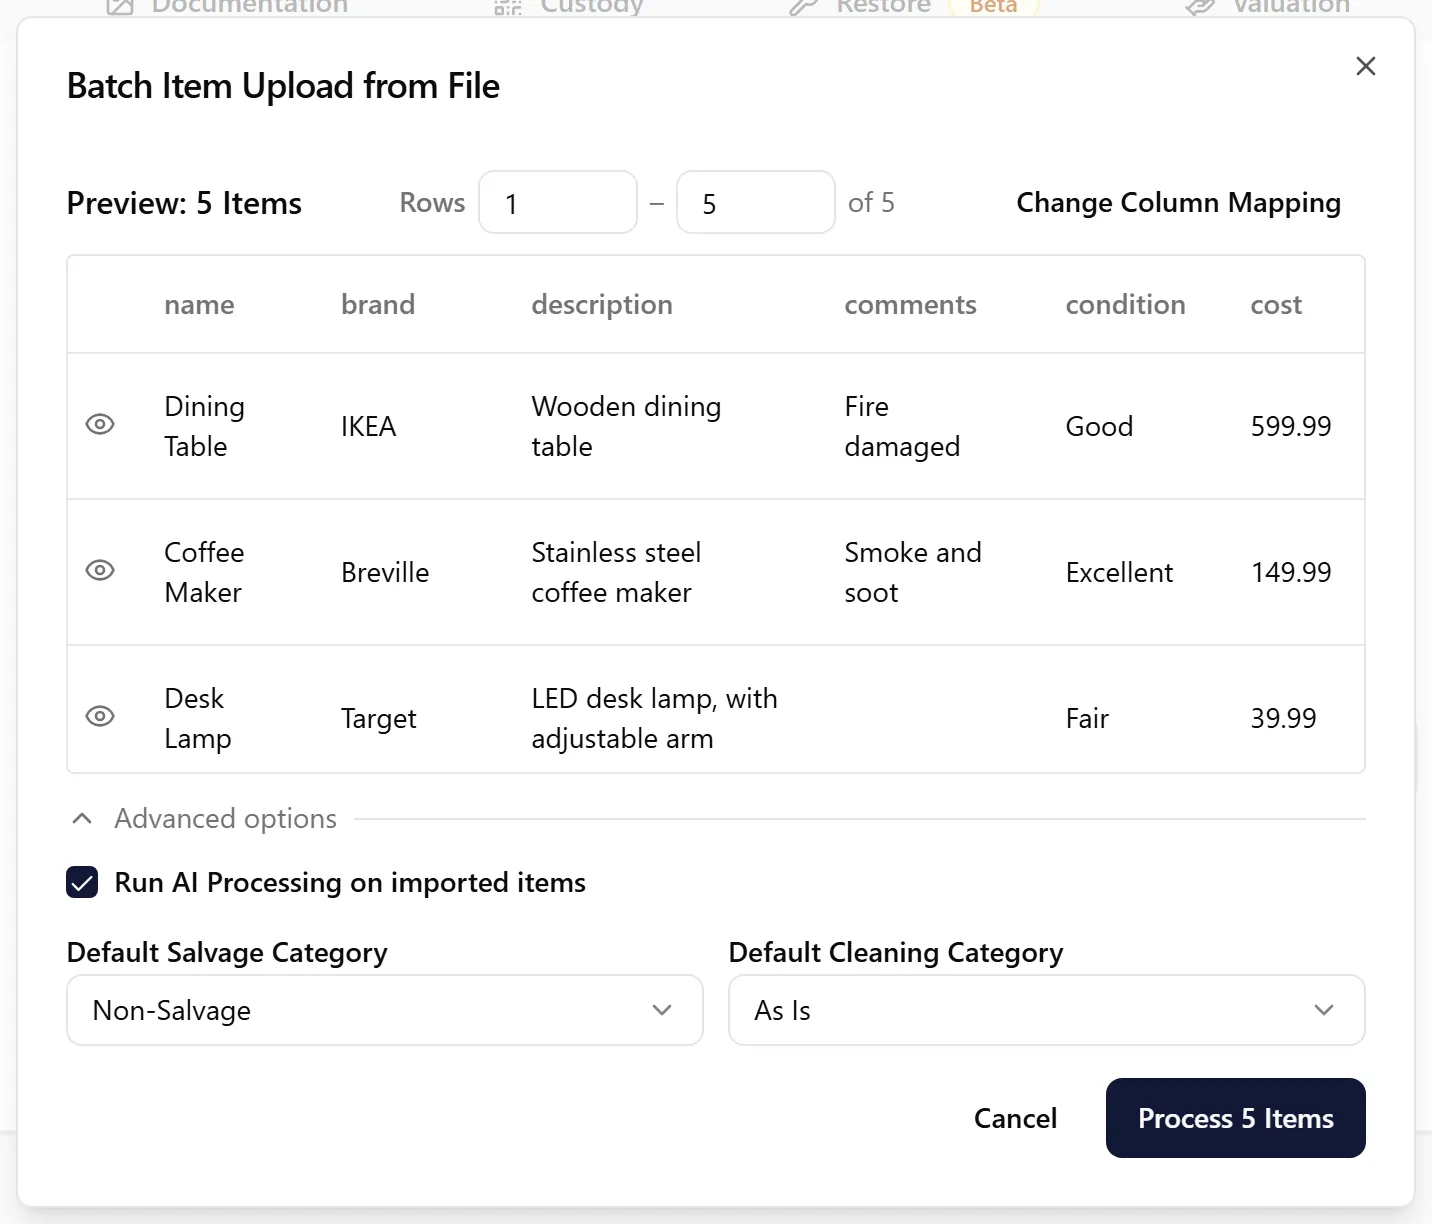
Section titled “Step 6: Preview and Process”The preview screen shows the first 10 of your items as they will be imported.
-
Verify that the item names, brands, descriptions, and other fields look correct
-
If something looks wrong, click Change Column Mapping (or Change Photos) to go back and adjust
-
To import only part of the file, set the Rows range (for example, rows 1–200)
-
Optionally, open Advanced options to turn off Run AI Processing on imported items (items are then created from your data without AI identification or pricing), or to set the Default Salvage Category (Non-Salvage by default) and Default Cleaning Category (As Is by default)
-
When everything looks good, click Process [N] Items to start the import
If you mapped an Item Number column, rows with invalid or repeated item numbers must be fixed in your file, or the column unmapped with Change Column Mapping, before you can import. Item numbers must be whole numbers: a column of codes like “A1” or “B12” isn’t matched to Item Number automatically, and the items are numbered in order instead. Rows whose item numbers already exist in the job can be skipped with Skip these rows and import the rest — useful for resuming a partial upload.
A progress bar will appear while items are being processed.
Step 7: Review Your Imported Items
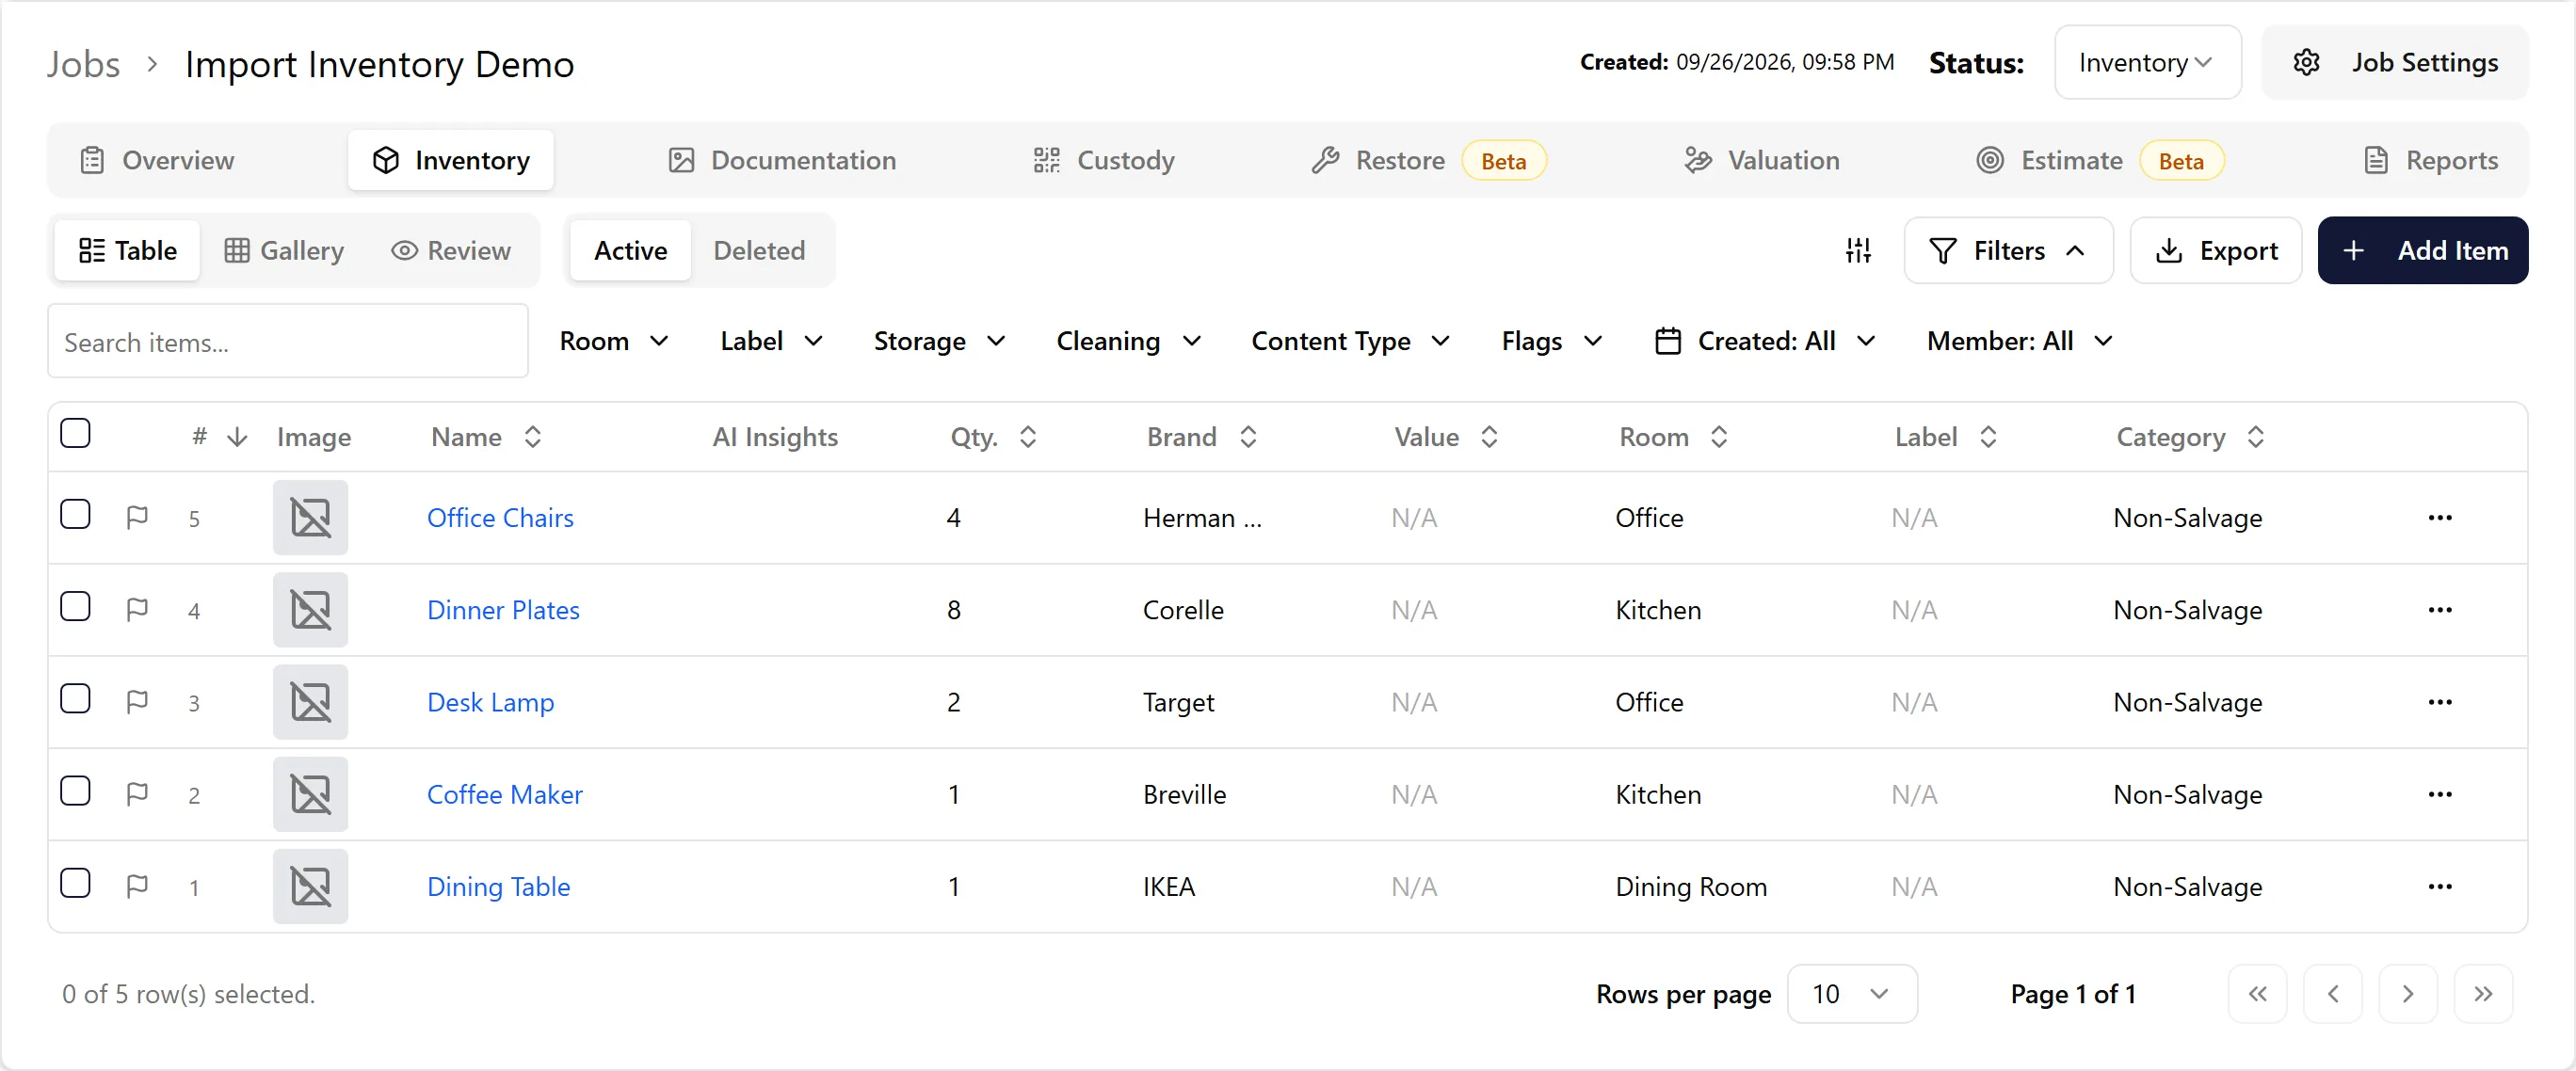
Section titled “Step 7: Review Your Imported Items”Once processing completes, the dialog closes and your items appear in the job’s inventory view.
-
Go to the Inventory tab to see your imported items
-
Items will have the name, brand, description, quantity, room, and other fields you provided in the spreadsheet
-
ContentsPal will automatically run AI pricing and categorization on the imported items in the background (unless you turned off Run AI Processing on imported items)
-
If your file included photos, they are attached to the items during import
-
Review the items and make any corrections as needed
Tips for Best Results
Section titled “Tips for Best Results”Preparing your spreadsheet:
-
Use the sample file as a starting point to ensure your columns are structured correctly
-
Make sure every item has a name — rows without a name will be skipped
-
Use consistent room names across rows so items are grouped correctly
-
If rooms in your spreadsheet don’t exist in the job yet, they will be created automatically
During import:
-
Use Auto Map first, then fine-tune individual columns if needed
-
Always check the preview before processing to catch any mapping issues early
After import:
-
AI will automatically price items and assign categories — this may take a few minutes
-
You can edit any item individually if corrections are needed
-
If you imported a PDF, Word file, or image (for example, a photo of a handwritten or printed form), check fields such as Condition and Age — the AI can miss or misread them, especially in handwriting. Check them in the preview before processing, and correct them on the items afterwards
Troubleshooting
Section titled “Troubleshooting”Q: My file won’t upload A: Make sure the file is a CSV, XLSX, DOCX, TXT, PDF, or image. Other file types are not supported.
Q: The columns didn’t map correctly A: Click Change Column Mapping from the preview screen, or Change Header Selection from the mapping screen if you selected the wrong header row.
Q: Some items are missing after import A: Rows without a value in the Name column are skipped. Check your spreadsheet to ensure all items have a name.
Q: The cost shows as $0 after import A: AI pricing runs in the background after import. Wait a few minutes and refresh the page. You can also manually update item costs.
Q: Rooms were created that I didn’t expect A: Room names from your spreadsheet are created automatically if they don’t already exist in the job. You can rename or delete rooms from the Rooms section in Job Settings.
Q: Where is the file I imported? A: ContentsPal keeps a copy of each imported file with the job. Open the job’s Documentation tab and choose Imports to see each import’s date, file, size, rows, items, and who ran it — click the file name to download it. An imported item’s Source (under Metadata when you open the item) also links to the file it came from. The Imports tab is available to organization owners, admins, and editors.
Q: My imported items have no photos A: Only some files bring photos across — see Which files bring photos across in Step 3. You can add photos to any item afterwards by opening it and clicking Add Images.
Q: Some items came back without a price A: ContentsPal prices each line by searching for a new equivalent of what it describes. A line that covers several different things (for example “Linens” or “Bedding”) may be left unpriced and marked Needs itemizing — open the item, click that badge in its Value section, and choose Itemize this entry to split it into separate items, which are then priced one by one. Other vague lines price better with more detail: add the brand, model, size, or material.
Q: My items were imported but not identified or priced A: AI identification counts toward your plan’s monthly item limit (200 items a month on the Free plan). Once the limit is reached, the remaining items are still imported but AI doesn’t identify or price them, and a message says you’ve reached your monthly AI Identification limit. The limit resets next month, or you can upgrade for a higher limit.
Need Help?
Section titled “Need Help?”If you encounter issues:
-
Go to Help and Support in the sidebar
-
Visit our support portal: https://support.contentspal.com
-
Use the chat widget for further support
Last Updated: September 2026