
📦 Managing Custody Labels
The Custody tab lets you create, manage, and print Labels — the QR code stickers you attach to boxes, bags, and tagged items during a packout. Labels let you track exactly what’s inside each container and where it’s stored.
🧭 Summary
Section titled “🧭 Summary”Labels are created on the web portal (or with Add in the mobile app’s Custody tab) and printed on sticker sheets that you attach to physical containers. Once items are scanned into a label on the mobile app, the Custody tab shows you everything at a glance: what’s in each box, which room it came from, what storage vault it’s sitting in, and what its cleaning or salvage category is.
You can filter, sort, export, and print labels directly from this tab.
⚙️ Prerequisites
Section titled “⚙️ Prerequisites”-
A job must already exist
-
You need web portal access
-
Labels are typically printed before the mobile team starts scanning items
🚀 Step-by-Step Instructions
Section titled “🚀 Step-by-Step Instructions”1. Open the Custody Tab
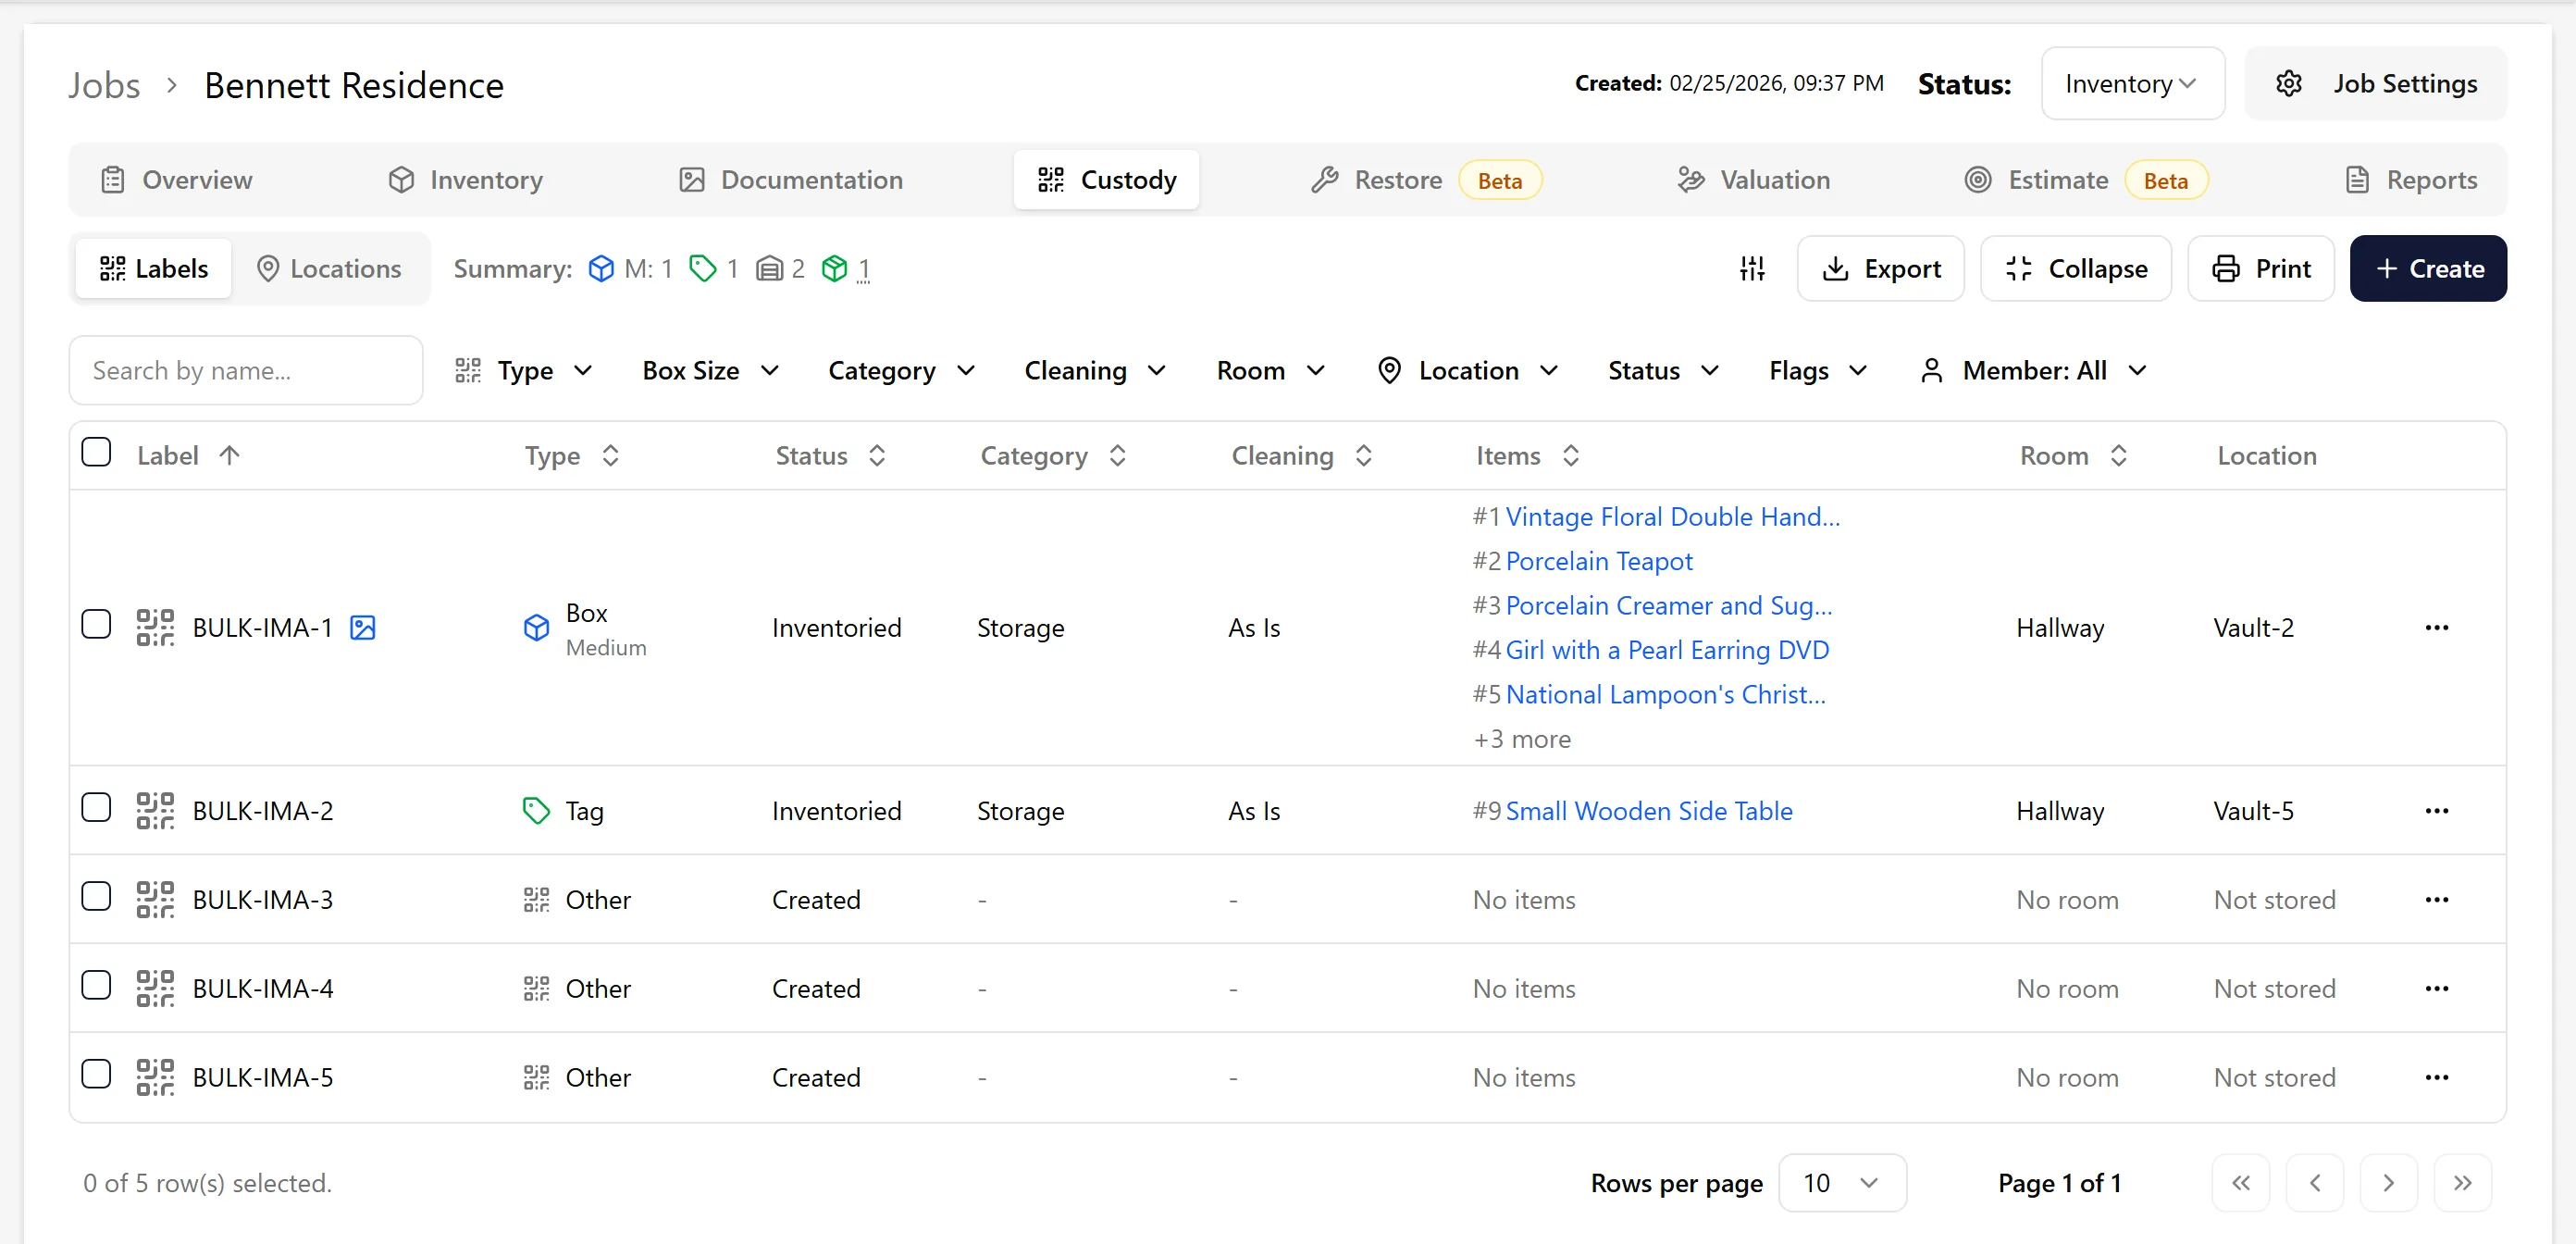
Section titled “1. Open the Custody Tab”From your job page, click the Custody tab in the top navigation bar.
You’ll see a summary bar at the top showing a count of each label type (boxes by size, tags, other). If the job has consumables, a 📦 count appears there too — click it for a per-code breakdown of consumables implied by box labels (“From label type”) versus those logged on labels (“Added”). Below that is the label table. Use the Labels / Locations toggle next to the summary to switch between the label table and a view of the storage locations this job’s labels have been placed in. For a tour of the Locations view, see Custody Locations Tab.
2. Create Labels
Section titled “2. Create Labels”Click the Create button in the top-right corner.
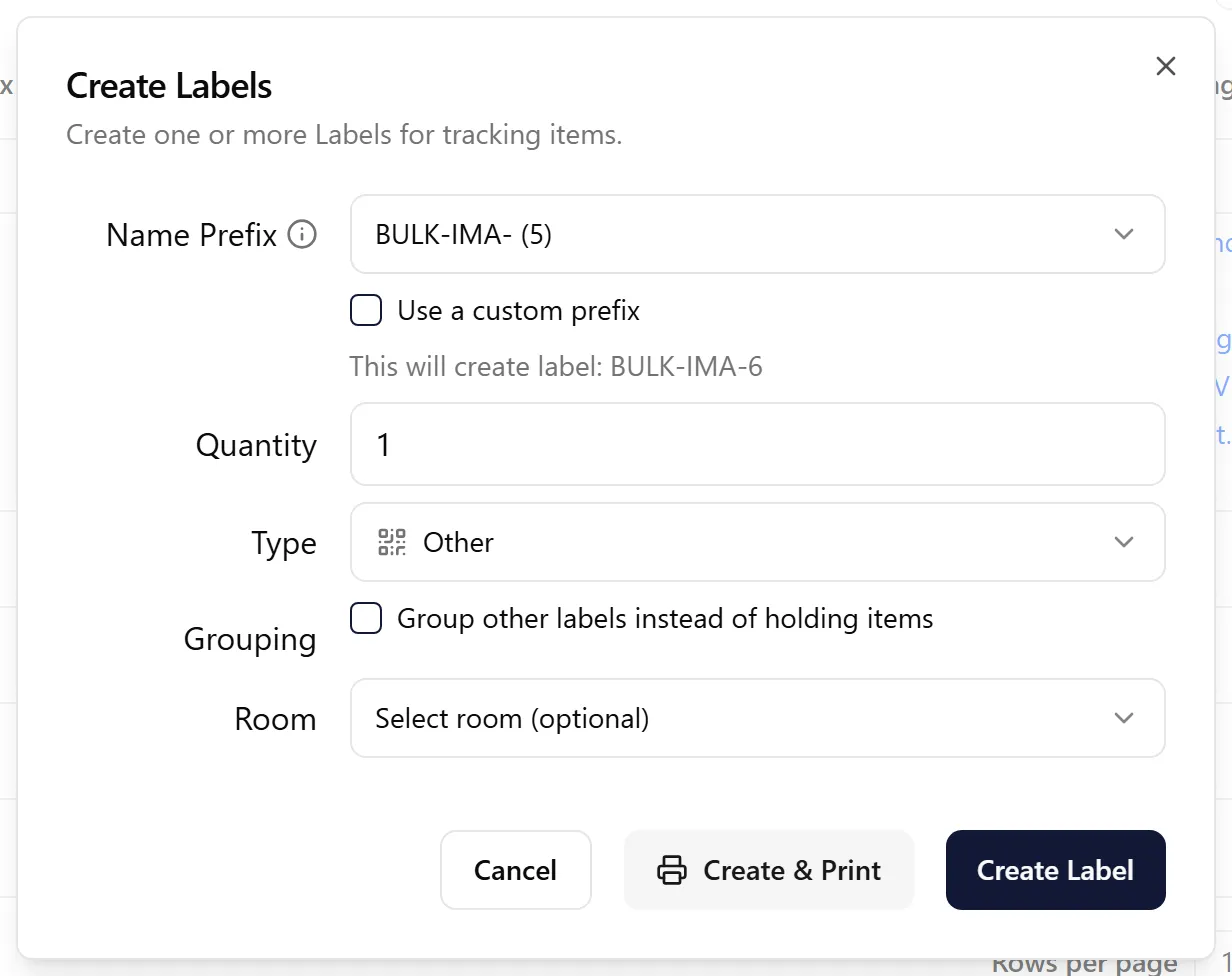
Fill in:
-
Name Prefix — The base name for your labels. If you enter
BOX-, labels will be namedBOX-1,BOX-2, etc. If the job already has labels, the prefix defaults to the one used most, and numbering continues after the highest existing number — tick Use a custom prefix to type a new one. Otherwise the prefix is pre-filled based on your organization’s default setting — you can change the default under Organization → Settings → General, in the Labels section. Options are: job name (default), no prefix (number-only labels), or a custom prefix. -
Quantity — How many labels to create in one go (e.g. enter
10to createBOX-1throughBOX-10) -
Type — Choose the label type (see below)
-
Room — Optionally assign the labels to a room right away
-
Grouping — Tick “Group other labels instead of holding items” to create a grouping label (see Grouping Labels Together below)
Label Types
Section titled “Label Types”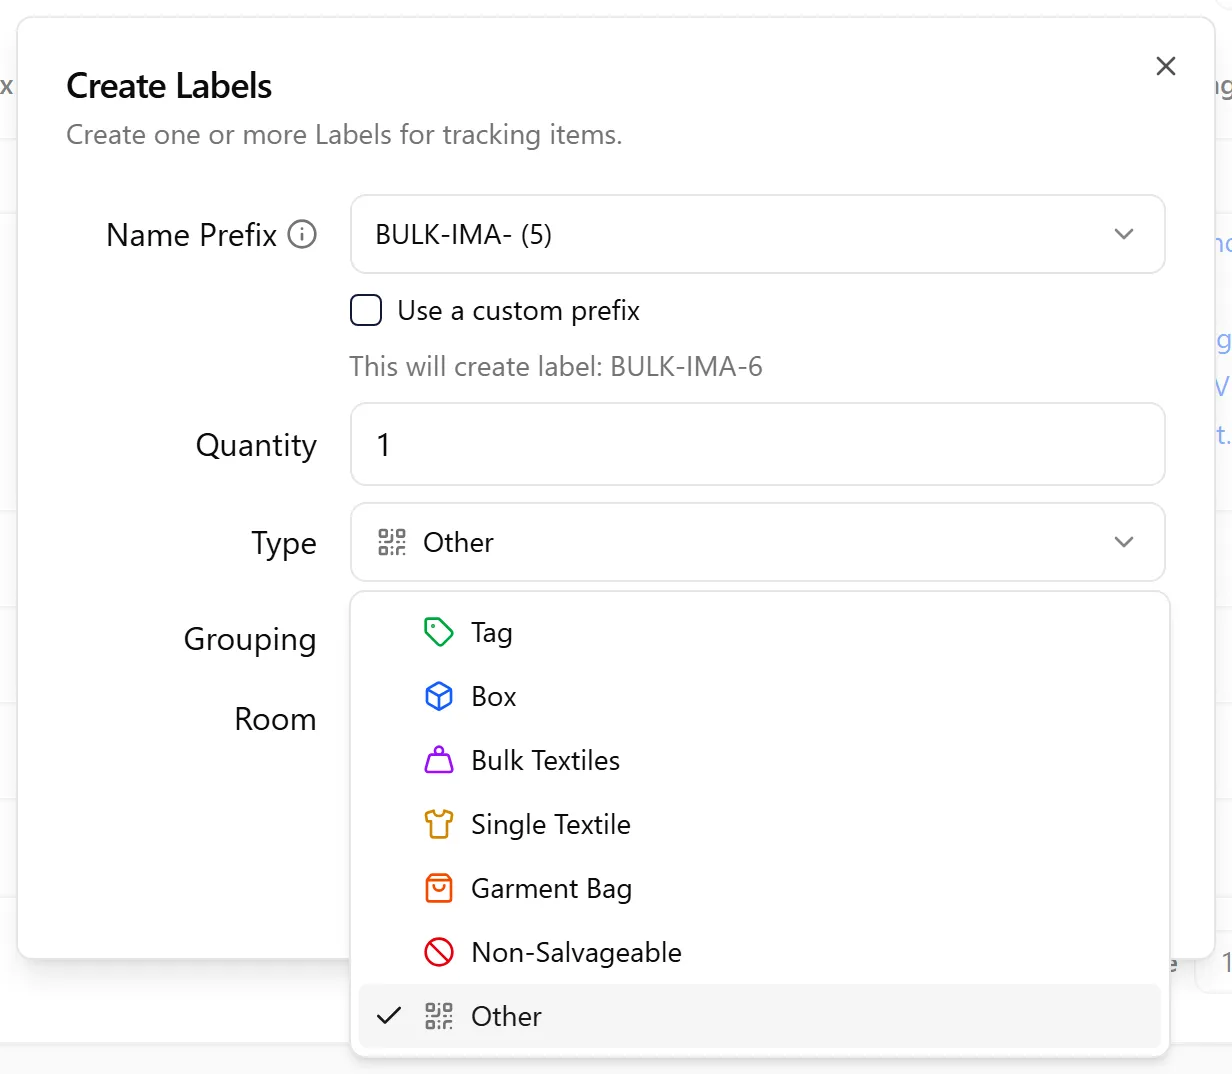
| Type | Used for |
|---|---|
| Tag | A single tagged item (furniture, appliance, etc.) |
| Box | A packed box — you can also set the box size |
| Bulk Textiles | A bundle of textile items packed together |
| Single Textile | One individual textile item |
| Garment Bag | Garment bag containing clothing |
| Non-Salvageable | Non-salvageable items tracked under one label |
| Other | Any other container or grouping |
Click Create Label (or Create N Labels) when ready. To print the new labels straight away, click Create & Print instead — if you cancel the print dialog, the new labels are discarded.
Grouping Labels Together
Section titled “Grouping Labels Together”A grouping label holds other labels instead of items — for boxes that travel together on a pallet, crate, or rack. Changing its room, status, categories, hashtags, or storage location updates every label in the group and their items, and labels in a group are marked In group in the table. See Grouping Custody Labels for how to create groups, edit them, and take a label out with Leave group, on the web and in the mobile app.
3. View the Label Table
Section titled “3. View the Label Table”The label table shows all labels for the job with the following columns:
-
Label — The label name (click to open details). A 🖼 icon means the label has photos attached; a 📦 icon means it has consumables.
-
Type — The label type and box size (for boxes)
-
Status — e.g. Inventoried, Created
-
Category — The salvage/storage category
-
Cleaning — The cleaning category
-
Items — Items packed into this label
-
Room — Which room the label is assigned to
-
Location — Which storage vault the label is currently in
-
Cleaning Code — The Xactimate cleaning code (hidden by default — turn it on in the column settings below)
Collapse / Expand the Items column
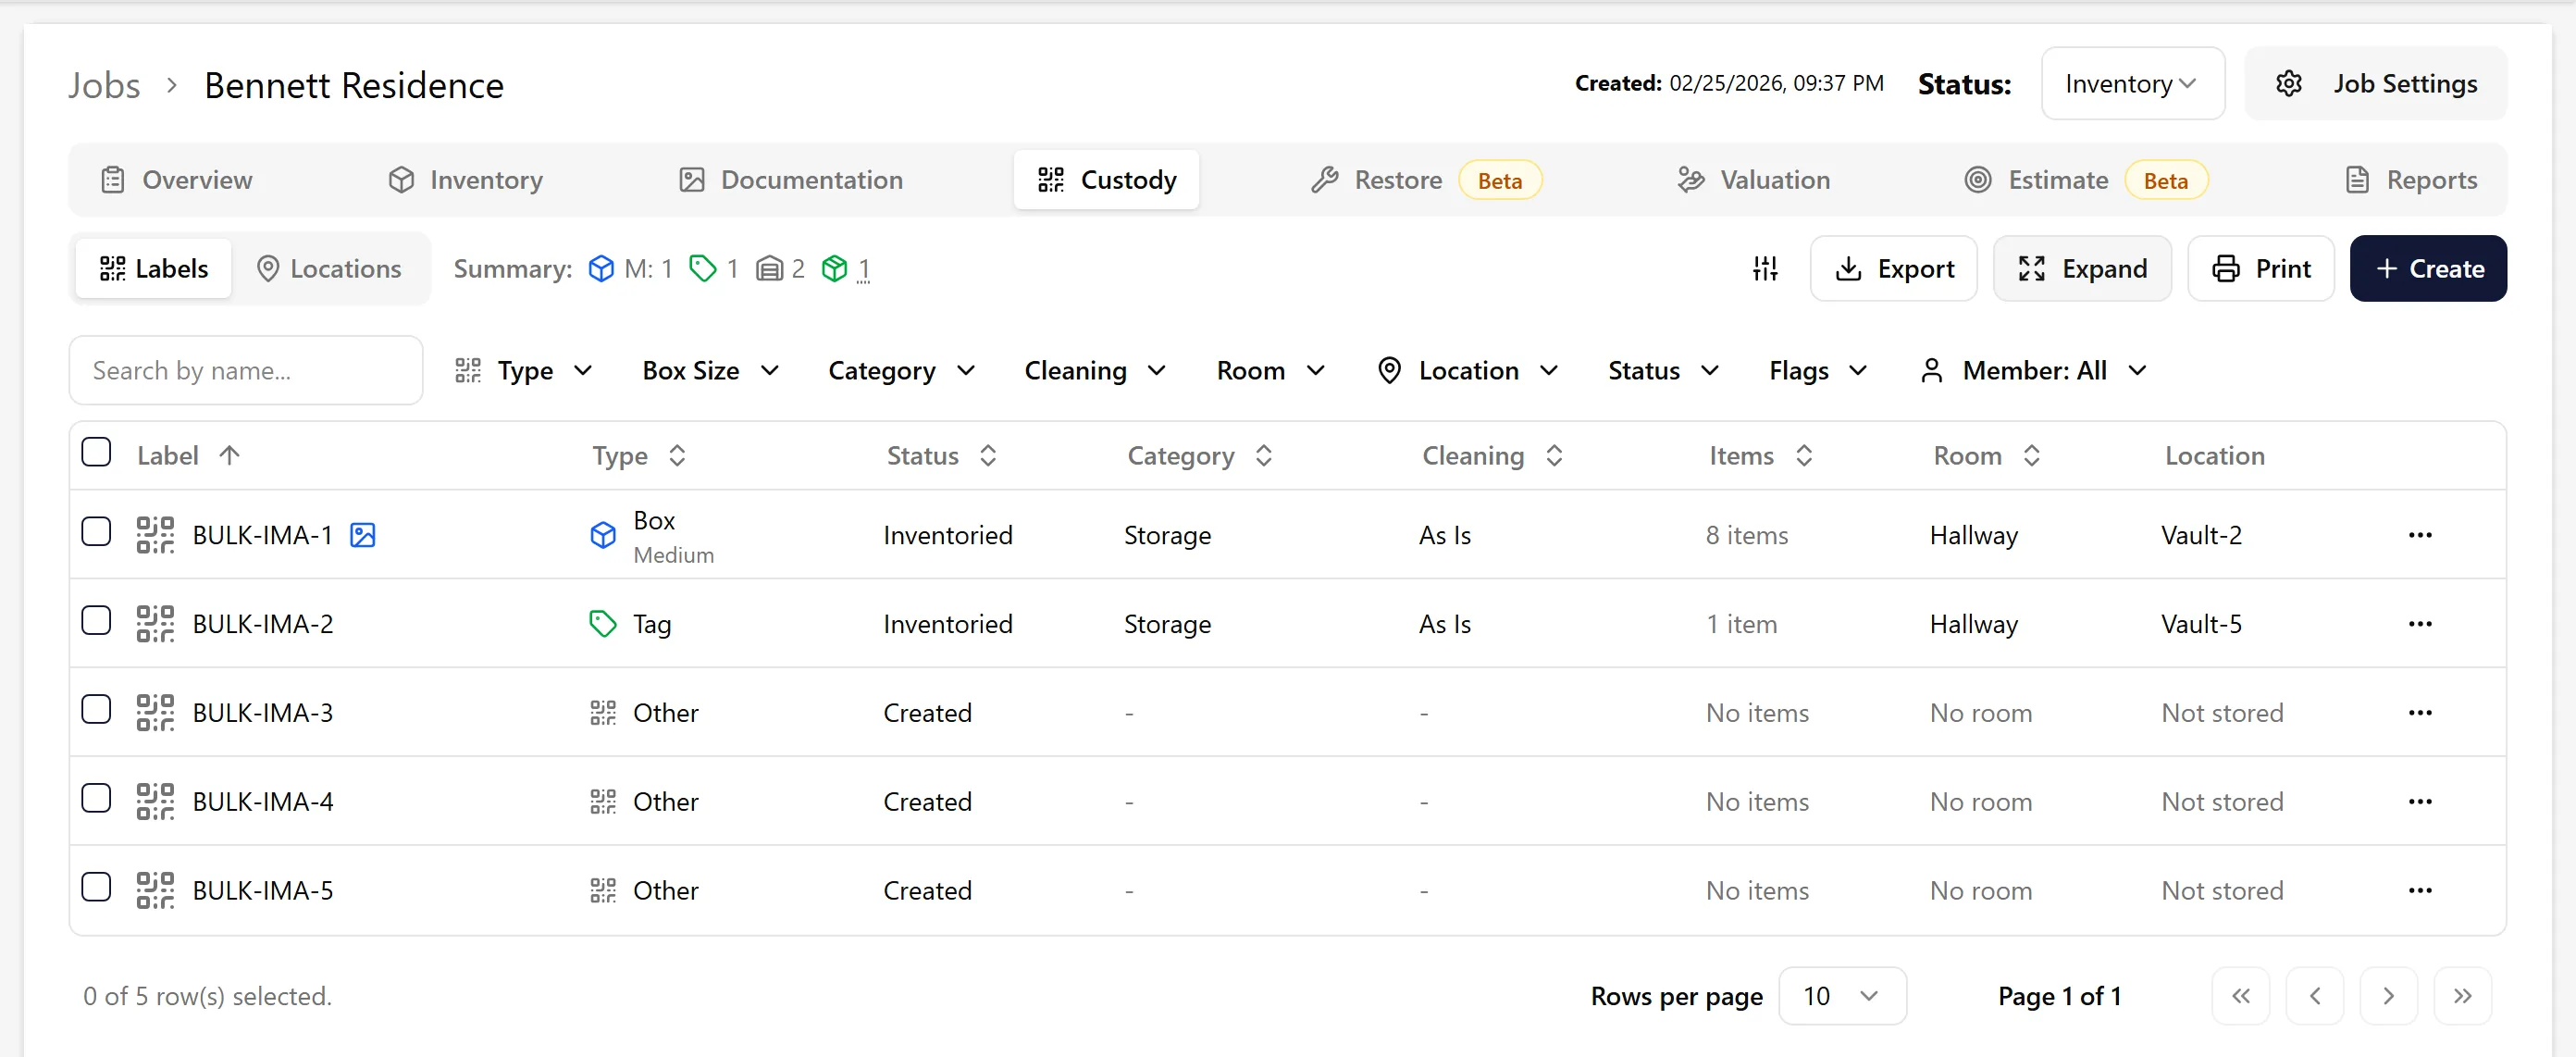
Section titled “Collapse / Expand the Items column”Click Collapse to hide the full item list and just show item counts — useful when you have many items per label and want a more compact view.
Click Expand to switch back to showing the full item names.
4. Customize Which Columns Are Visible
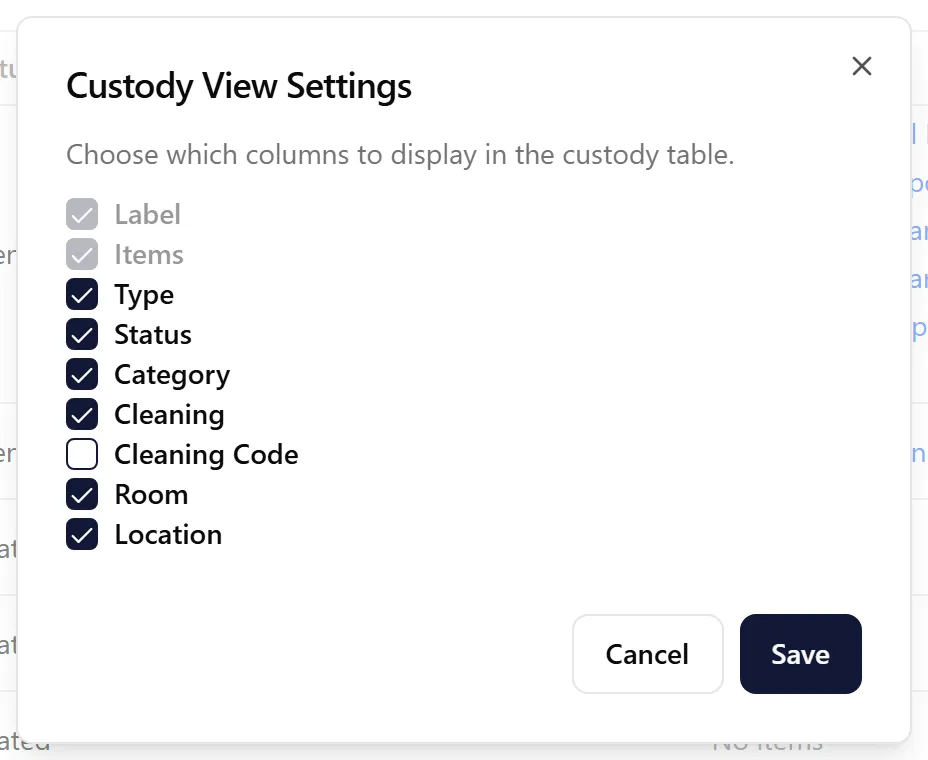
Section titled “4. Customize Which Columns Are Visible”Click the sliders icon (⚙) in the top-right area to open Custody View Settings.
Check or uncheck columns to show or hide them. Label and Items are always visible.
5. Filter Labels
Section titled “5. Filter Labels”When you have many labels, use the filter bar below the toolbar to narrow down what you see.
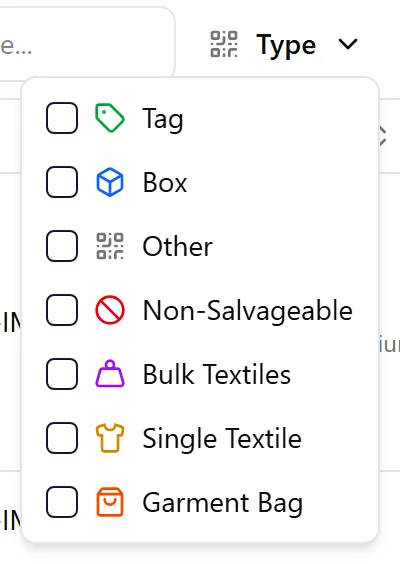
Available filters:
-
Search — Search by label name
-
Type — Filter by label type (Tag, Box, Bulk Textiles, etc.)
-
Box Size — Filter boxes by size
-
Category — Filter by salvage/storage category
-
Cleaning — Filter by cleaning category
-
Room — Filter by room (or “No Room”)
-
Location — Filter by storage vault (or “Not stored”)
-
Status — Filter by storage status
-
Flags — Show only labels with warnings (e.g. a room mismatch)
-
Member — Filter by who created or last updated the label
Click Clear (shown whenever a filter is active) to reset all filters at once. On smaller screens the filters sit behind a Filters button, which turns blue when any filter is active.
6. View and Edit a Label
Section titled “6. View and Edit a Label”Click a label name to open the label’s details dialog. You can also click the ⋯ menu on a row and choose View Label.
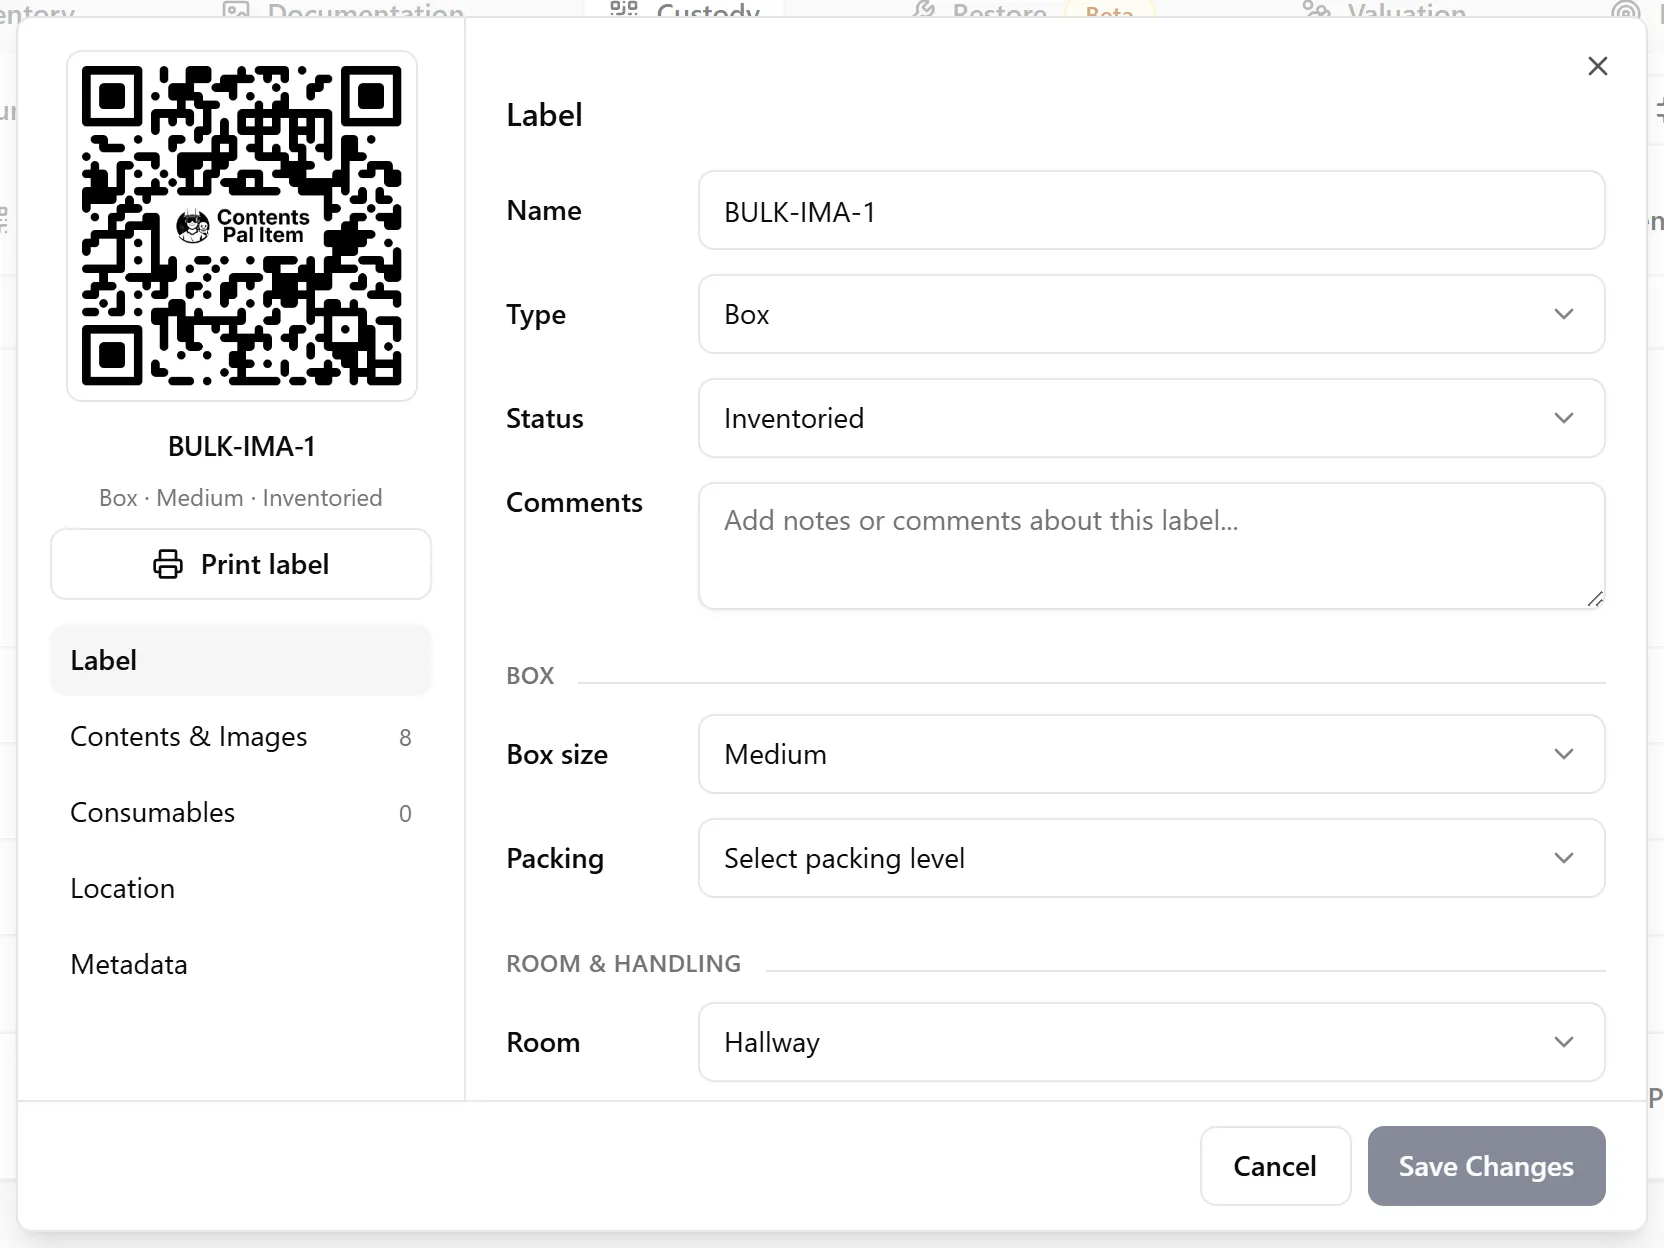
The left side of the dialog shows the label’s QR code, a Print label button, and the list of tabs:
Label tab
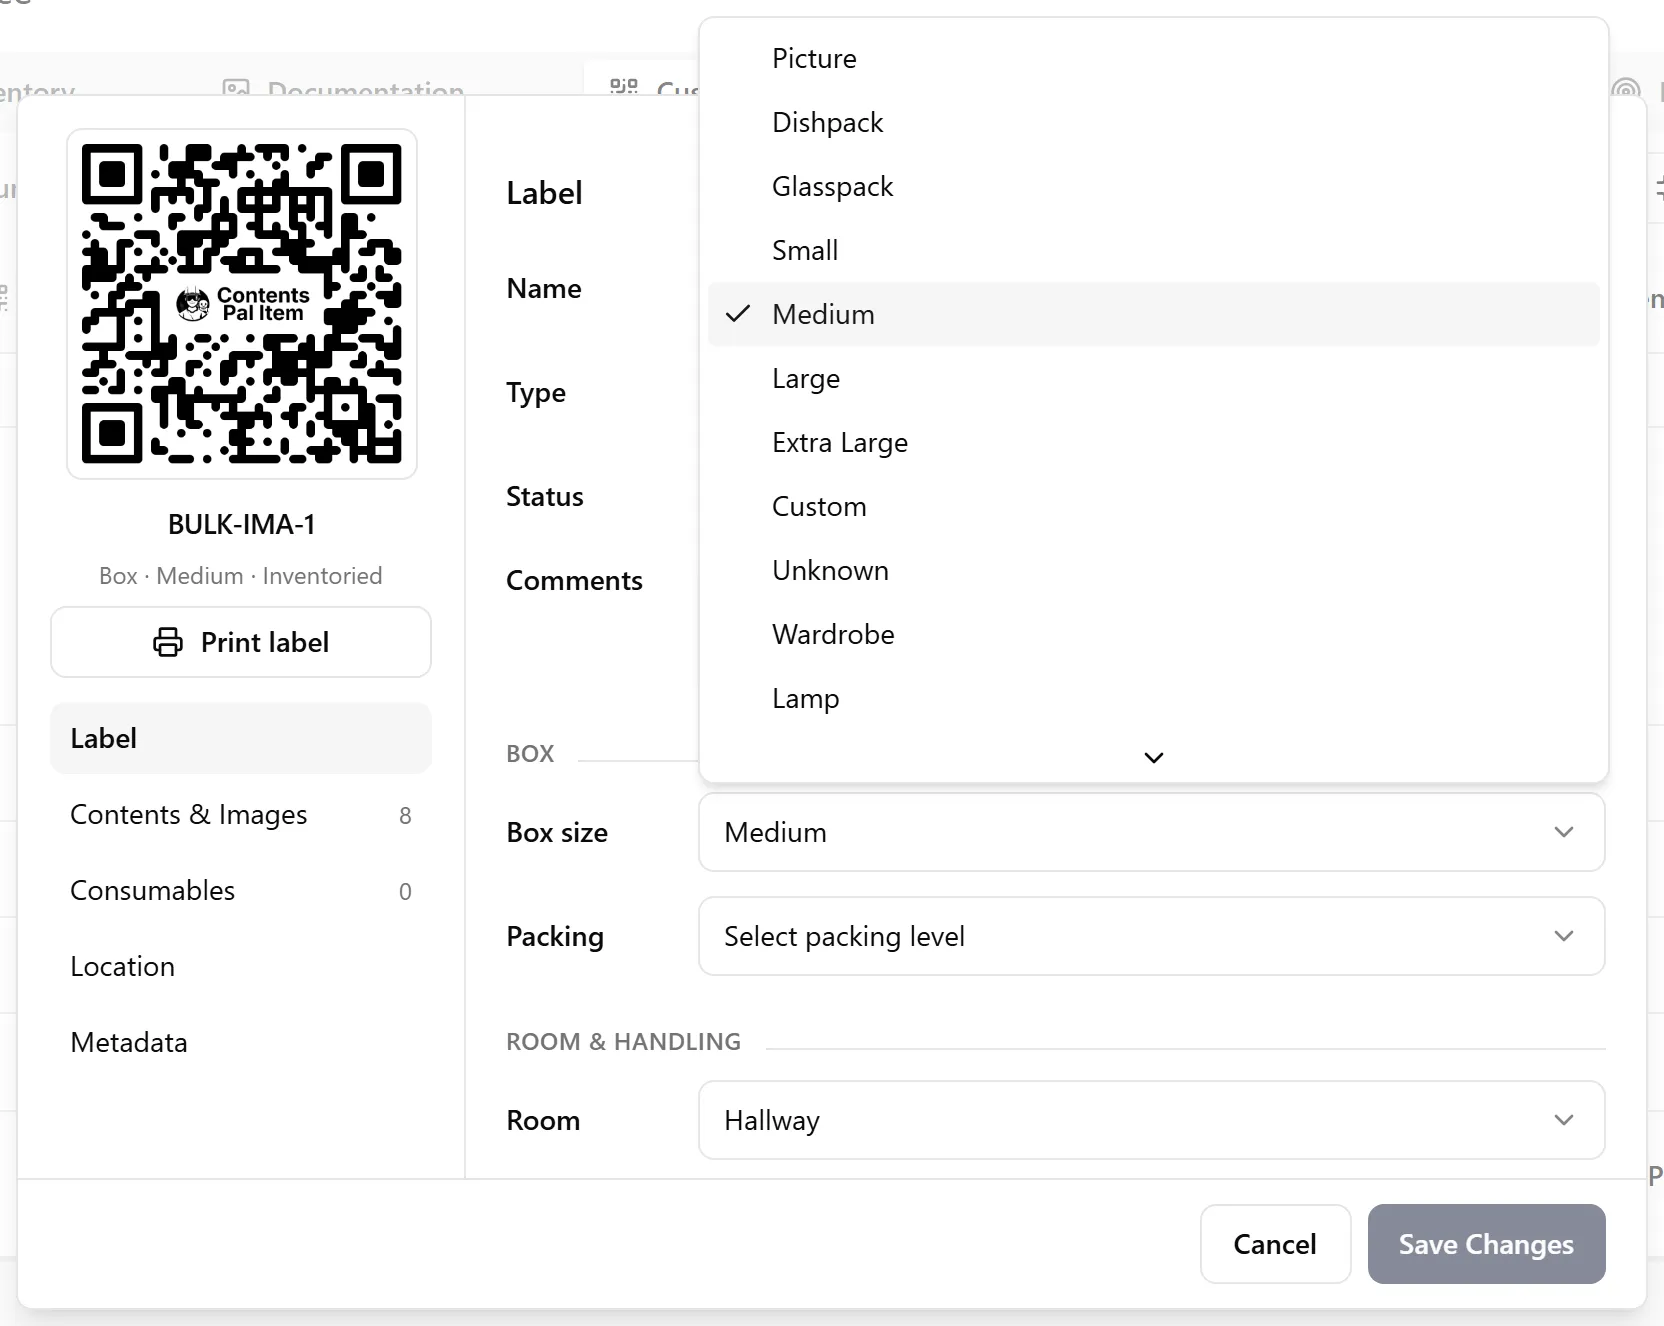
Section titled “Label tab”Edit the label’s name, type, status, comments, and room. For boxes, you can also set the Box size and Packing level. Tags and boxes also have Storage and Cleaning categories, and show the label’s Xactimate Cleaning code when there is one (with a Copy button).
Contents & Images tab
Section titled “Contents & Images tab”View the items packed in this label and any photos attached to it. To add a photo, for example an after-cleaning shot, click the + tile under Images and choose one or more image files.
For a grouping label, this tab lists the labels in the group instead of items, with Add labels to add more and an ✕ to remove one.
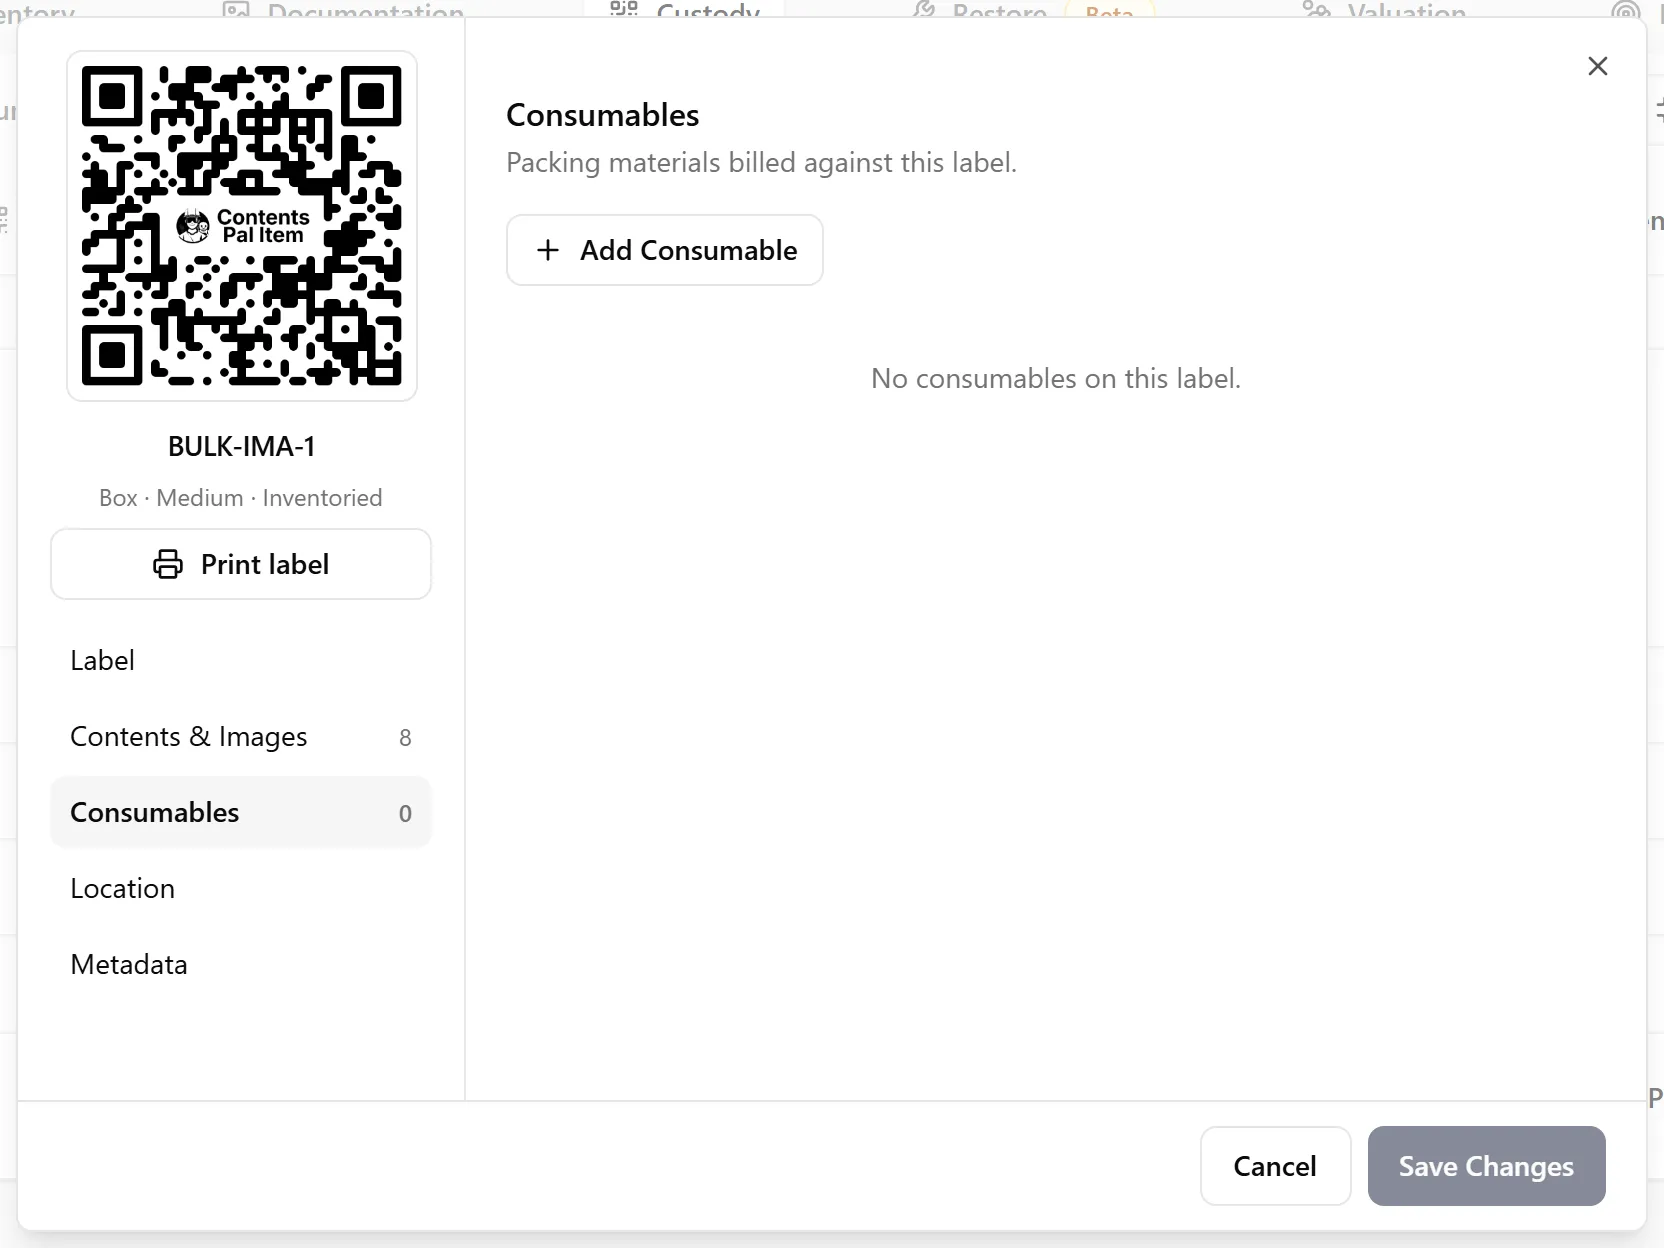
Consumables tab
Section titled “Consumables tab”Track consumable materials used with this label (e.g. packing paper, tape). Click Add Consumable to log usage.
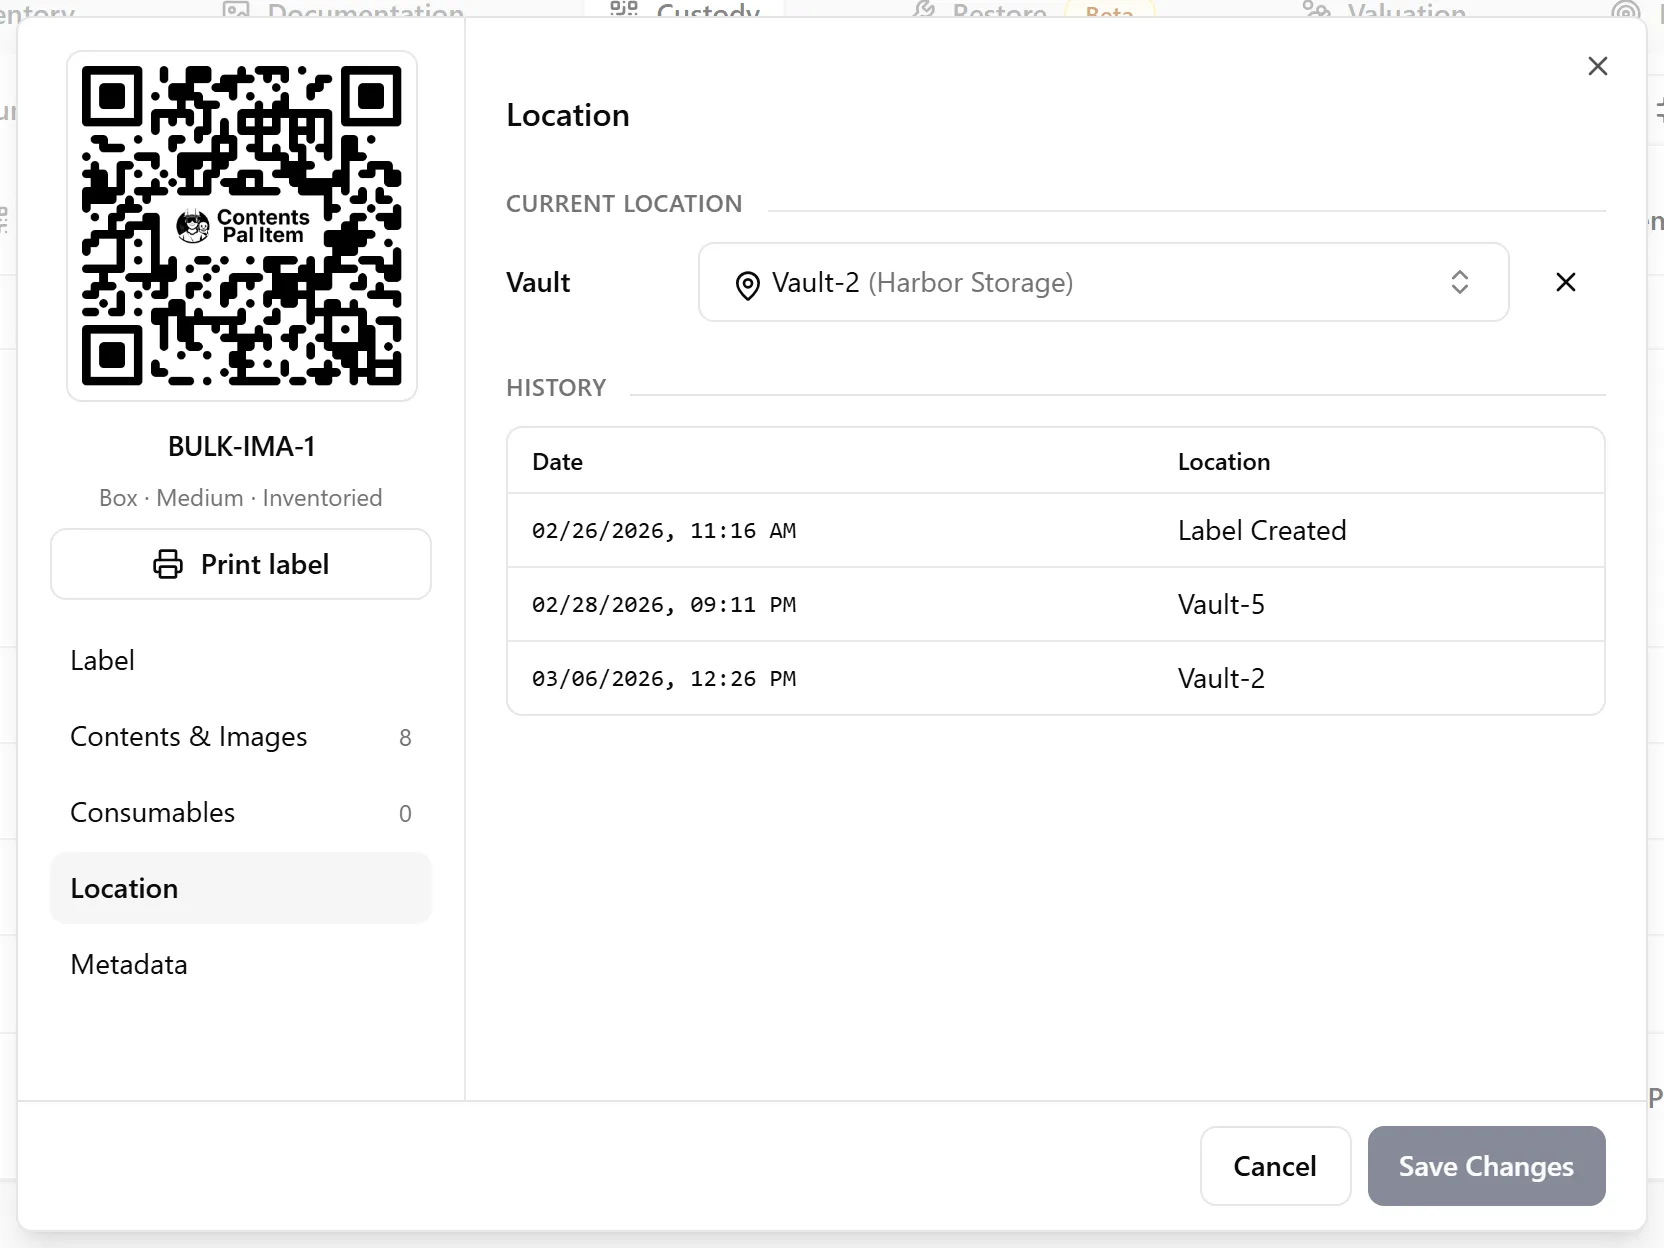
Location tab
Section titled “Location tab”See the label’s current storage vault and its full History — a log of every time the label was moved to a different location.
Metadata tab
Section titled “Metadata tab”View system-level details like the label’s identifiers, creation date, and who last modified the label.
Click Save Changes to save any edits.
7. Use the Row Actions Menu
Section titled “7. Use the Row Actions Menu”Click the ⋯ button at the end of any row to see actions for that label.
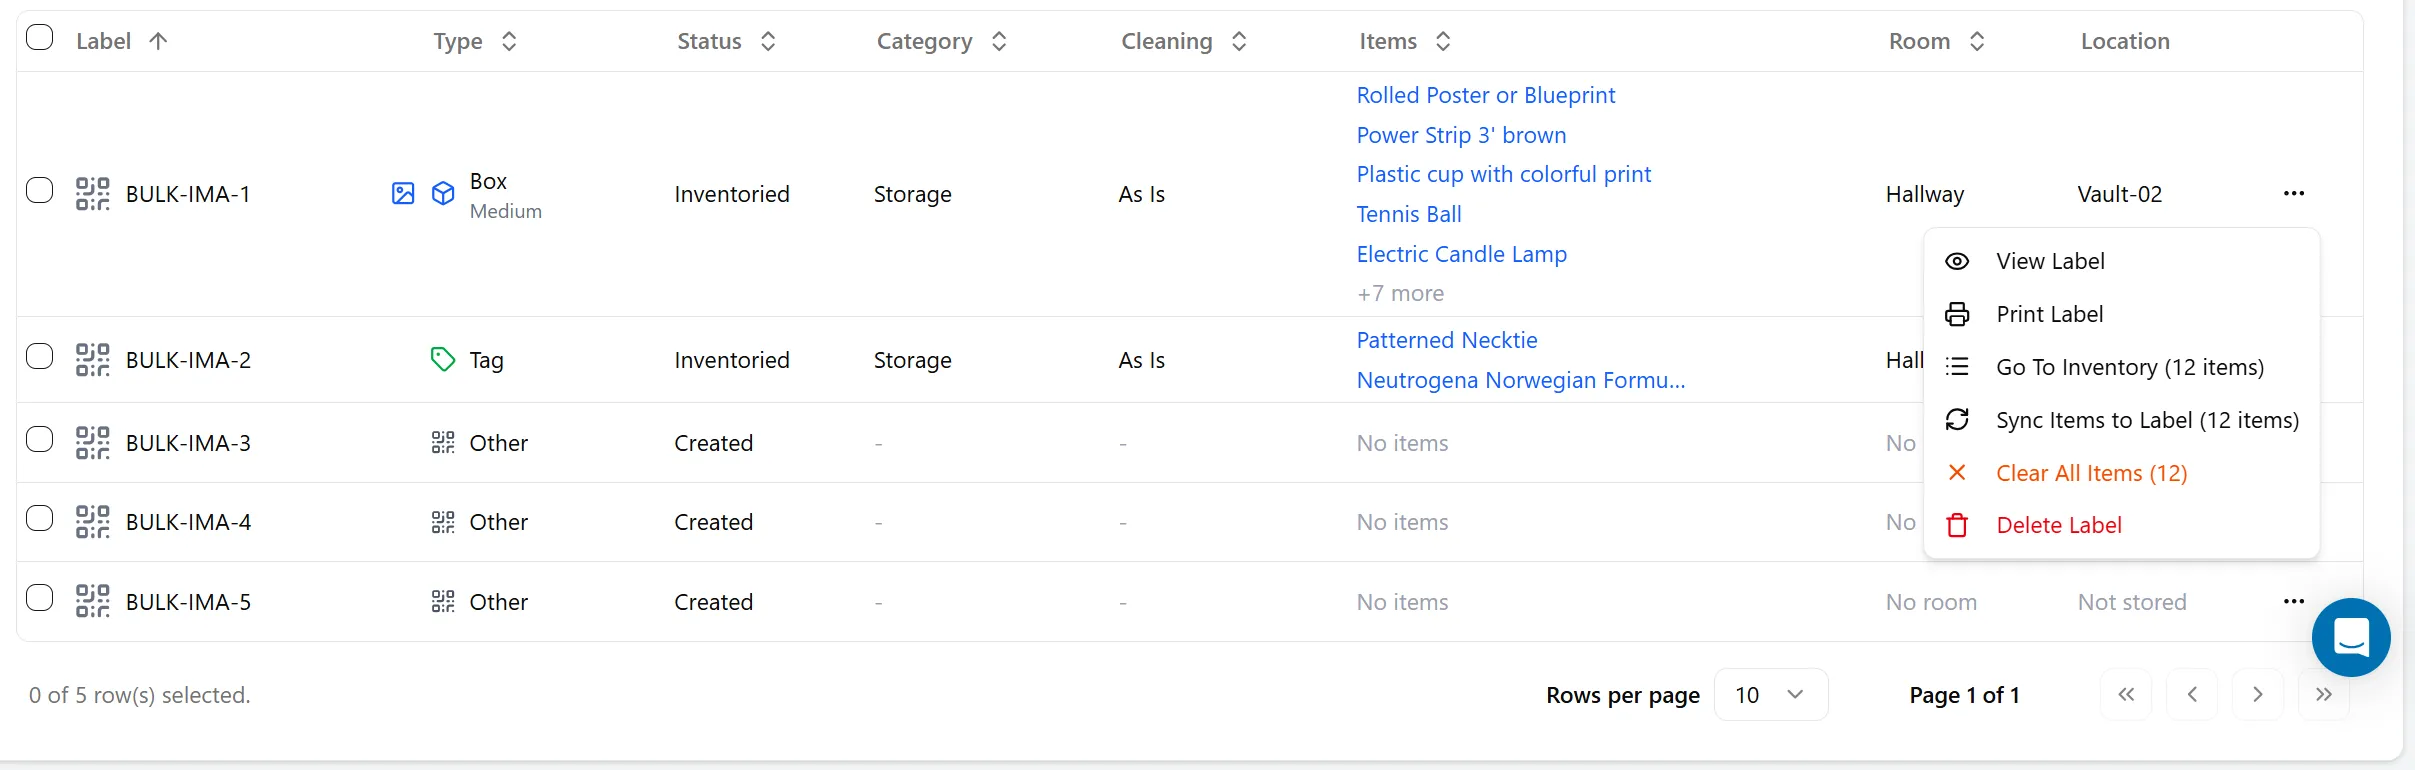
| Action | What it does |
|---|---|
| View Label | Opens the Label Details dialog |
| Print Label | Prints just this one label |
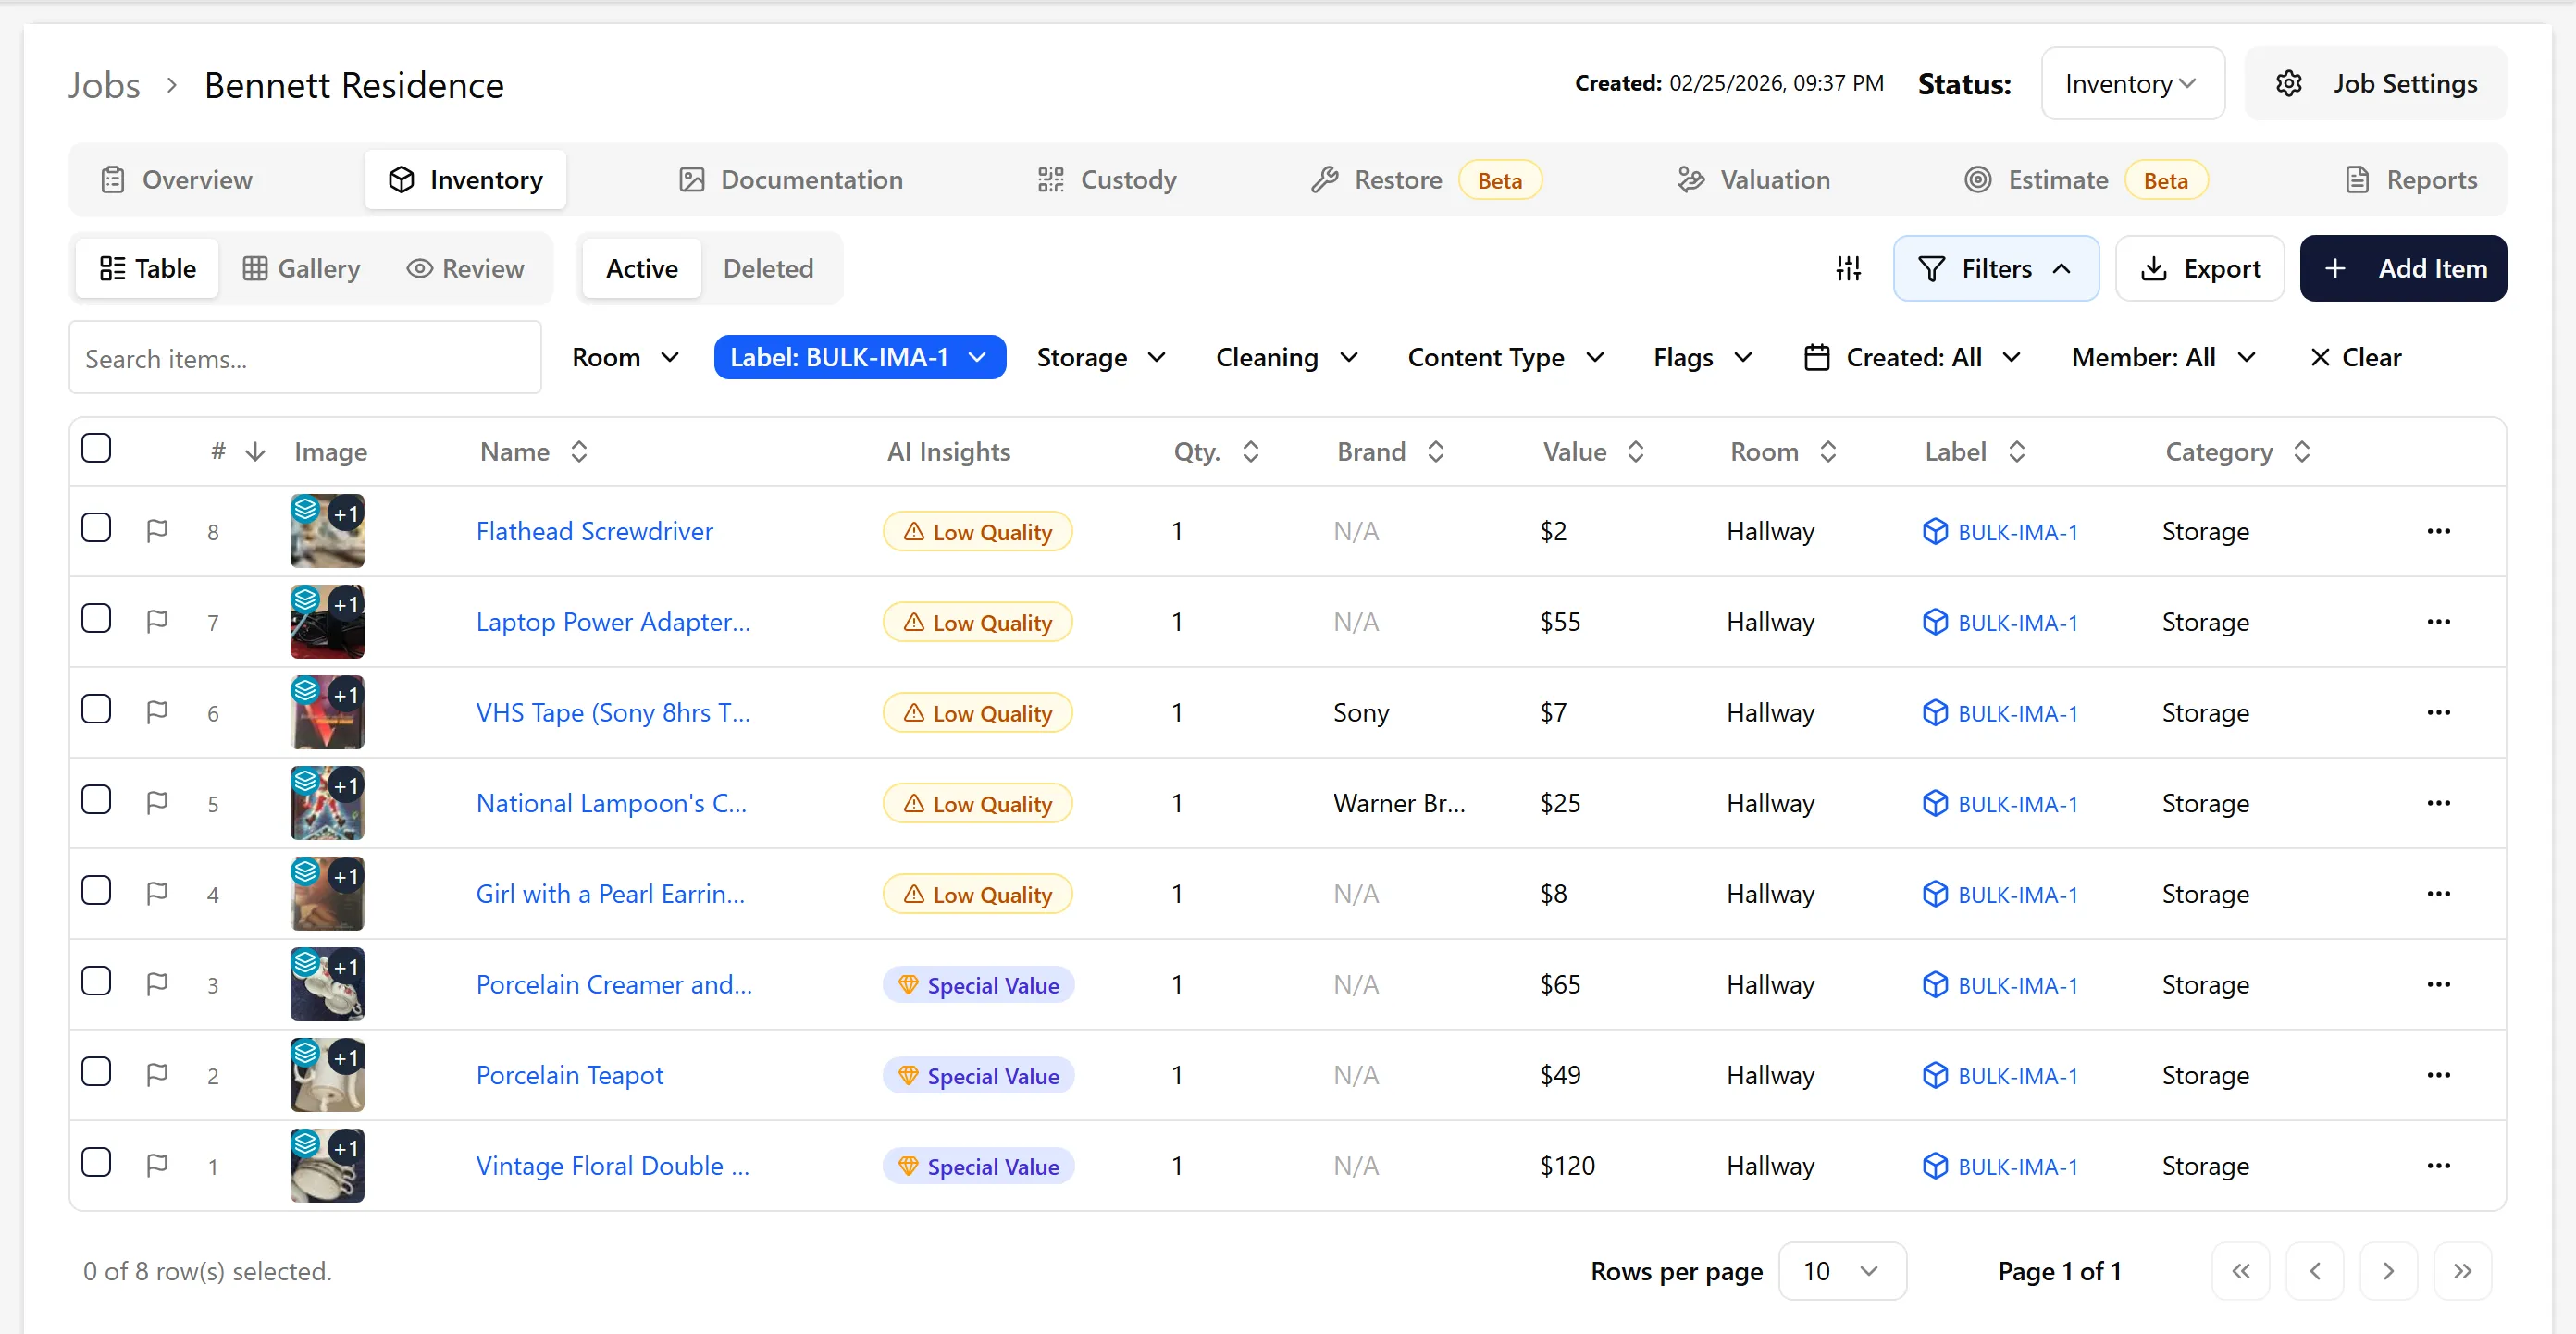
| Go To Inventory | Opens the Inventory tab filtered to show only items on this label |
| Sync Items to Label | Updates item rooms to match the label’s room assignment |
| Clear All Items | Removes all items from this label (items are not deleted) |
| Delete Label | Permanently deletes the label |
Go To Inventory (filtered view)
Section titled “Go To Inventory (filtered view)”When you click Go To Inventory, the Inventory tab opens with a filter applied showing only the items associated with that label — making it easy to review or edit those specific items.
8. Print Labels
Section titled “8. Print Labels”Click the Print button and choose:
-
Print All Labels — Print every label in the current view
-
Print Selected Labels — Print only the rows you’ve checked
-
Print Range — Enter a start and end row number to print a consecutive range
-
Pick List — A printable PDF checklist of the checked labels (or all labels, if none are checked), sorted by storage location, with each label’s items and a Picked box. Use it to pull a customer’s boxes from several vaults. See Pick List in Reports Overview
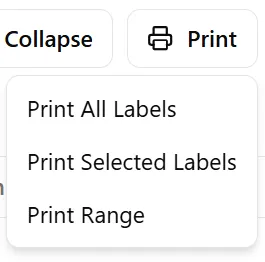
To change what each printed label says (for example, to drop the organization name or print the customer name instead of the job name), click Customize in the print dialog. See Choose What Each Label Says (Customize Label) in How to Print Labels.
9. Export to Spreadsheet or CSV
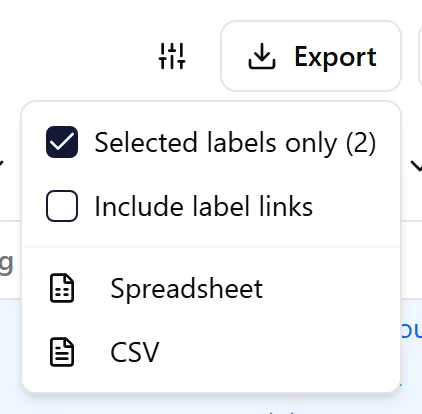
Section titled “9. Export to Spreadsheet or CSV”Click the Export button to download the current (filtered) label list. If you’ve selected rows, tick Selected labels only to export just those; tick Include label links to add a link to each label.
-
Spreadsheet — Downloads an Excel-compatible file
-
CSV — Downloads a plain comma-separated file
The export includes: Label Name, Label ID, Type, Storage Status, Storage (category), Cleaning Category, Items, Room, Location, and Xactimate code.
10. Bulk Actions (Select Multiple Labels)
Section titled “10. Bulk Actions (Select Multiple Labels)”Check the box on one or more rows (or check the header to select all). Once rows are selected, an Edit Labels (N) button appears.
From there you can:
-
Delete Labels — Delete all selected labels at once
-
Batch Edit — Change status, category, room, type, or location across all selected labels; selecting a grouping label updates the labels in its group too
-
Group Labels — Put the selected labels in a group (see Grouping Labels Together above)
-
Move to Job — Move the selected labels, and their items, to another job; room information doesn’t move, so they arrive with no room
✅ Best Practices
Section titled “✅ Best Practices”-
Name labels with a consistent prefix — Using a prefix like
BOX-orHALL-makes it easy to sort and search labels later. Set a default prefix for your whole organization under Organization → Settings → General (in the Labels section) so it’s pre-filled every time. -
Create labels in batches — Enter a quantity like
20to create a numbered series all at once, rather than one at a time. -
Assign rooms when creating labels — This helps the mobile team know where to scan items and avoids room mismatches later.
-
Use the Location tab to verify where a box currently is and confirm its full movement history.
-
Export before and after storage — A CSV export gives you a snapshot of all labels and their locations at any point in time.
🧩 Troubleshooting
Section titled “🧩 Troubleshooting”A label shows a room mismatch warning (⚠️ triangle icon): One or more items inside the label are assigned to a different room than the label itself. Click the warning icon or use Sync Items to Label from the row actions menu to align them.
The Location column shows “Loading…”: Location data is fetched in the background after the page loads. Wait a moment and it will fill in automatically.
I can’t find a label I just created: Check if any filters are active — a Clear button appears next to the filters if so (on smaller screens, the Filters button is highlighted blue). Click Clear to reset all filters.
A label shows “No items” but I know items were scanned into it: The item association may have been cleared. Use Go To Inventory with the label filter in the Inventory tab to investigate.