
Bulk Image Upload
Esta página aún no está disponible en tu idioma.
This guide explains how to use the Bulk Image Upload feature to quickly create inventory items by uploading multiple photos at once from your computer.
When to Use This
Section titled “When to Use This”Use Bulk Image Upload when you want to:
-
Add a large number of items to a job at once
-
Upload photos taken outside the app (e.g., from a camera or phone gallery)
-
Quickly populate inventory from existing photos without adding items one at a time
Step 1: Open Bulk Image Upload
Section titled “Step 1: Open Bulk Image Upload”-
Open your job in the web app
-
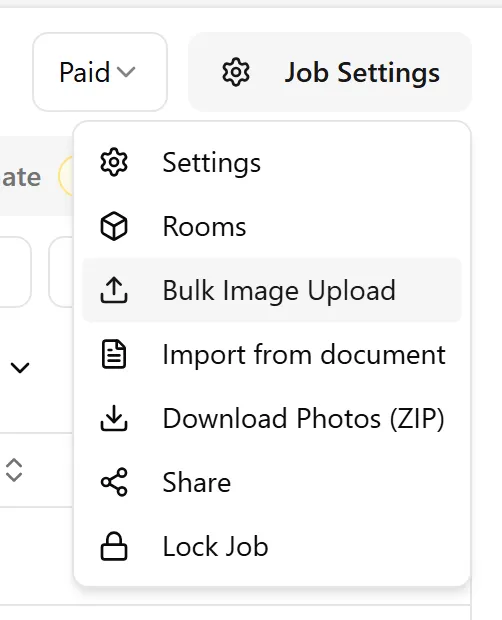
Click Job Settings in the top-right corner
-
Select Bulk Image Upload
(The job must be unlocked — if it’s locked, unlock it first and the option will appear.)
Step 2: Add Your Images
Section titled “Step 2: Add Your Images”-
Drag and drop image files into the upload area, or click it to browse your computer
-
You can also drag & drop whole folders — every image inside is added (handy when your photos are organized into per-room folders; see Room below)
-
You can add files in multiple batches — they will accumulate in the list
-
The dialog shows your current file count and total size
Supported formats: JPG, JPEG, PNG, WEBP, HEIC, HEIF, GIF
Limits:
-
Up to 5,000 images per upload session
-
Maximum 3 GB total file size — you may hit this limit before reaching 5,000 files depending on image sizes
-
Each image must be at least 100 × 100 pixels — smaller images are skipped
Any files that are skipped (unsupported format, too small, or unreadable) are listed in the dialog with the reason, and you can download the list.
Step 3: Configure Upload Settings
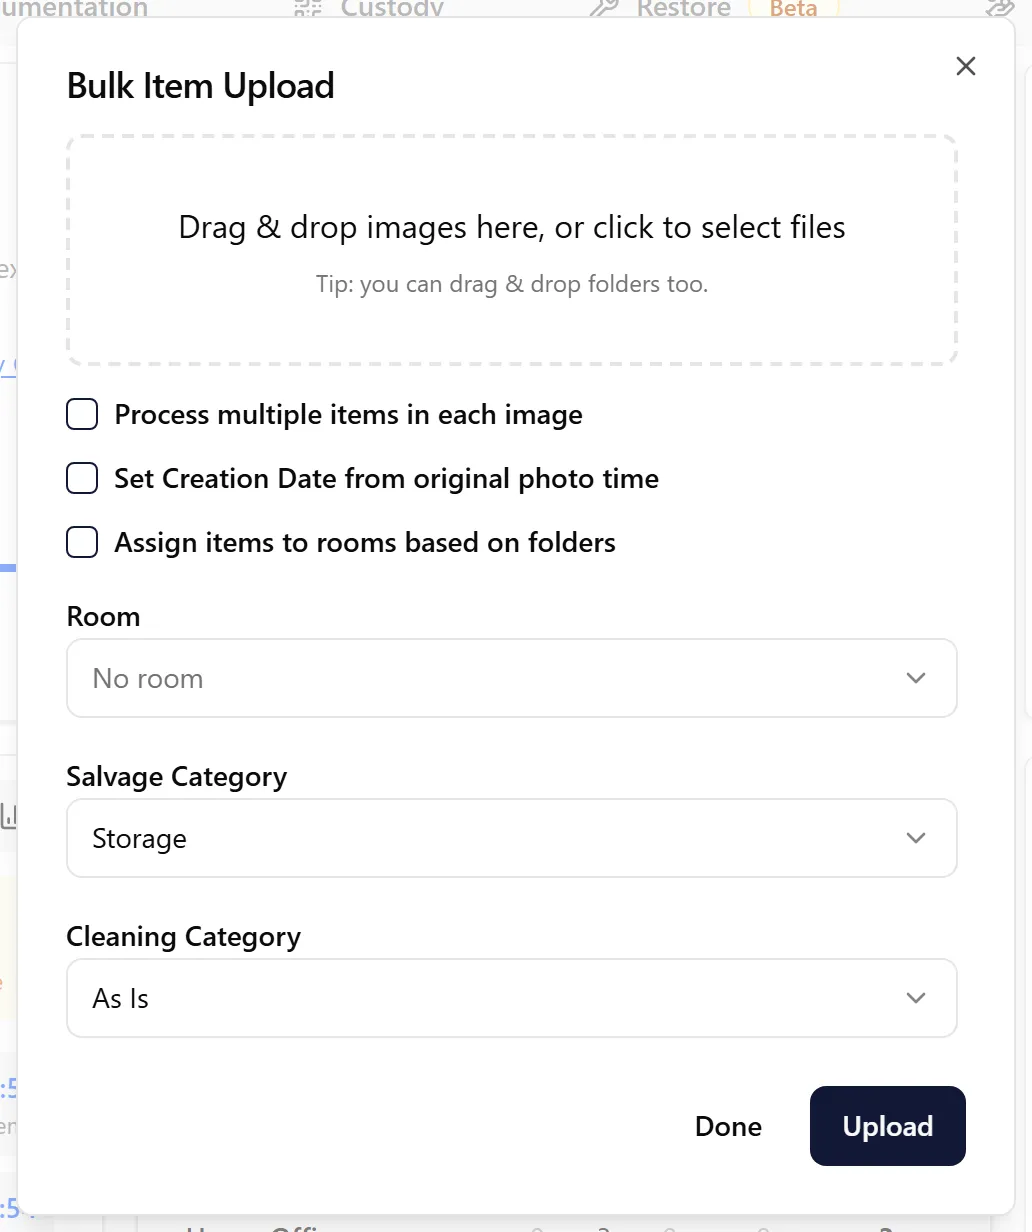
Section titled “Step 3: Configure Upload Settings”Before uploading, configure the following settings that will apply to all items created in this batch:
Processing Mode
Section titled “Processing Mode”-
Single Item Mode (default) — AI identifies one main item per photo. Use this when each photo focuses on a single object.
-
Multiple Items Mode — Check “Process multiple items in each image” to have AI detect and split multiple objects from each photo into separate inventory items. Use this for wide shots or room overview photos that contain several items.
Select a room from the dropdown to assign all uploaded items to that room, or choose New Room to create one. If no room is selected (No room), items will be unassigned.
Assign items to rooms based on folders
Section titled “Assign items to rooms based on folders”If your photos are organized into folders — one folder per room — check “Assign items to rooms based on folders” to place each item in a room named after the folder it came from. When enabled, the single Room dropdown is replaced by a preview of the rooms that will be used.
-
Each photo is assigned to a room named after the folder directly containing it (for example, a photo in a
Master Bedroomfolder goes to the “Master Bedroom” room) -
Folder names are matched to your existing rooms (ignoring case); any that don’t exist yet are created automatically
-
The preview lists each folder with its photo count, marks each room as existing or new, and shows how many new rooms will be created — review this before uploading
-
Photos that aren’t inside a folder are left unassigned
You can pick a folder with the browse button or drag & drop one or more folders into the upload area.
Original Photo Date
Section titled “Original Photo Date”Check “Set Creation Date from original photo time” to give each item the date and time the photo was originally taken, instead of the time of upload.
Salvage Category
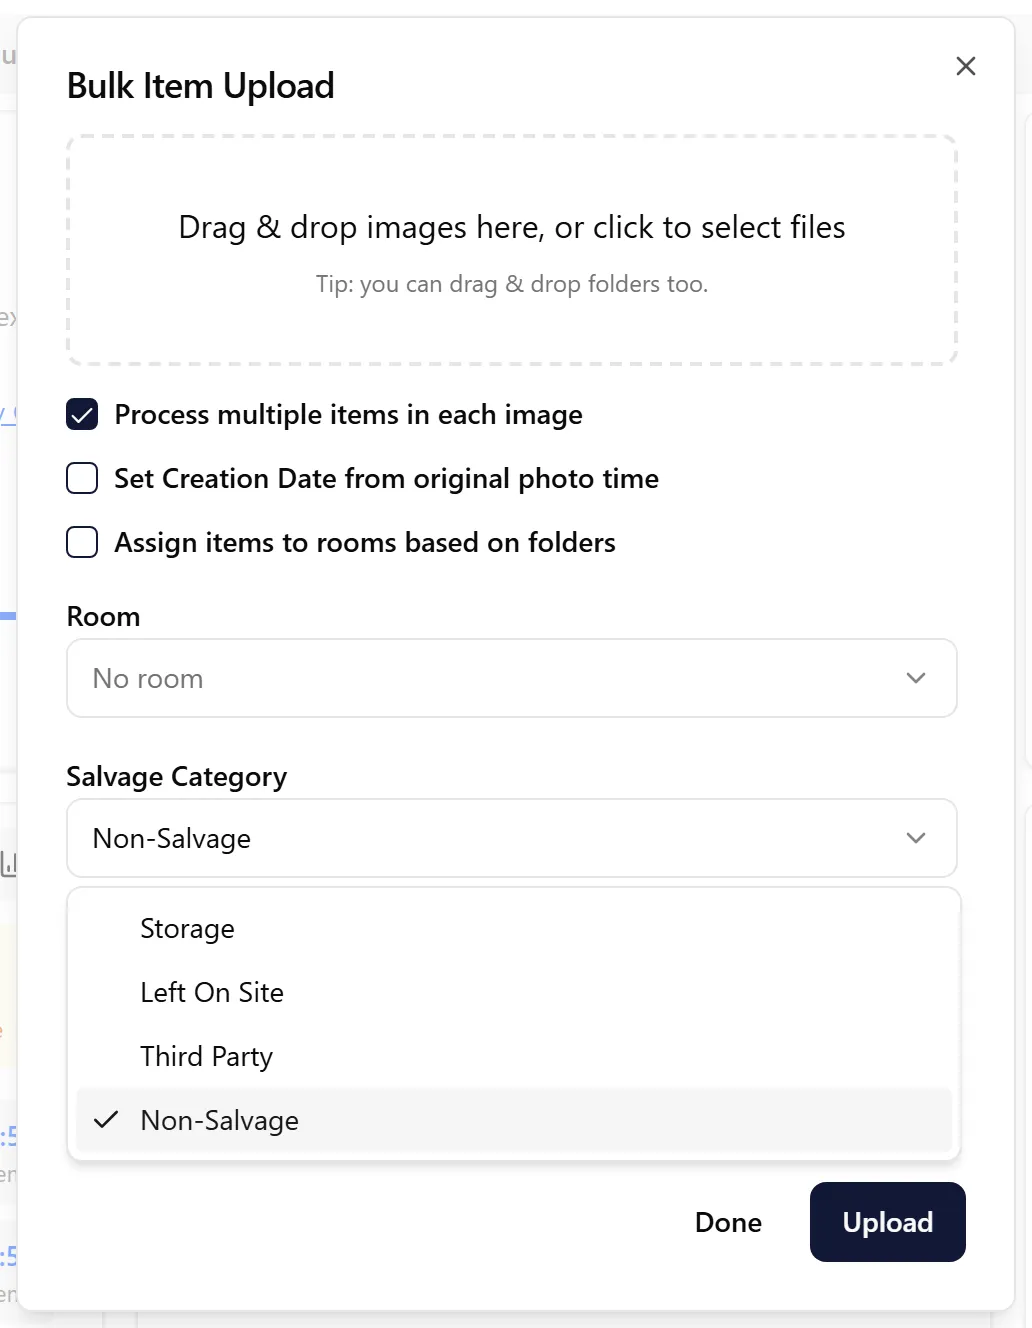
Section titled “Salvage Category”Choose a salvage category for all items in this batch: Storage, Left On Site, Third Party, or Non-Salvage.
Cleaning Category
Section titled “Cleaning Category”Set the cleaning category for all items: As Is (default), Needs Cleaning, Biohazard, or Unknown.
(For insurance adjuster organizations, the Salvage Category and Cleaning Category options are not shown.)
Step 4: Upload
Section titled “Step 4: Upload”-
Review your files and settings
-
Click Upload
-
A progress overlay will appear showing:
-
Number of items processed out of total
-
Percentage complete
-
Elapsed time and estimated time remaining
-
The file currently being processed
-
-
Do not close the dialog while the upload is in progress
Step 5: AI Identification
Section titled “Step 5: AI Identification”Once all images are uploaded:
-
AI identification automatically begins in the background
-
You will see a confirmation message when the upload is complete
-
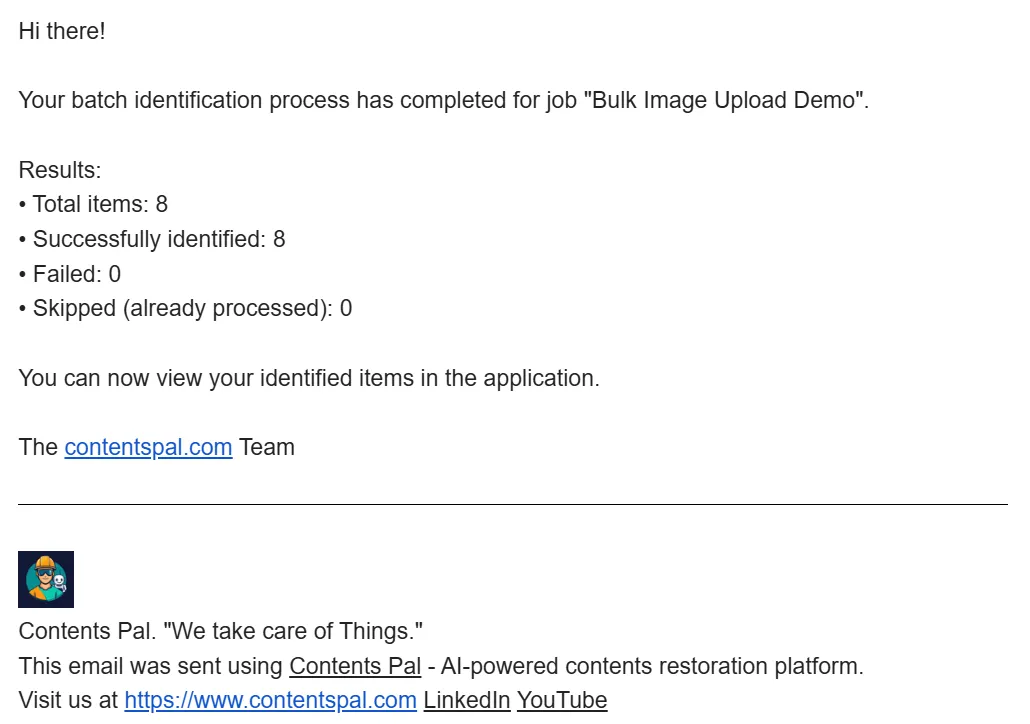
You will receive an email notification when AI processing finishes, with a summary of the results including total items processed, successfully identified, and any failures
-
If you enabled Multiple Items Mode, each uploaded photo may produce several inventory items as AI detects individual objects
Step 6: Review Your Items
Section titled “Step 6: Review Your Items”After processing completes:
-
Go to your job’s inventory view
-
Review the newly created items
-
Items will appear with AI-generated names, descriptions, and pricing
-
Edit any items that need corrections — update names, descriptions, rooms, or categories as needed
Tips for Best Results
Section titled “Tips for Best Results”Before uploading:
-
Remove blurry or duplicate photos beforehand
-
Organize photos into one folder per room, then enable “Assign items to rooms based on folders” to place items in the right rooms in a single upload (rooms are created automatically as needed)
-
Use clear, well-lit photos for better AI identification
Choosing the right processing mode:
-
Use Single Item Mode for close-up photos of individual items
-
Use Multiple Items Mode for wide-angle shots, shelves, or room overviews where multiple items are visible
Working with large batches:
-
For very large jobs, consider uploading in batches by room to keep items organized
-
Assign the room and salvage category during upload to save time on manual edits later
Troubleshooting
Section titled “Troubleshooting”Q: My files were rejected during drop A: Check that your files are in a supported format (JPG, JPEG, PNG, WEBP, HEIC, HEIF, GIF) and at least 100 × 100 pixels. Other file types are not accepted. If files couldn’t be read, extract them from any ZIP file first, and make sure files stored in iCloud or OneDrive are downloaded to your computer.
Q: I hit the file or size limit A: Upload in multiple rounds. Complete one batch, then open the dialog again for the next set of images.
Q: AI didn’t identify items correctly A: AI results can be edited. Open any item and update its name, description, or other details manually.
Q: I uploaded photos but don’t see new items A: AI processing runs in the background and may take a few minutes. Wait for the email notification, then refresh the page.
Q: My items were uploaded but not identified A: If your organization has reached its monthly AI identification limit, the items are still created but AI identification doesn’t run. You can identify them manually or upgrade for a higher limit.
Q: Can I cancel an upload in progress? A: You cannot cancel mid-upload. Wait for the current batch to finish processing.
Q: Can I upload more photos to a job that already has items? A: Yes. Open Bulk Image Upload again and add the new photos. Each upload only adds new items — the items already in the job are never changed or replaced.
Q: I uploaded in Single Item Mode, but some photos show several items A: You don’t need to upload them again. Open the item in the web app and use Analyze Image → Multiple Items in its Photos section, or re-identify several items at once from the Inventory table. See How do you run Multi-Mode after you’ve already taken a picture?.
Need Help?
Section titled “Need Help?”If you encounter issues:
-
Go to Help and Support in the sidebar
-
Visit our support portal: https://support.contentspal.com
-
Use the chat widget for further support
Last Updated: September 2026