
Add Non-Salvageable Items
Esta página aún no está disponible en tu idioma.
This article explains how to add non-salvageable items (damaged beyond repair or disposal items) on ContentsPal.
🧭 Summary
Section titled “🧭 Summary”Non-Salvageable Mode is a specialized capture mode for documenting items that are damaged beyond repair, contaminated, or designated for disposal. These items are tracked separately from salvageable inventory and generate their own dedicated reports. The mode features a distinctive red interface to help teams quickly identify which items cannot be restored.
⚙️ Prerequisites
Section titled “⚙️ Prerequisites”-
A job must be created before adding non-salvageable items
-
Camera permissions enabled on mobile device
-
(Optional) Printed QR labels for boxes or disposal containers
🚀 Step-by-Step Instructions
Section titled “🚀 Step-by-Step Instructions”1. Enter Non-Salvageable Mode
Section titled “1. Enter Non-Salvageable Mode”-
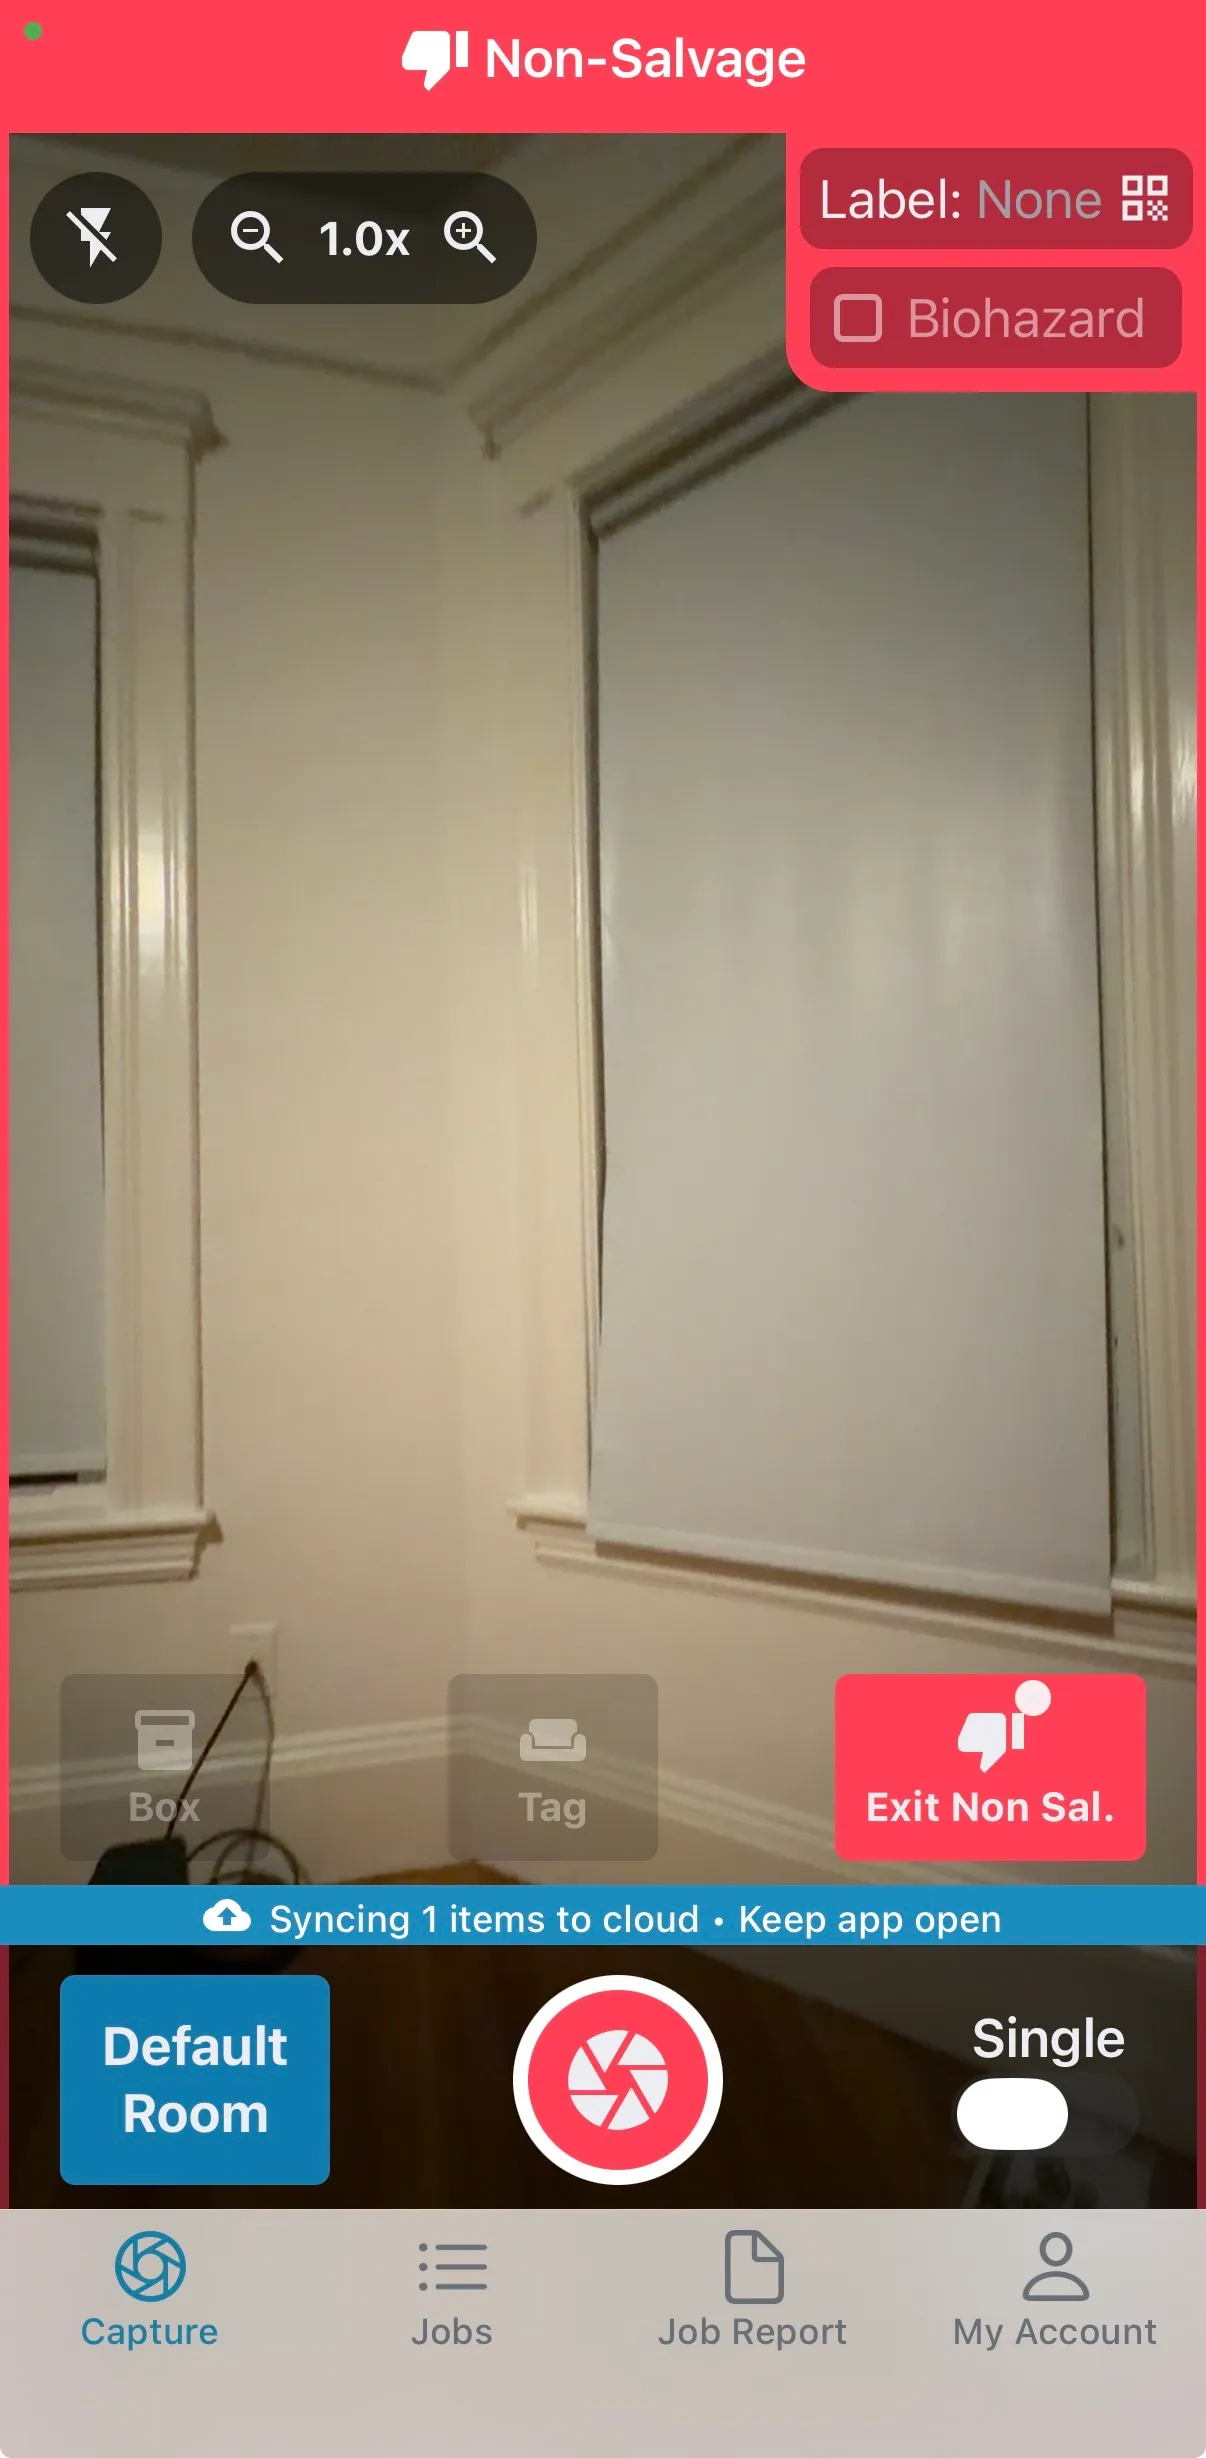
On the camera screen, tap the Non Sal. button at the bottom
-
The interface turns red with a thumbs-down icon to indicate non-salvageable mode
-
The status bar displays “Non-Salvage” to confirm you’re in the correct mode
2. Capture Non-Salvageable Items
Section titled “2. Capture Non-Salvageable Items”-
Take a photo of the damaged or disposal item
-
The app automatically marks the item as non-salvageable
-
After capturing, the app stays in non-sal mode for continuous shooting
-
Take photos of additional non-salvageable items without re-entering the mode
What to photograph:
-
Items damaged beyond repair (water damage, fire damage, broken furniture)
-
Contaminated items requiring disposal
-
Items with biohazard concerns
-
Rubbish or debris from the site
3. Add Optional Labels (Recommended)
Section titled “3. Add Optional Labels (Recommended)”While in non-sal mode, you can optionally assign labels to track disposal:
Option 1: Scan a QR Label
-
Tap Label in the top overlay
-
Scan the QR code to link the item to a tag or disposal container
Option 2: Select or Create a Label
-
Tap Label, then Select / Create Label
-
Type to search the job’s existing labels, or tap Create new label to use your own text
-
Tap Make New for an automatic label name
-
Useful for tracking grouped disposal items
4. Mark Biohazard Items (If Needed)
Section titled “4. Mark Biohazard Items (If Needed)”For contaminated or biohazard items:
-
Toggle the Biohazard checkbox in the top overlay (it becomes available after you capture the item)
-
This marks the item as requiring special handling
-
Biohazard items require special handling and disposal procedures
-
Clearly visible in reports for proper safety protocols
5. Exit Non-Salvageable Mode
Section titled “5. Exit Non-Salvageable Mode”-
Tap the Exit Non Sal. button when finished
-
The interface returns to normal color
-
The app returns to regular mode for salvageable items
📋 Non-Salvageable vs. Regular Items
Section titled “📋 Non-Salvageable vs. Regular Items”Understanding the key differences:
| Non-Salvageable Items | Regular (Salvageable) Items |
|---|---|
| Damaged beyond repair or disposal items | Items that can be cleaned, restored, or stored |
| Red interface with thumbs-down icon | Blue (tag) or green (box) interface |
| Tracked separately in dedicated reports | Part of main inventory reports |
| Excluded from standard inventory lists | Included in inventory lists by default |
| Cannot be added to boxes | Can be boxed or tagged |
| AI identification and pricing for the claim | Full AI identification and pricing |
When to use Non-Salvageable Mode:
-
Water-damaged furniture beyond repair
-
Fire-damaged items with smoke contamination
-
Broken or shattered items
-
Moldy or contaminated materials
-
General debris and rubbish
-
Biohazard or health-hazardous items
When to use Regular Mode:
-
Items that can be cleaned
-
Items for storage
-
Items needing restoration
-
Items in good condition
📊 Non-Salvageable Reporting
Section titled “📊 Non-Salvageable Reporting”Non-salvageable items are tracked and reported separately:
Dedicated Non-Salvage Report
Section titled “Dedicated Non-Salvage Report”-
Separate PDF report specifically for non-salvageable items
-
Organized by room and label
-
Shows photos, descriptions, quantities
-
Includes biohazard indicators
-
Provides complete disposal documentation
Job Metrics
Section titled “Job Metrics”-
Non-salvage count displayed in job dashboard
-
Tracked separately from salvageable inventory count
-
Helps calculate total job scope
-
Useful for insurance documentation
Report Filtering
Section titled “Report Filtering”-
Inventory List Reports: Exclude non-salvageable items by default
-
Non-Salvage Reports: Show ONLY non-salvageable items
-
Policyholder Reports: Include only non-salvage items for transparency
🔐 Policyholder Disposal Approval
Section titled “🔐 Policyholder Disposal Approval”When a job contains non-salvageable items, you can request formal approval from the policyholder before disposing of these items. This provides transparency and documentation for the disposal process.
Requesting Disposal Approval
Section titled “Requesting Disposal Approval”In the web app, open the job’s Overview tab. When non-salvageable items are present:
-
Locate the Approval Action
- Under Quick Actions, a Request Non Salvageable Disposal Approval row appears when the job has non-salvageable items
-
Send Approval Request
-
Click Request Non Salvageable Disposal Approval
-
A dialog opens allowing you to send an email to the policyholder
-
The email includes a link to view the non-salvageable items report
-
Policyholder receives details about items marked for disposal
-
-
Track Approval Status
-
After sending, the row shows Non Salvageable Disposal Approval Sent
-
Click Resend → to send the approval request again if needed
-
Once approved by the policyholder, the row turns green showing Inventory Approved with the approval date, and a View → link to the approved report
-
Resetting Approval Status
Section titled “Resetting Approval Status”If you need to modify the non-salvageable items list or resend the approval request after it’s been approved:
-
Locate the Reset Button
-
On the green Inventory Approved row, look for the Reset button
-
The button appears next to the approval status message
-
-
Reset the Approval
-
Click Reset
-
Confirm by clicking Reset Approval in the dialog
-
This clears the current approval status and allows you to send a new request
-
-
After Reset
-
The row returns to Request Non Salvageable Disposal Approval
-
Make any needed changes to the non-salvageable items
-
Send a new approval request to the policyholder
-
Policyholder will need to approve again with the updated information
-
-
Additional non-salvageable items were discovered after initial approval
-
Items previously marked for disposal can now be salvaged
-
Policyholder needs to review updated disposal list
-
Disposal scope has significantly changed
🎯 Working with Boxes in Non-Sal Mode
Section titled “🎯 Working with Boxes in Non-Sal Mode”Important: You cannot use Box Mode and Non-Sal Mode simultaneously. However, you can:
-
Use Multimode within Non-Sal Mode
-
Take one photo showing multiple disposal items
-
AI automatically identifies each item separately
-
Faster for documenting large amounts of debris
-
-
Label Non-Salvageable Items to Containers
-
Assign a label/tag to disposal containers
-
Group multiple non-salvageable items under one tag
-
Track what disposal bins or containers hold
-
-
Switch Between Modes
-
Document salvageable items in Box/Tag mode
-
Switch to Non-Sal mode for damaged items
-
Each mode is independent and exclusive
-
✅ Best Practices
Section titled “✅ Best Practices”-
Enter Non-Sal mode at the start when you know items are damaged
-
Look for the red interface to confirm you’re in the right mode
-
Document clearly - even disposal items need good photos for insurance
-
Use biohazard marking for contaminated items requiring special handling
-
Label disposal containers to track what was removed from the site
-
Take before and after photos of damaged areas
-
Review non-salvage reports before finalizing the job
-
Stay in continuous mode to quickly document multiple damaged items
🧩 Troubleshooting
Section titled “🧩 Troubleshooting”Can’t find Non-Sal button:
-
Ensure you’re on the camera screen (not inventory or reports)
-
Check that you have an active job selected
-
Non-Sal button is located at the bottom with Box and Tag buttons
Interface isn’t turning red:
-
Confirm you tapped the Non Sal. button (not Tag or Box)
-
The top bar should show a red background with thumbs-down icon
-
Try exiting and re-entering the mode
Can’t add items to boxes while in Non-Sal mode:
-
This is expected behavior - Box and Non-Sal modes are mutually exclusive
-
Exit Non-Sal mode to use Box mode
-
Use labels instead to group non-salvageable items
Biohazard checkbox not visible:
-
Look in the top overlay notch area (below the red status bar)
-
Scroll or adjust view if the overlay is partially hidden
-
The checkbox appears as “Biohazard” with a toggle
🔑 Key Takeaways
Section titled “🔑 Key Takeaways”-
Non-Salvageable Mode is for items damaged beyond repair or marked for disposal
-
Red interface with thumbs-down icon clearly identifies the mode
-
Items are tracked separately and excluded from standard inventory reports
-
Optional labeling helps document and track disposed items
-
Biohazard marking ensures proper handling of contaminated materials
-
Continuous shooting mode allows rapid documentation of multiple damaged items
-
Dedicated Non-Salvage Reports provide complete disposal documentation
-
Request policyholder approval for disposal via email with detailed item reports
-
Reset approval status if disposal list changes after initial approval
-
Approval tracking provides transparency and documentation for disposal decisions
-
Cannot be combined with Box Mode, but can use Multimode for efficiency