
🏷️ How to Print Labels
Esta página aún no está disponible en tu idioma.
Print QR code labels for your inventory items directly from ContentsPal — on web or mobile. You can print labels for all items in a job, a specific selection, or a custom range — on a variety of sticker sheet and single-label thermal printer formats.
🧭 Summary
Section titled “🧭 Summary”ContentsPal lets you generate and print QR code labels from any job’s Custody tab on both the web portal and the mobile app. Each label includes a QR code linked to the item, along with details like the job name, item name, item type, and room.
You can choose from over a dozen built-in label layouts, organized into tabs so you can quickly find the stock you have on hand:
-
US (Letter) — Avery and ULINE sheets on US Letter paper
-
EU (A4) — Avery A4 sheets (L7160, L7163, L7164, L7162)
-
Rolling — single-label thermal formats for roll printers (Zebra ZSB series, Brother QL-810W)
-
Custom — define your own sheet (page size, columns, rows, label size, gaps, and margins) with a live preview
The same layouts are available on web and mobile, so you can use either device interchangeably. (Choosing which fields print on each label is done on the web portal.)
There are three ways to print:
-
Print All Labels — prints every label in the current view
-
Print Selected Labels — prints only the labels you’ve checked off
-
Print Range — prints a specific range of labels by position
You can also print a single label — on web from the label’s ⋯ row menu (Print Label) or the Print label button in its details dialog, and on mobile from the label’s detail screen.
⚙️ Prerequisites
Section titled “⚙️ Prerequisites”-
Access to a ContentsPal job with inventory items
-
A printer loaded with compatible labels (US Letter or EU A4 Avery sheets, ULINE sheets, a single-label thermal roll, or your own custom sheet — see supported layouts below)
-
Web: a modern browser (Chrome, Edge, or Safari recommended)
-
Mobile: the ContentsPal mobile app (iOS or Android) connected to a printer through the system print dialog (AirPrint on iOS, Default Print Service on Android)
🖨️ Which Printer Should I Use?
Section titled “🖨️ Which Printer Should I Use?”Any label printer works, as long as it takes a sheet or roll size ContentsPal prints (see the layouts below). Printers our customers use include:
-
Brother QL-810W
-
Zebra ZSB DP14 or Zebra GK420D
-
Jadens JD268BT
-
Westinghouse WHTP203e
A regular office printer with Avery or ULINE sticker sheets works too.
🚀 Step-by-Step Instructions (Web)
Section titled “🚀 Step-by-Step Instructions (Web)”1. Open the Custody Tab
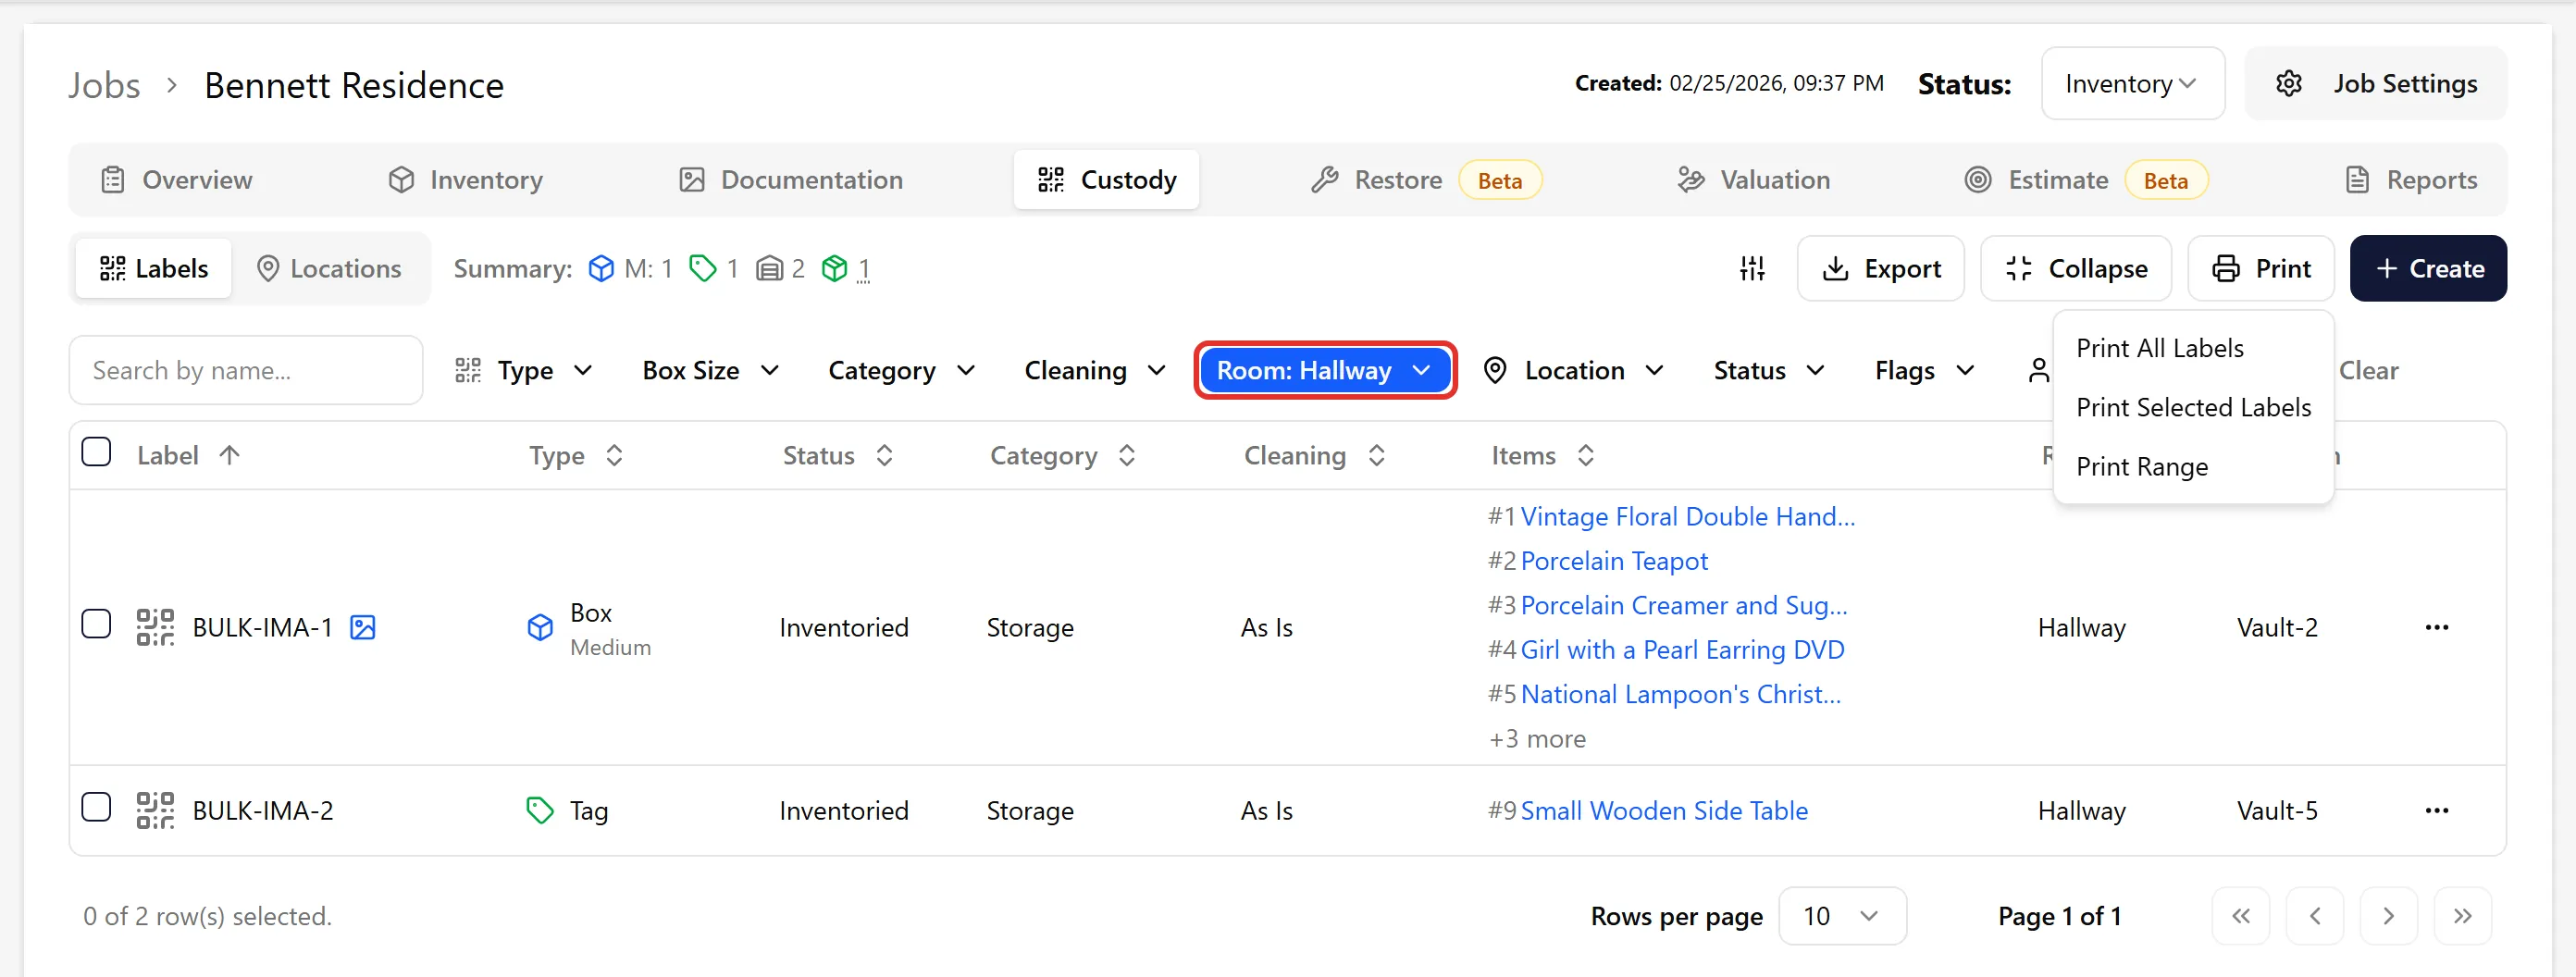
Section titled “1. Open the Custody Tab”Navigate to Jobs, then open the job you want to print labels for. Click on the Custody tab to see the list of labels.
2. Choose a Print Option
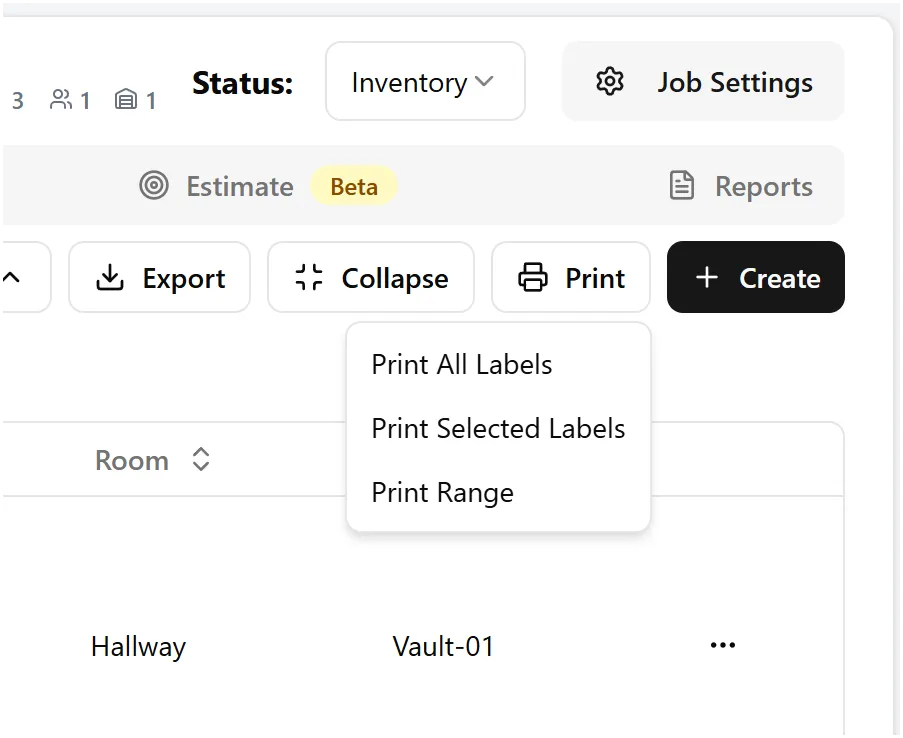
Section titled “2. Choose a Print Option”Click the Print button in the toolbar above the custody table. A dropdown menu appears with three options:
Print All Labels
Section titled “Print All Labels”Prints labels for every item currently visible in the table. If you have filters applied, only the filtered items will be printed.
Print Selected Labels
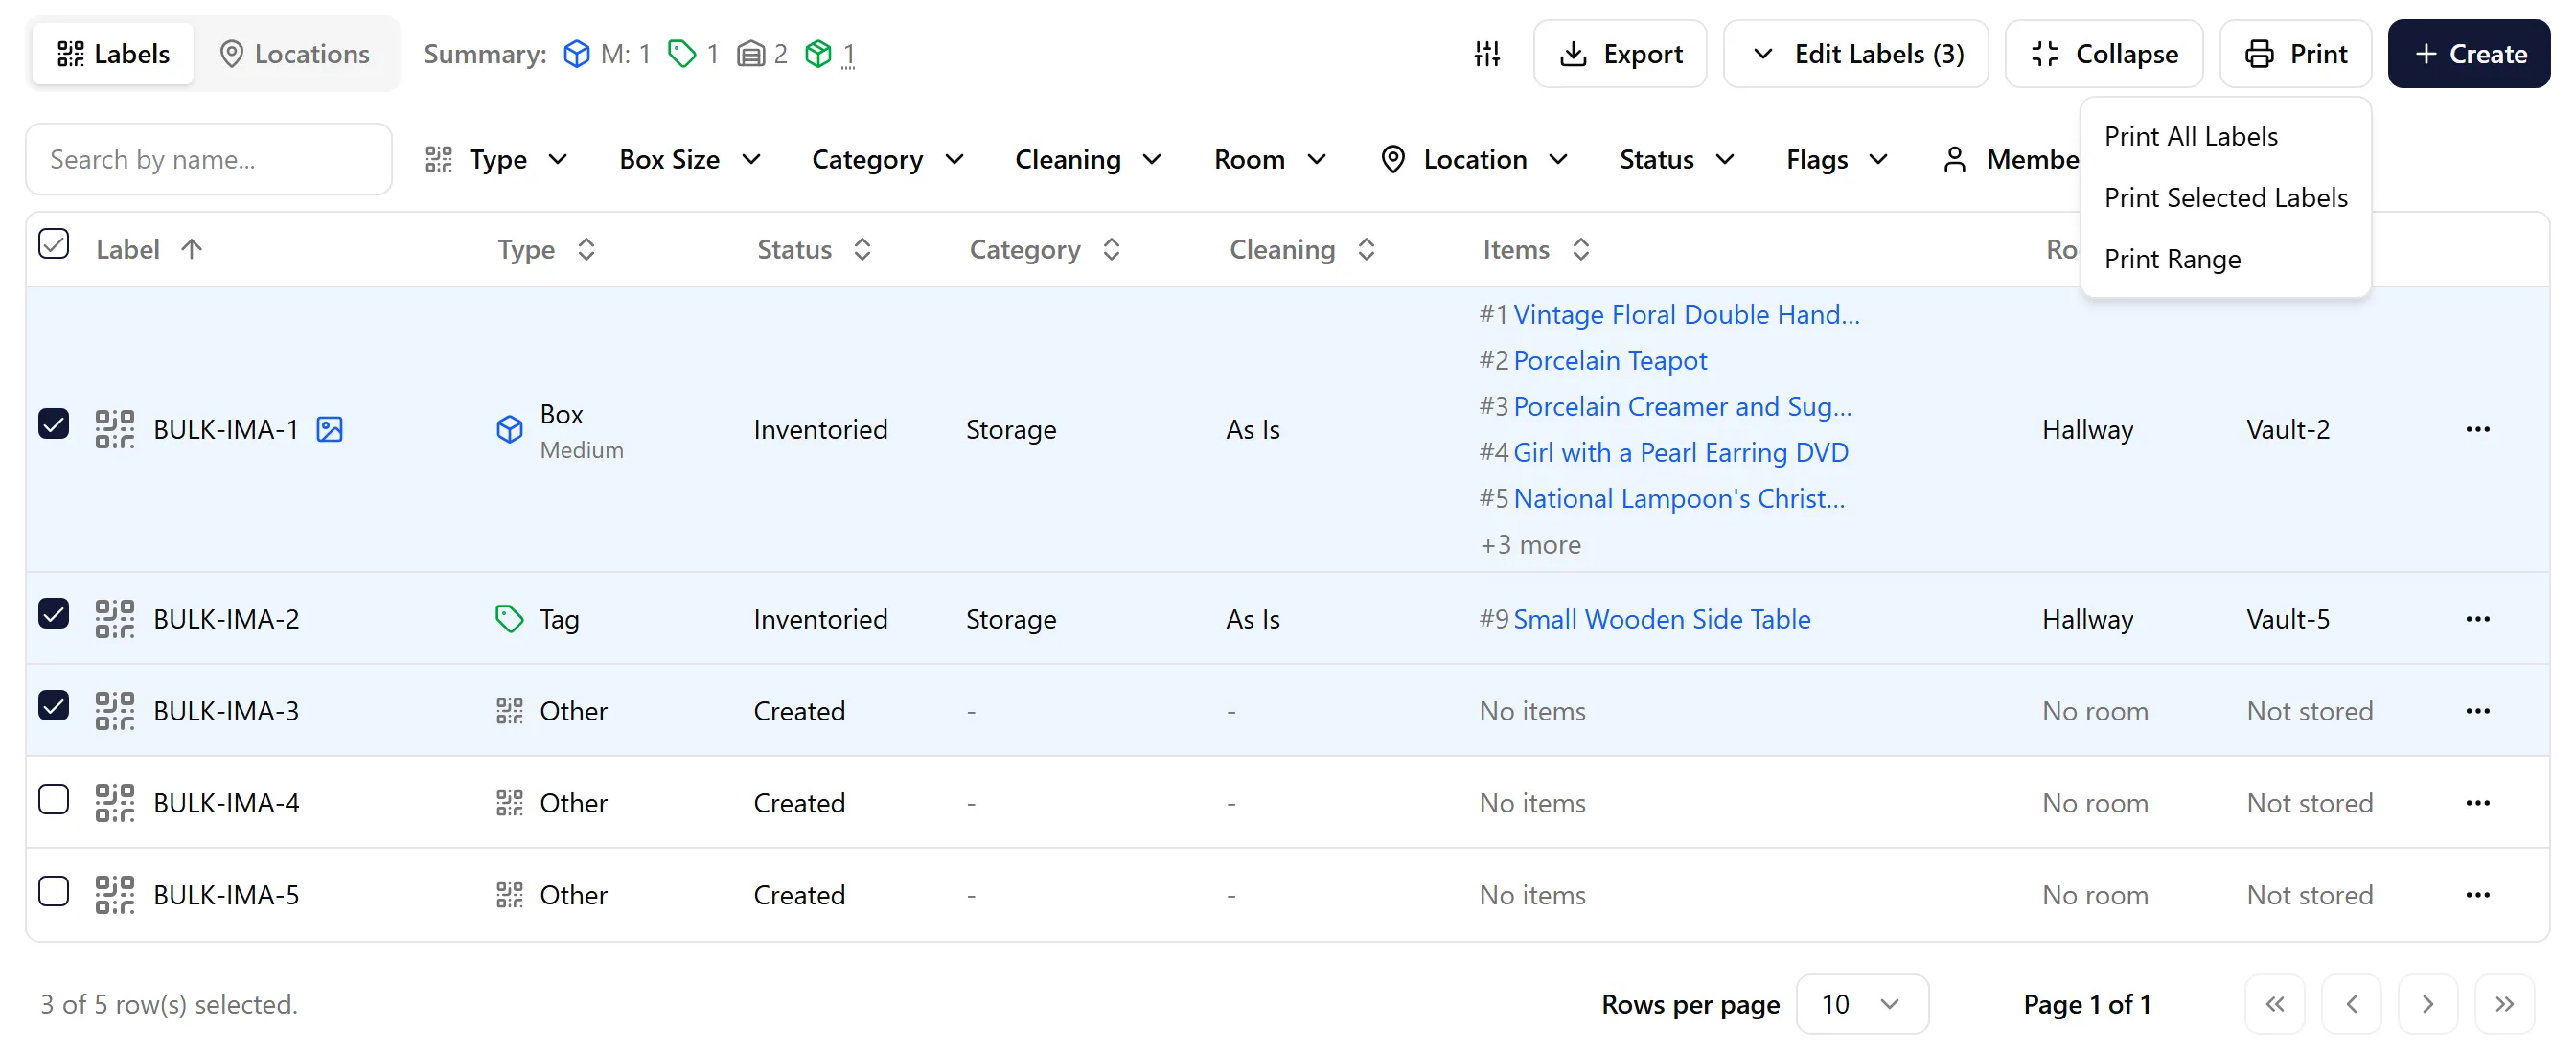
Section titled “Print Selected Labels”First, check the boxes next to the items you want to print. Then choose Print Selected Labels to print only those specific items.
Print Range
Section titled “Print Range”Opens a separate dialog where you can enter a First Index and Last Index to print a consecutive range of labels. This is useful when you need to reprint a specific section.
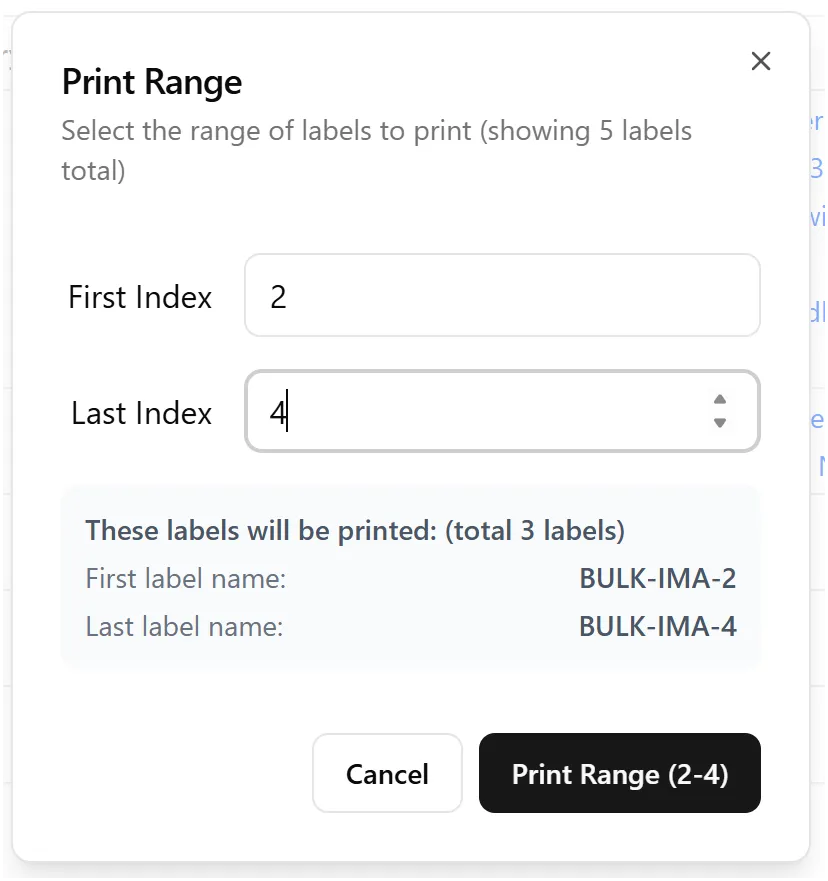
First Index and Last Index are positions in the label list — not the numbers printed on the labels. On most jobs the two match, but if a label was named differently from the rest (a typo, a different prefix, or extra spacing) it sorts out of sequence and shifts the positions of everything after it. If your labels use more than one prefix, tick Use prefix and pick the prefix you want, and the positions will match that prefix’s numbering.
3. Select a Label Layout
Section titled “3. Select a Label Layout”After choosing your print option, the Print Labels dialog opens. Here you can pick the sticker layout that matches your label stock.
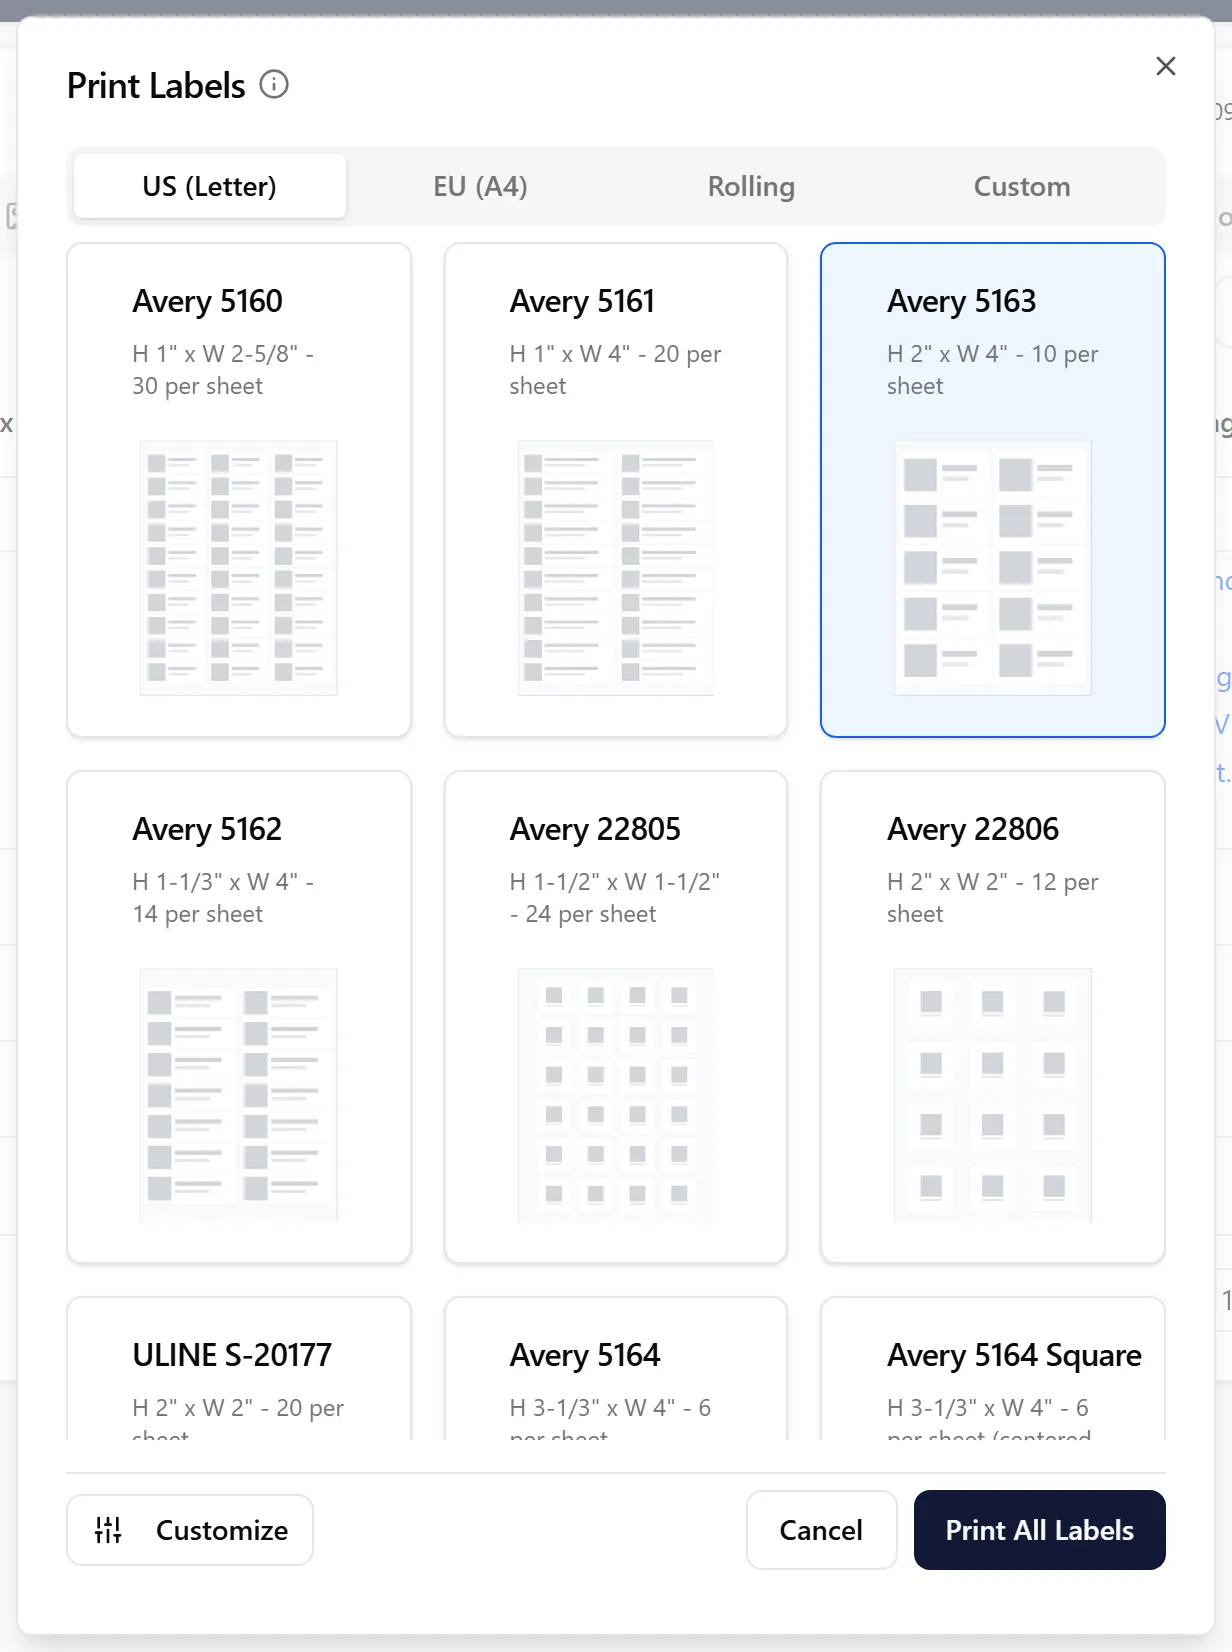
The layouts are split across tabs — US (Letter), EU (A4), Rolling, and Custom. Click a tab to see the sheets in that group, then click a layout card to select it (the selected layout is highlighted in blue). Each layout card shows:
-
The layout name (e.g., Avery 5160 or Avery L7160)
-
The label dimensions and how many labels fit per sheet
-
A visual preview of the label arrangement
Design Your Own Sheet (Custom tab)
Section titled “Design Your Own Sheet (Custom tab)”If your label stock isn’t one of the built-in sheets, open the Custom tab and enter your own parameters:
-
Page size — Letter or A4
-
Units — millimetres or inches (switching units converts the values you’ve already entered)
-
Label style — Wide (QR beside the text) or Square (QR above the text)
-
Columns and Rows — capped automatically to what fits the page for your label size, gaps, and margins
-
Label width / height, Column gap, Row gap, and Page margin
-
QR size — the size of the square QR code within each label. Shrink it to leave more room for the text on small labels (it’s capped to what fits the label)
A live preview updates as you type so you can see how the sheet will look. Your custom settings are saved in the browser (on mobile, on the device), so they’re ready the next time you print.
Choose What Each Label Says (Customize Label)
Section titled “Choose What Each Label Says (Customize Label)”Click the Customize button (sliders icon) at the bottom of the dialog to open Customize Label. The main text is always the label name; you choose what prints in the three other parts:
-
Header — Job Name, Job Number, Customer Name, or Claim Number
-
Secondary line and Footer — Item Name, Item Description, Room Name, Storage Status, Box Size, Salvage Category, Cleaning Category, Organization Name, or Creation Date
Pick Item Name to print the items attached to each label — useful when you reprint labels after cleaning and need to match each label back to its item without looking it up. A tag shows its item; a box lists its items, with a × quantity where there’s more than one, trimmed to fit the label. Item Description prints the first attached item’s description instead, falling back to its name.
A live preview shows a real label as you change the fields, and your choices are saved for the next print.
Example: remove your business name and show your logo
Section titled “Example: remove your business name and show your logo”By default the header prints the Job Name, the secondary line prints the Room Name, and the footer prints your Organization Name. To drop the business name:
-
Click Customize.
-
Set Footer to None. Leave Header on Job Name.
-
Check the preview and click Done. Reset to defaults puts all three parts back.
To put your company logo in the middle of the QR code, an organization admin turns on Use organization logo in QR codes under Organization → Settings → General (in the QR Codes section). The logo comes from Organization → Settings → Details.
What you can’t change:
-
The label name is always the main, largest text. Text sizes are set by each layout, so you can’t enlarge one part. For bigger text overall, pick a larger layout.
-
Customize Label is only on the web portal. Labels printed from the mobile app use the default fields. On mobile, turning on Show label storage status prints the status in place of the organization name.
-
The organization logo in the QR code applies to labels printed from the web portal.
4. Print Your Labels
Section titled “4. Print Your Labels”Click the Print All Labels, Print Selected Labels, or Print Range button at the bottom of the dialog (the button text matches your chosen print option).
A new browser tab will open with your labels laid out and ready to print. Your browser’s print dialog will appear automatically.
Example: Wide Layout Labels (e.g., Avery 5163)
Section titled “Example: Wide Layout Labels (e.g., Avery 5163)”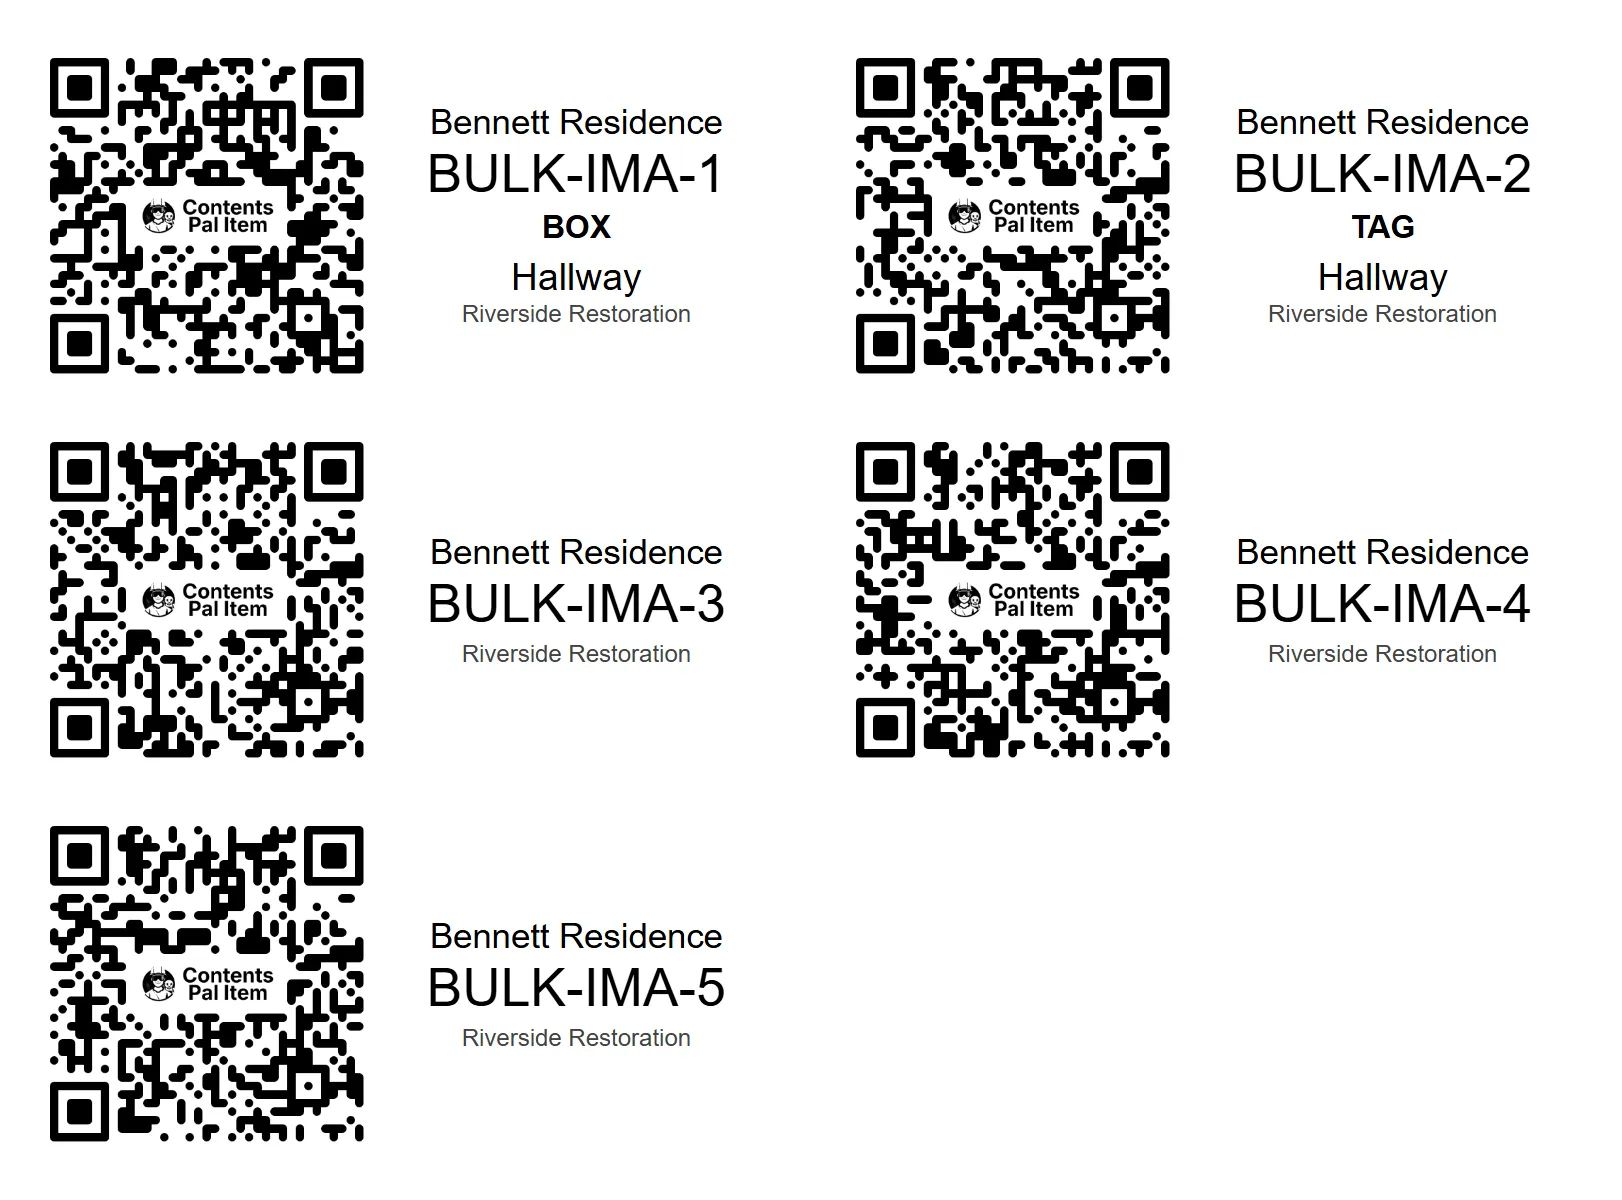
Each label includes:
-
A QR code linked to the item
-
The job name at the top
-
The item name (e.g., BULK-IMA-1)
-
The item type (BOX or TAG)
-
The room name or organization name
Example: Large Layout Labels (e.g., Avery 5164)
Section titled “Example: Large Layout Labels (e.g., Avery 5164)”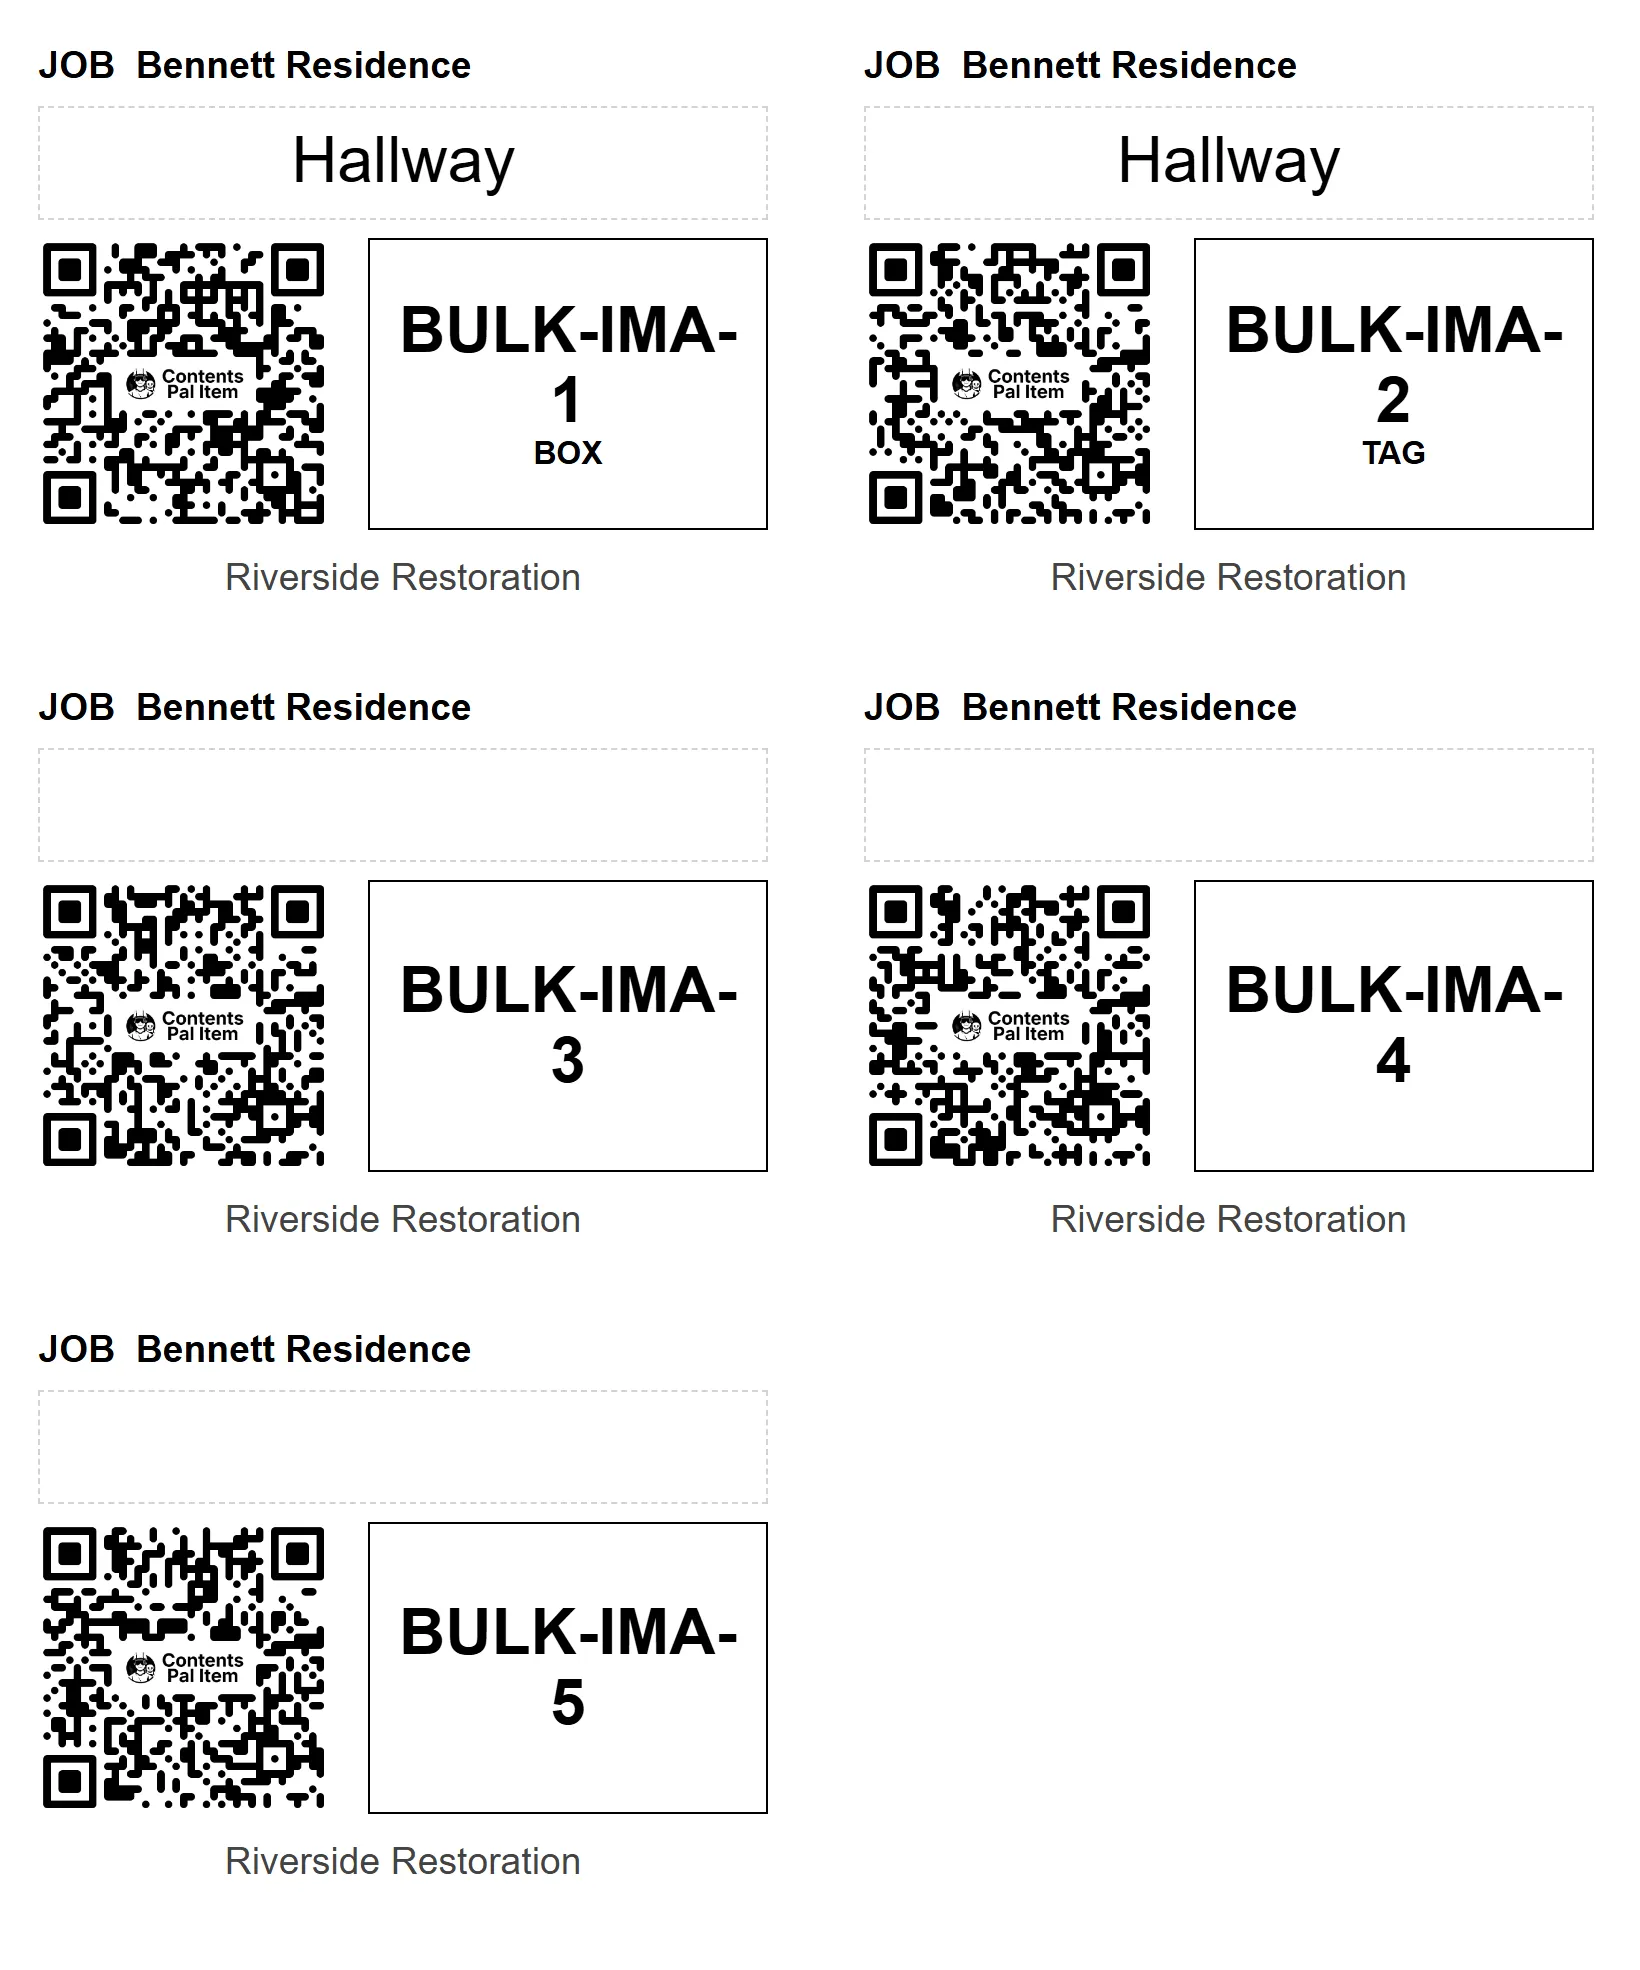
The larger formats show more detail, including:
-
A dashed area holding the secondary line — the room name by default. If you set the secondary line to None, or the field you chose is empty for that label, the box prints blank so you can write in it by hand
-
A large, easy-to-scan QR code
-
The item name and type in a bordered box
📱 Step-by-Step Instructions (Mobile)
Section titled “📱 Step-by-Step Instructions (Mobile)”The mobile app uses your phone or tablet’s system print dialog to send labels to any AirPrint (iOS) or Default Print Service (Android) printer on your network.
1. Open the Custody Tab
Section titled “1. Open the Custody Tab”In the mobile app, open the job you’re working on and tap the Custody tab. You’ll see the list of inventoried labels for the job.
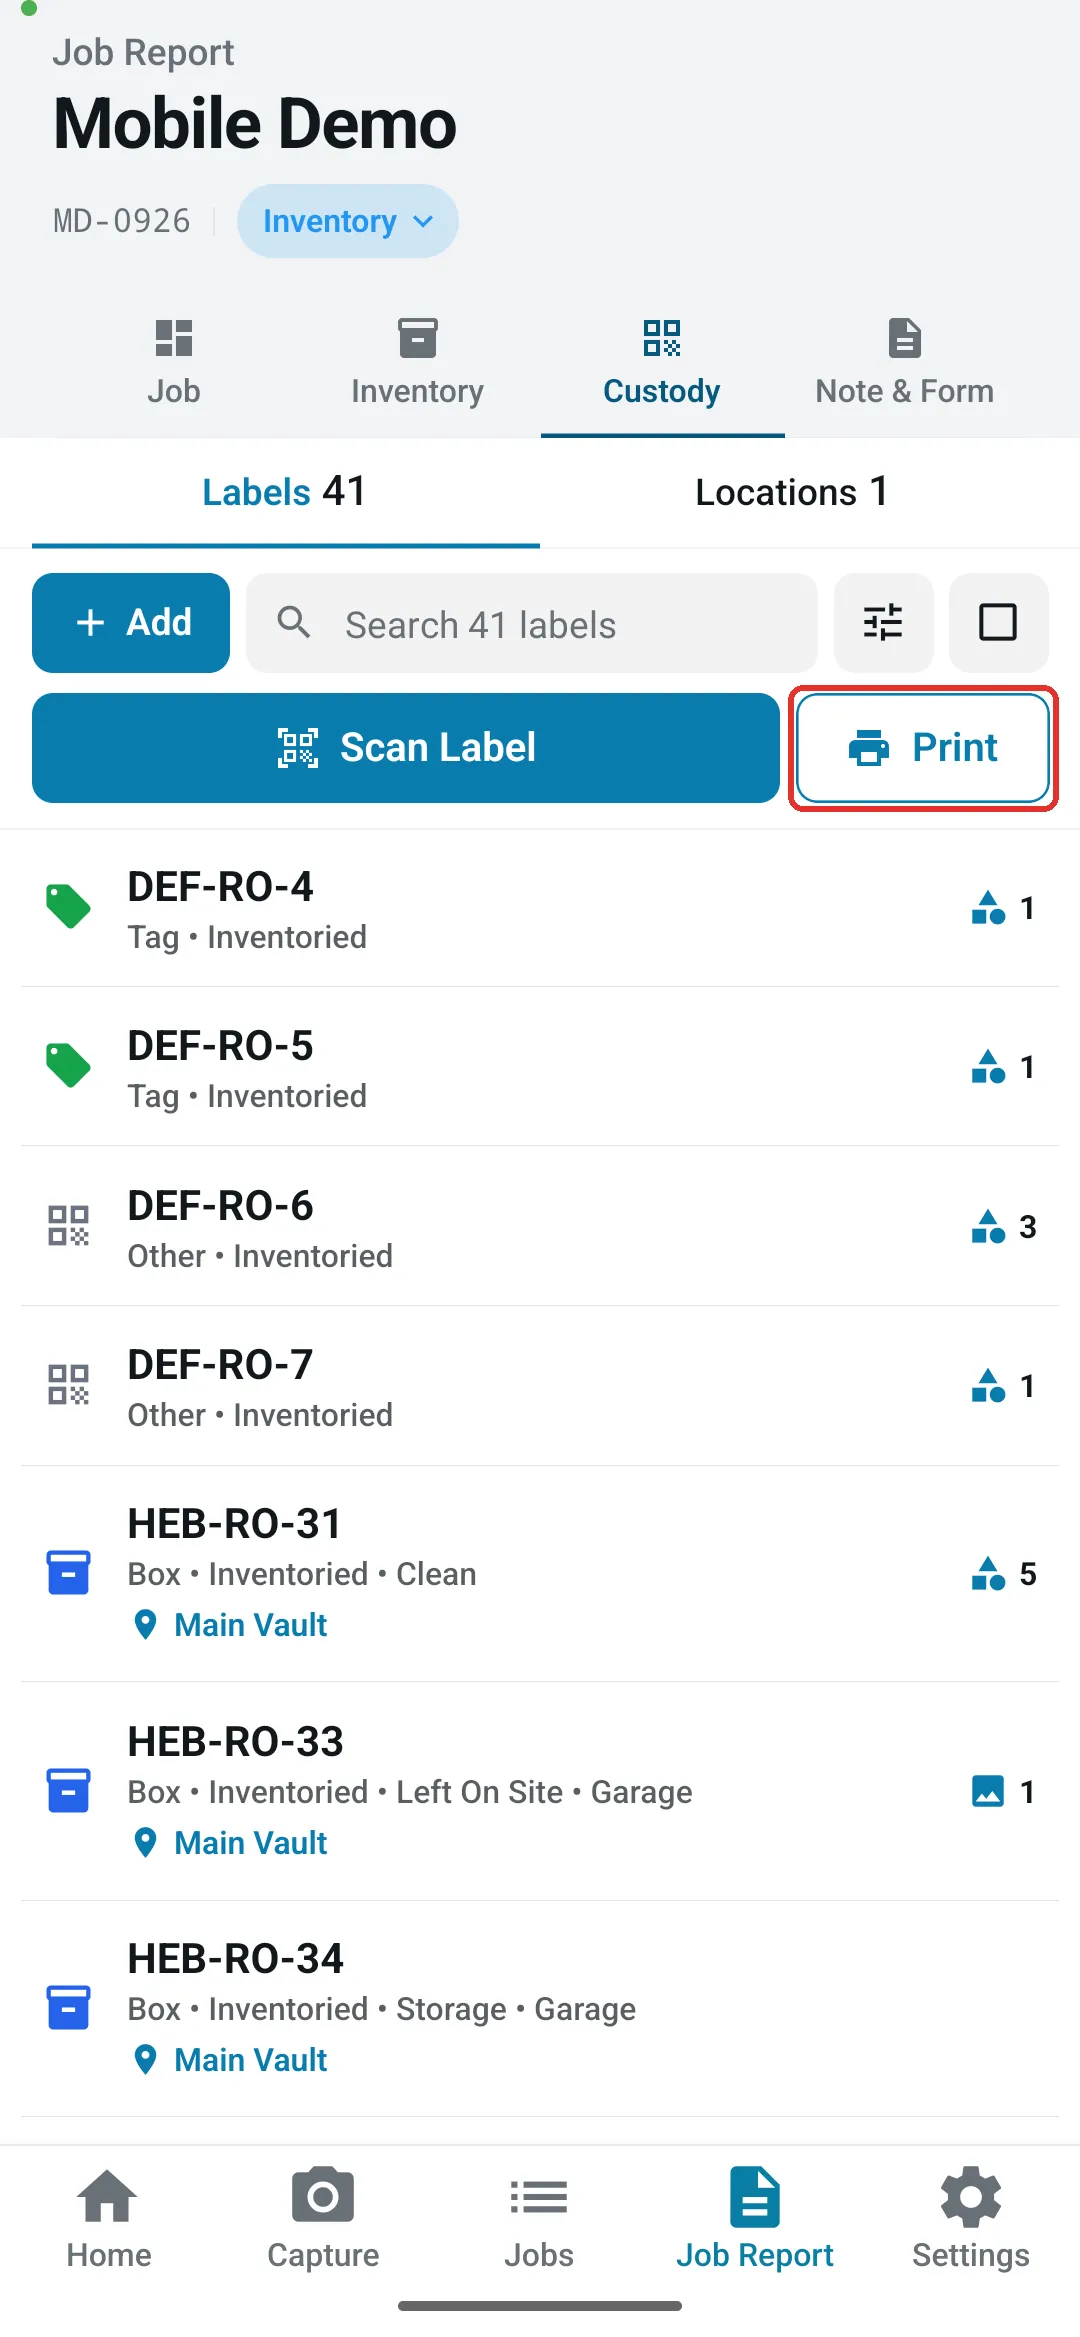
2. Tap Print and Choose a Scope
Section titled “2. Tap Print and Choose a Scope”Tap the Print button at the top of the Custody tab. A scope picker appears with three options:
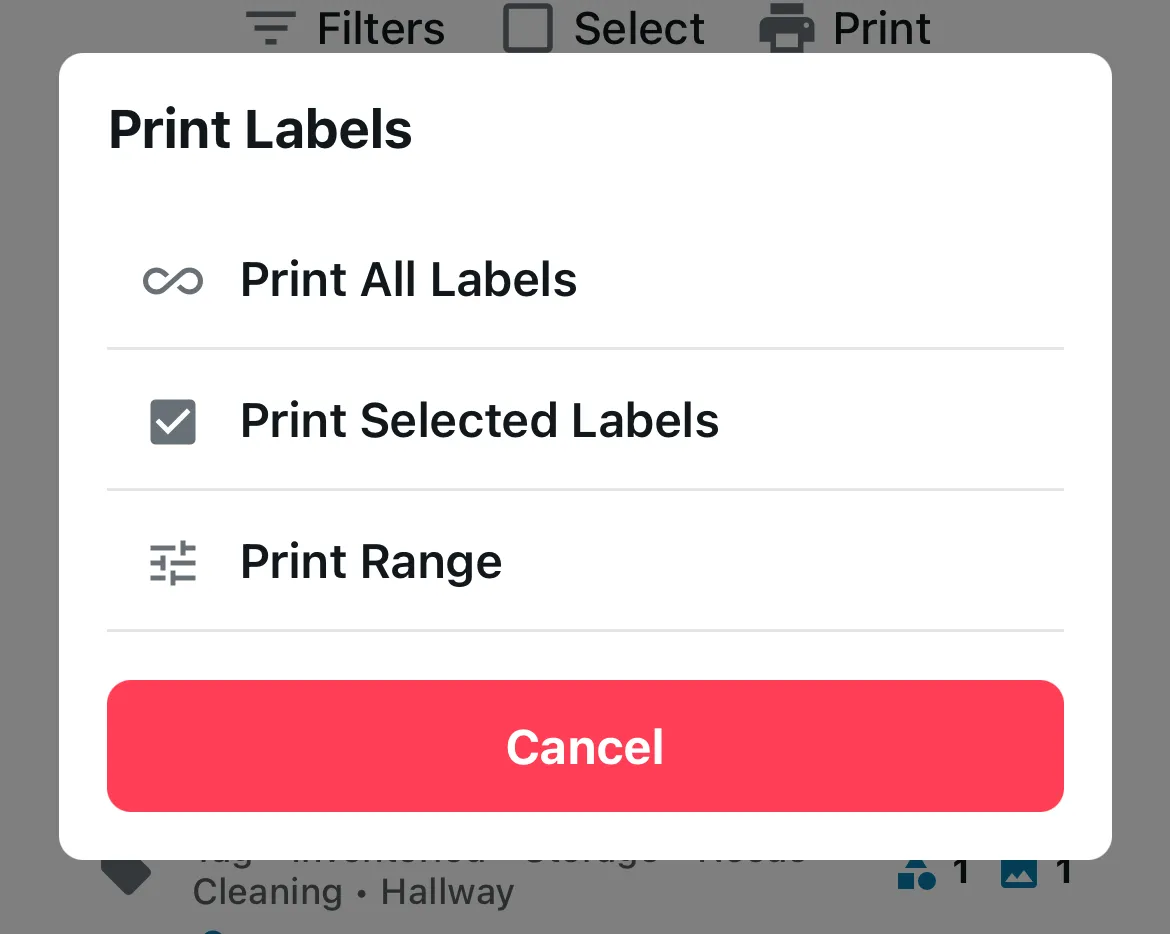
Print All Labels
Section titled “Print All Labels”Sends every label currently shown in the Custody list (matching your filters) to the print dialog. Labels are sorted by name (using natural numeric order, so BOX-2 comes before BOX-10).
Print Selected Labels
Section titled “Print Selected Labels”Prints only the labels you’ve checked. To use this:
-
First tap Select in the Custody tab toolbar to enter selection mode.
-
Tap each label you want to print — checked rows are highlighted.
-
Then tap Print (in the toolbar or the selection bar) and choose Print Selected Labels.
If you choose Print Selected Labels without anything checked, the app will let you know nothing is selected.
Print Range
Section titled “Print Range”Opens a range picker where you enter a Start and End position. The app counts through the same name-sorted list used by Print All, so position 1 is the alphabetically/numerically first label, and so on.
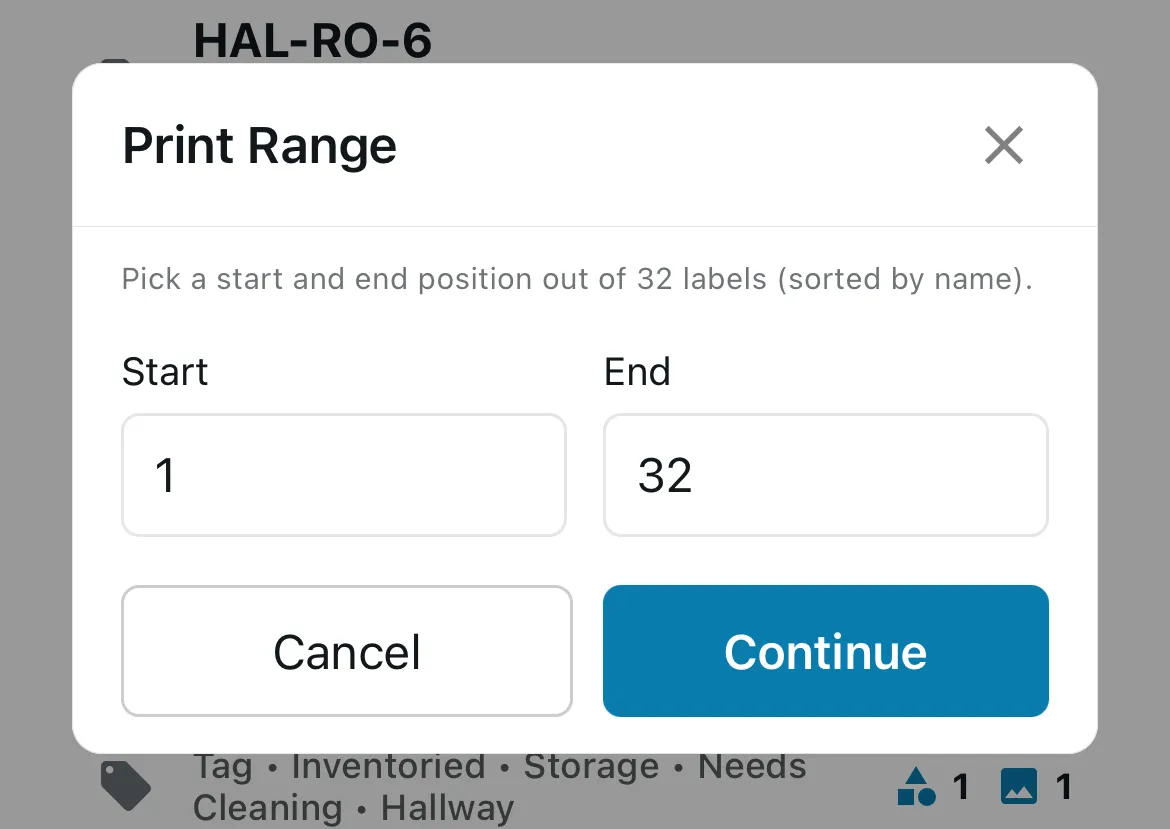
3. Pick a Sticker Layout
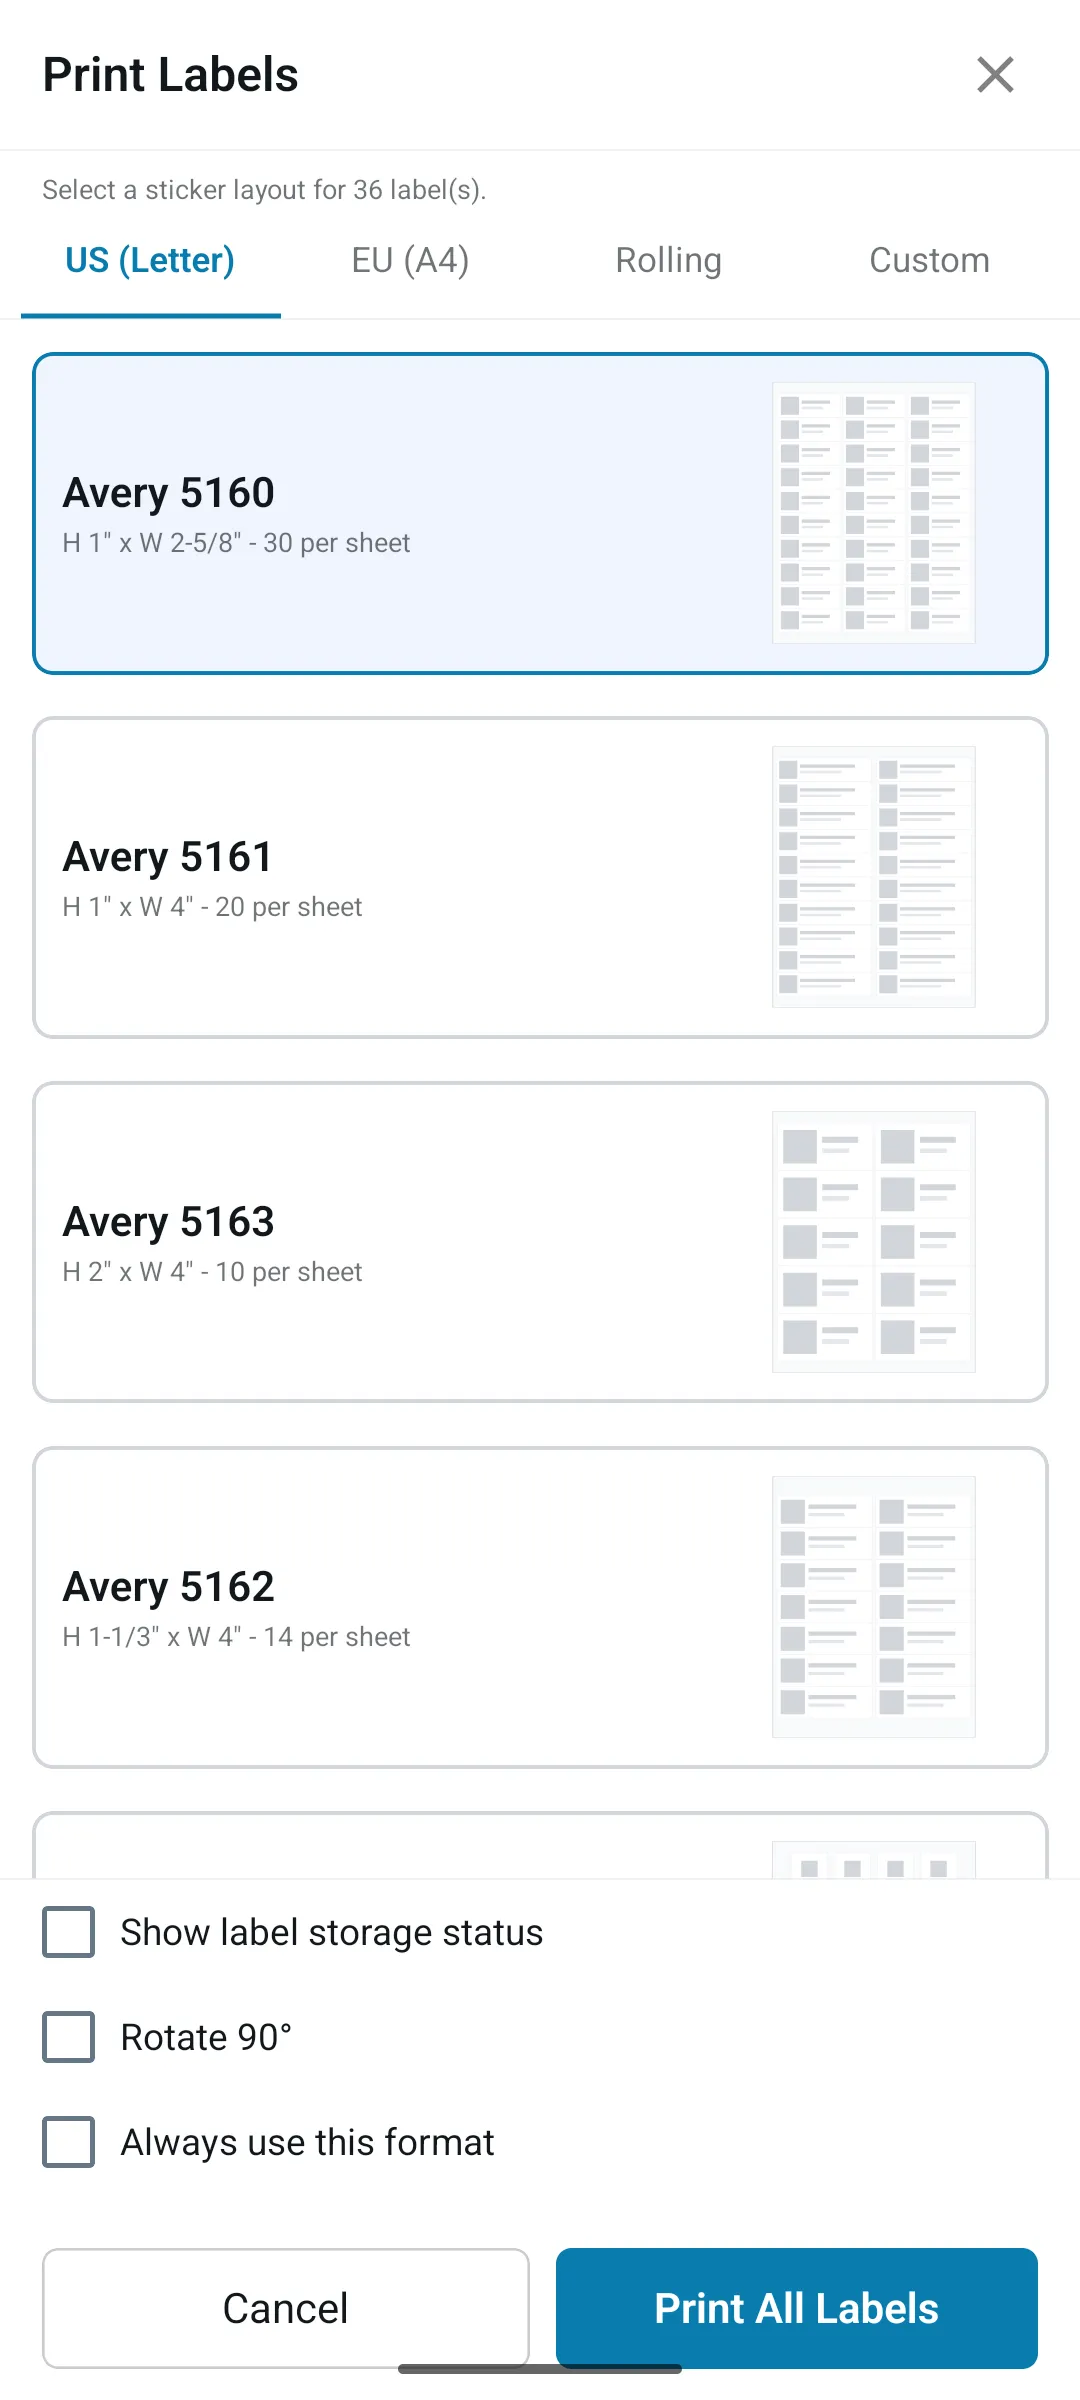
Section titled “3. Pick a Sticker Layout”The Print Labels dialog opens full-screen with the same US (Letter), EU (A4), Rolling, and Custom tabs as the web dialog. Each tab shows its layouts as cards with a preview of how labels are arranged on the sheet.
-
Tap a tab to switch groups, then tap a card to select it — the selected card is highlighted in blue.
-
The app remembers your last-used layout between sessions and reopens on that layout’s tab, so the layout you printed yesterday is already selected today.
-
The same Avery (US Letter and EU A4), ULINE, and single-label thermal layouts are available as on web, plus the Custom tab for defining your own sheet (see the supported layouts table below).
Print Options
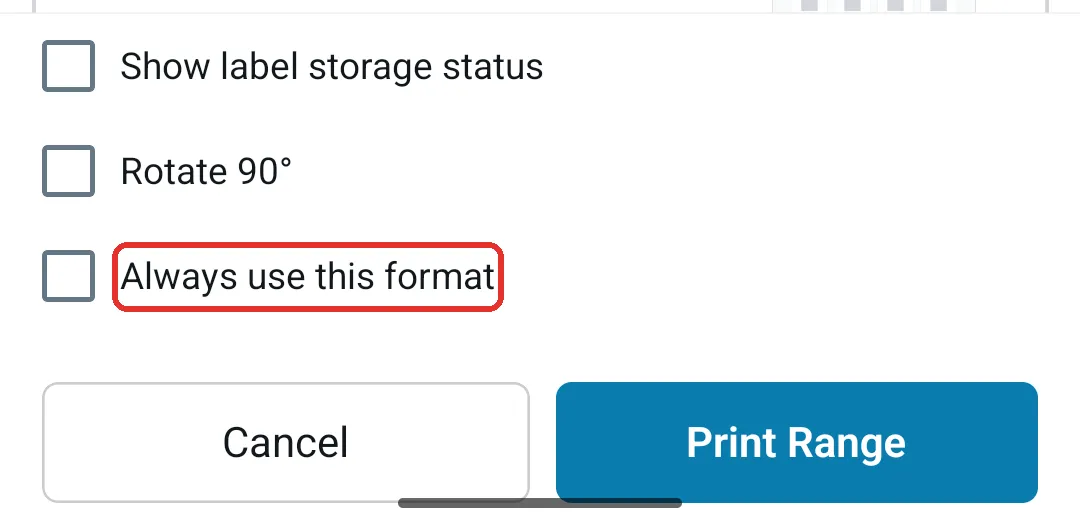
Section titled “Print Options”At the bottom of the dialog, before printing, you can toggle a few options:
-
Show label storage status — Adds the label’s current storage status (e.g. Stored, In Transit) to each printed label.
-
Rotate 90° — Rotates the page orientation 90°. Useful when your label sheet feeds sideways through the printer, or for thermal rolls that print landscape.
-
Include site/warehouse name — For vault/storage location labels, adds the storage site or warehouse name to the label.
-
Include coordinates — For vault/storage location labels, adds the location’s coordinates to the label.
-
Always use this format — Remembers the selected layout and options and applies them automatically next time, skipping the layout picker so printing is one tap. To get the layout picker back, tap Reset Print Format under Settings → Printing in the app.
When you’re ready, tap Print All Labels / Print Selected Labels / Print Range at the bottom (the button label matches the scope you picked). Your device’s system print dialog then opens with a preview, and from there you choose the printer, copies, and confirm.
4. Print a Single Label
Section titled “4. Print a Single Label”To print just one label without going through the scope picker, open the label’s detail view (tap any label name in the Custody tab) and tap Print in the row of action buttons (next to Move, Restore, and Photo).
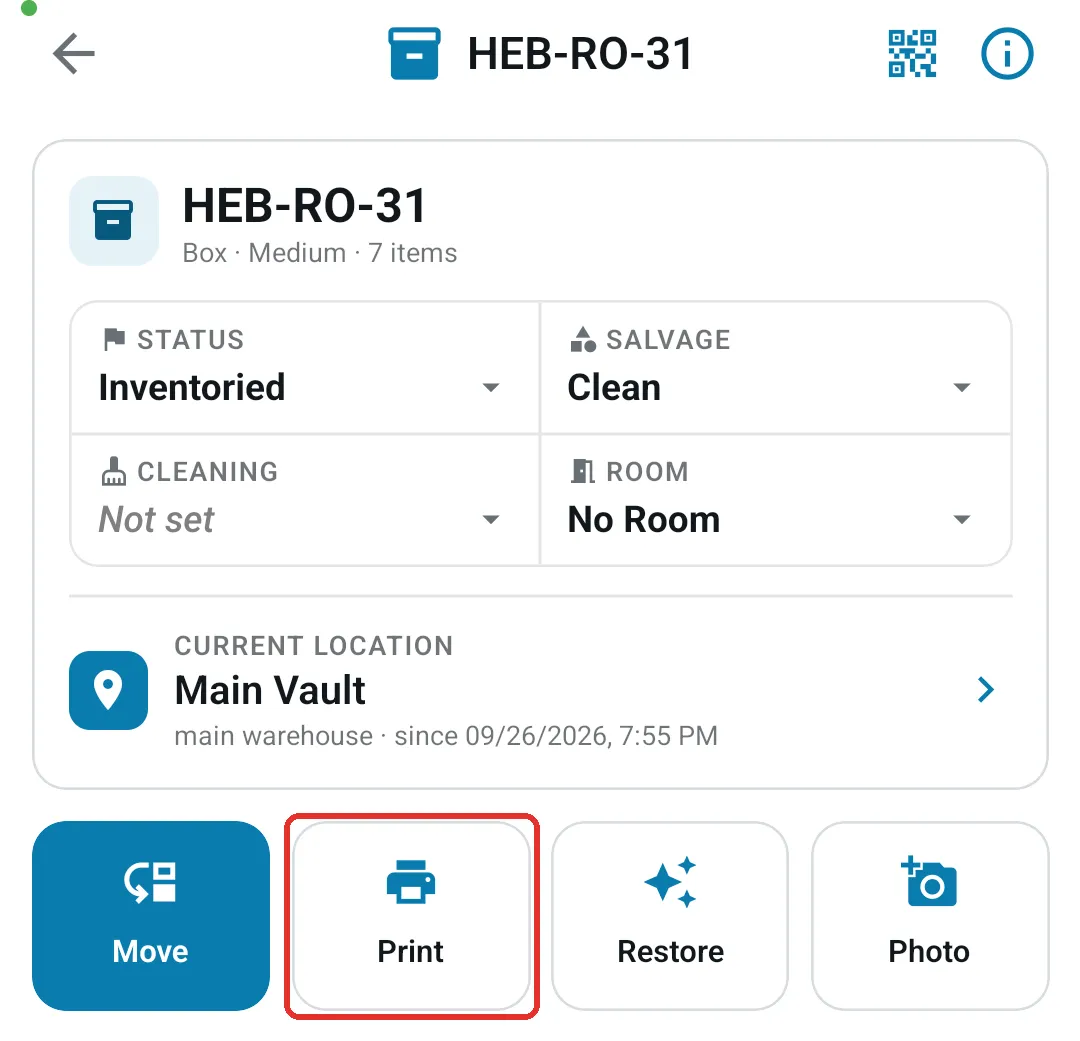
This takes you straight into the Print Labels dialog with that one label selected — handy when you’ve damaged a single sticker and just need a quick reprint.
5. Print Right After Closing a Box or Finishing a Tag
Section titled “5. Print Right After Closing a Box or Finishing a Tag”When you close a box or finish a tag in the mobile app, the dialog includes a Print label after closing option. Leave it on to jump straight into the Print Labels dialog for that label as soon as the box/tag is done — so you can label it on the spot without going back to the Custody tab.
📋 Supported Label Layouts
Section titled “📋 Supported Label Layouts”| Tab | Layout | Dimensions | Labels per Sheet | Best For |
|---|---|---|---|---|
| US (Letter) | Avery 5160 | 1” × 2⅝” | 30 | Small, compact labels |
| US (Letter) | Avery 5161 | 1” × 4” | 20 | Medium wide labels |
| US (Letter) | Avery 5162 | 1⅓” × 4” | 14 | Medium wide labels |
| US (Letter) | Avery 5163 | 2” × 4” | 10 | Standard wide labels |
| US (Letter) | Avery 5164 | 3⅓” × 4” | 6 | Large labels with room for room name |
| US (Letter) | Avery 5164 Square | 3⅓” × 4” | 6 | Large labels with a centered QR code |
| US (Letter) | Avery 22805 | 1½” × 1½” | 24 | Small square labels |
| US (Letter) | Avery 22806 | 2” × 2” | 12 | Medium square labels |
| US (Letter) | ULINE S-20177 | 2” × 2” | 20 | Square labels (high density) |
| US (Letter) | Single Page | 8½” × 11” | 1 | Vault/storage locations — extra-large QR code |
| EU (A4) | Avery L7160 | 63.5 × 38.1 mm | 21 | A4 small labels (3 × 7) |
| EU (A4) | Avery L7163 | 99.1 × 38.1 mm | 14 | A4 wide address labels (2 × 7) |
| EU (A4) | Avery L7164 | 63.5 × 72 mm | 12 | A4 medium labels (3 × 4) |
| EU (A4) | Avery L7162 | 99.1 × 33.9 mm | 16 | A4 compact wide labels (2 × 8) |
| Rolling | Single 3×1” | 1” × 3” | 1 (roll) | Single-label thermal printers — small labels |
| Rolling | Single 3×2” | 2” × 3” | 1 (roll) | Single-label thermal printers — medium labels |
| Rolling | Single 2×1” | 1” × 2” | 1 (roll) | Single-label thermal printers — compact labels |
| Rolling | Shipping 4×6” | 4” × 6” | 1 (roll) | Thermal shipping labels — includes a box-contents list |
| Custom | Custom sheet | Your own dimensions | Configurable | Any label stock not listed above |
🖨️ Recommended Printers
Section titled “🖨️ Recommended Printers”Any standard inkjet or laser printer works with the Avery (US Letter and EU A4) and ULINE sheet layouts — just load the matching label sheets and make sure your printer has the right paper size (Letter or A4).
If you’d rather print one sticker at a time (no sheets to peel), use a single-label thermal printer with one of the Single layouts. We recommend:
-
Zebra ZSB Series — compact desktop thermal label printers. Pair with the Single 2×1”, 3×1”, or 3×2” layout that matches your label roll.
-
Brother QL-810W — wireless thermal label printer. It prints on Brother DK label rolls, which come in several sizes; choose the Single layout that most closely matches the DK roll you’ve loaded.
✅ Best Practices
Section titled “✅ Best Practices”-
Filter before printing — Use the table filters (Room, Type, Status, etc.) to narrow down items before choosing Print All Labels. This avoids printing labels you don’t need.
-
Use Print Range for reprints — If a few labels got damaged or you only need to reprint part of a batch, use Print Range instead of reprinting everything.
-
Match your layout to your stock — Make sure you select the layout that matches the actual label sheets loaded in your printer. Mismatched layouts will result in misaligned labels.
-
Set the right page size — Load Letter paper for US (Letter) sheets and A4 paper for EU (A4) sheets. In the Custom tab, set Page size to match the paper in your printer.
-
Check the preview — When using Print Range, always verify the first and last label names shown in the preview to make sure you’re printing the right items.
-
Use the Single layouts for thermal printers — The Single options (3×1”, 3×2”, 2×1”) are designed for single-label thermal printers (e.g. Zebra ZSB, Brother QL-810W) that print one label at a time from a roll.
-
Mobile: enter selection mode before Print Selected — On the mobile app you need to tap Select in the Custody toolbar and check the labels first; otherwise Print Selected Labels has nothing to send.
-
Mobile: try Rotate 90° for thermal rolls — If a thermal printer feeds labels sideways, toggle Rotate 90° in the Print Labels dialog so the label content matches the paper orientation.
🧩 Troubleshooting
Section titled “🧩 Troubleshooting”Labels are misaligned on the sheet: Make sure you selected the correct layout that matches your label stock. Also check your printer settings — set margins to “None” and scaling to “100%” or “Actual Size” in the print dialog.
Print window doesn’t open (web): Your browser may be blocking pop-ups. Allow pop-ups for the ContentsPal site and try again.
QR codes aren’t scanning: Try using a larger label format (e.g., Avery 5163 or 5164) for more readable QR codes. Also ensure your printer is set to the highest quality setting.
Labels look blurry or low quality: Make sure the print dialog is set to the highest quality. In Chrome on web, check that “Background graphics” is enabled in the print settings.
Print Range shows wrong labels: The position numbers correspond to the labels in their currently-sorted order. On web, filters and sorting in the custody table affect the range. On mobile, the range is over the name-sorted list of labels shown in the Custody list, so it follows your filters (labels still in “Created” status are hidden unless you turn them on in the Status filter).
Mobile: the Print button is greyed out: No labels are showing in the Custody list. Clear your search and filters — and if the job only has labels in “Created” status, turn on Created in the Status filter — then the Print button enables.
Mobile: the Print button or options are missing entirely: The Show Print Functions setting (under Settings → Printing in the app) is turned off, which hides all label printing in the mobile app. Turn it back on — or, if your organization admin manages and locks your app settings, ask them to re-enable it.
Mobile: no printers appear in the system dialog: Make sure your phone and the printer are on the same Wi-Fi network, and that the printer supports AirPrint (iOS) or has the Default Print Service / a vendor print plugin installed (Android).
Thermal labels print at the wrong size, cut off, or across two labels: Each Single layout prints one label per page, sized exactly to the label. For example, Single 3×2” makes a page 3” wide and 2” tall. Pick the layout that matches the roll loaded in the printer, and make sure the paper or label size in the print dialog (or the printer’s own settings) matches it too. On web, also set scaling to 100% (or “Actual Size”). If the labels come out sideways, turn on Rotate 90° (mobile) or Rotate labels 90° (web).
Mobile: print preview is clipped or blank: Force-close and reopen the app, then try again. The app generates a PDF before handing it to the system print dialog, so the preview should match what comes out of the printer — if it doesn’t, double-check that the selected layout matches the label sheet loaded in the printer.