
Add 360° Photos
Esta página aún no está disponible en tu idioma.
This article explains how to capture 360° photos of the job site with a supported 360 camera and add them to your job on ContentsPal.
🧭 Summary
Section titled “🧭 Summary”360° photos capture an entire room in a single shot. Instead of taking many overlapping photos, you place a 360 camera in the middle of the room, capture once, and get an interactive image that anyone viewing the job can pan and rotate to look in every direction.
You can add 360° photos in two places:
-
Job Media — general documentation of the job or loss site
-
Rooms — attach 360° photos to a specific room, alongside the room’s regular photos
The capture and import flow is identical in both cases. The screenshots below show the Job Media flow; for a room, start from the room’s media gallery instead.
⚙️ Prerequisites
Section titled “⚙️ Prerequisites”-
A job must be created before adding 360° photos
-
A supported 360 camera:
-
Ricoh Theta — capture from the app & import
-
Insta360 — capture from the app & import
-
Akaso 360 — import photos taken on the camera
-
-
The camera powered on with its Wi-Fi enabled (the app connects to the camera over Wi-Fi)
📷 Recommended Device
Section titled “📷 Recommended Device”- Ricoh Theta X — our recommended 360 camera. It offers the smoothest experience with ContentsPal: capture and import directly from the app, with high-quality previews of your captures before you import them.
🚀 How to Add 360° Photos
Section titled “🚀 How to Add 360° Photos”1. Open Job Media (or a Room)
Section titled “1. Open Job Media (or a Room)”-
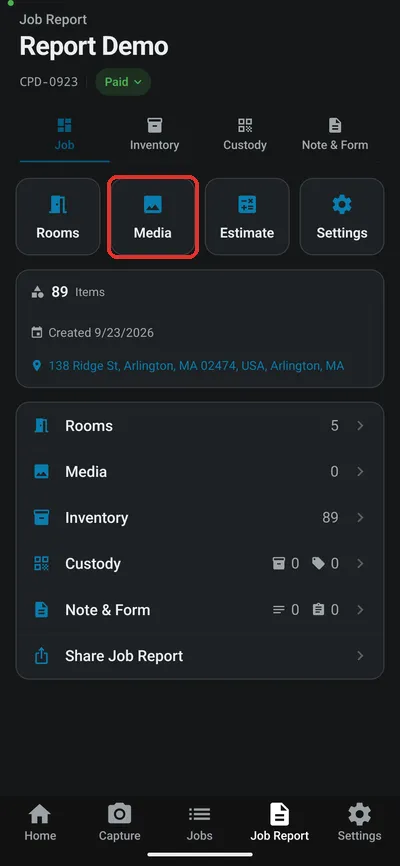
Open your job from the Jobs list (this opens the Job Report on its Job tab)
-
Tap the Media tile
-
For a room 360: tap the Rooms tile, open the room, and use the room’s Add photo/video button instead — the remaining steps are the same
2. Start Adding Media
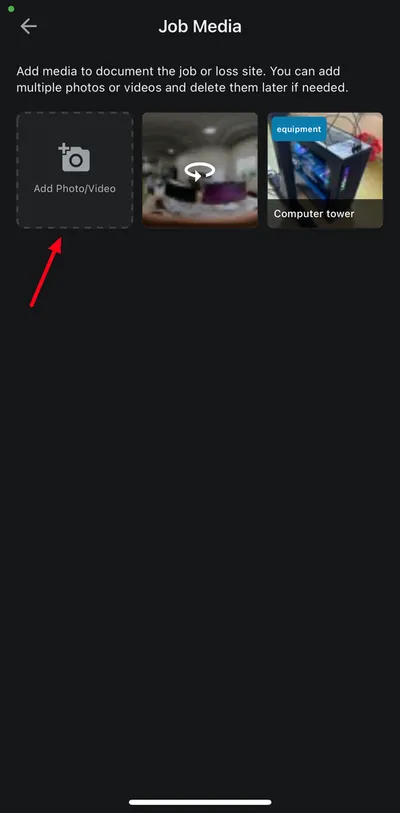
Section titled “2. Start Adding Media”- In the Job Media gallery, tap the Add Photo/Video tile
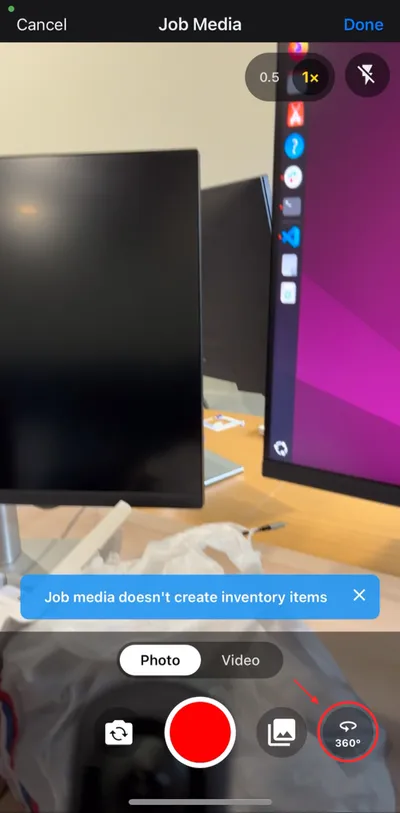
- The camera opens — tap the 360° button in the bottom-right corner
3. Pick a Camera from Your List
Section titled “3. Pick a Camera from Your List”-
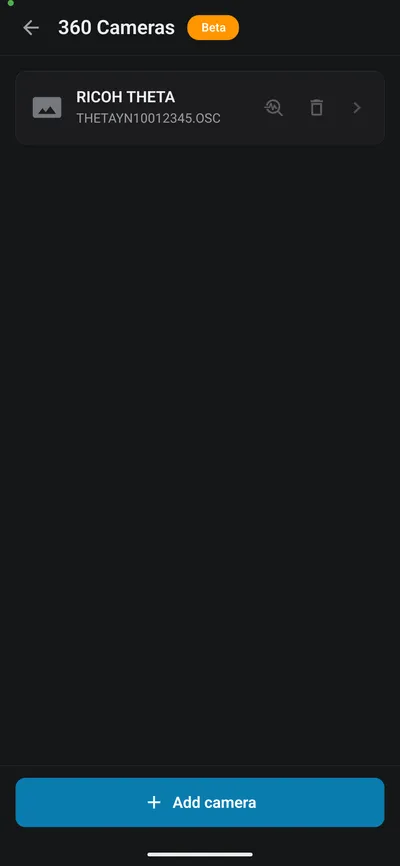
The 360 Cameras screen lists every camera you have set up, of any brand
-
Tap a camera to connect to it, or tap Add camera if the list is empty or you’re setting up a new one
-
Adding a camera asks for the brand first — pick Ricoh Theta, Insta360, or Akaso 360
4. Connect to the Camera
Section titled “4. Connect to the Camera”-
When adding a camera: enter the camera’s Wi-Fi name (SSID) and password — for Ricoh Theta the default password is autofilled for you
-
The app remembers each camera, so future connections happen upon selection
-
You can save as many cameras as you like, including several of the same brand — each keeps its own Wi-Fi name and password
-
Wait for the green Camera connected indicator at the top of the screen
5. Capture and Import
Section titled “5. Capture and Import”-
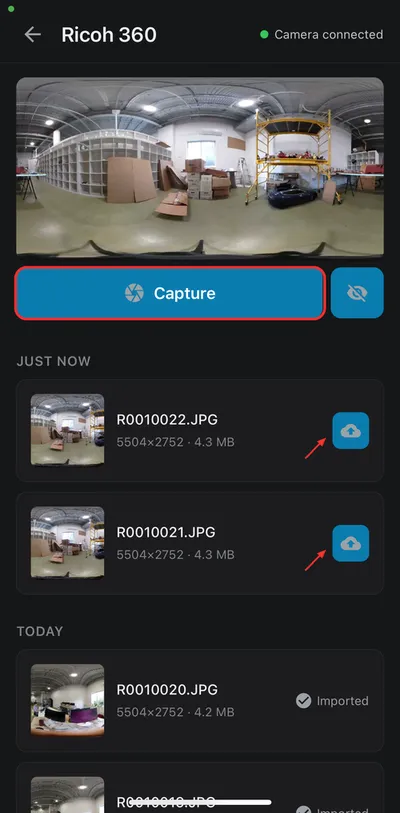
Place the camera in the middle of the room, then tap Capture to take a 360° photo remotely
-
New photos appear in the list below — tap the import button next to each photo you want to add to the job
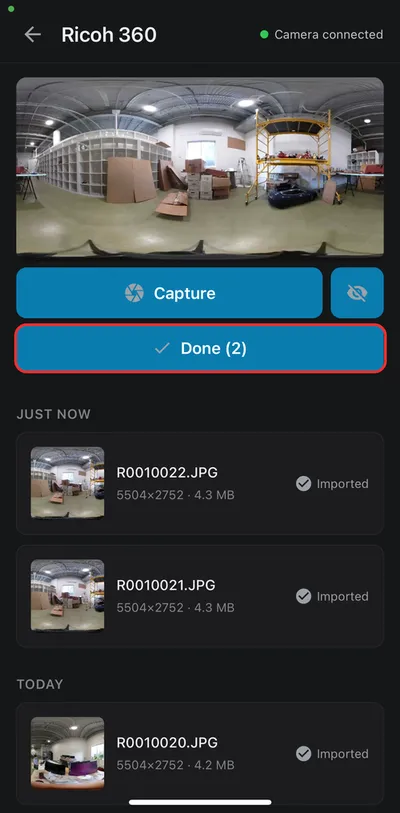
- Imported photos are marked Imported. When you’ve imported everything you need, tap Done
-
When prompted, disconnect from the camera’s Wi-Fi so your phone can get back online and upload
-
You can also disconnect at any time with the Disconnect button shown above the photo list while the camera is connected
6. Uploading Happens in the Background
Section titled “6. Uploading Happens in the Background”-
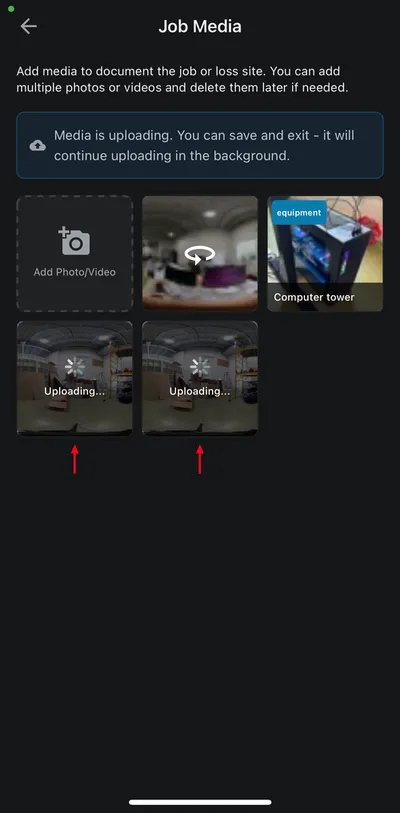
Back in the gallery, your 360° photos show an Uploading… indicator
-
You can save and exit — uploads continue in the background and resume automatically when you have a connection
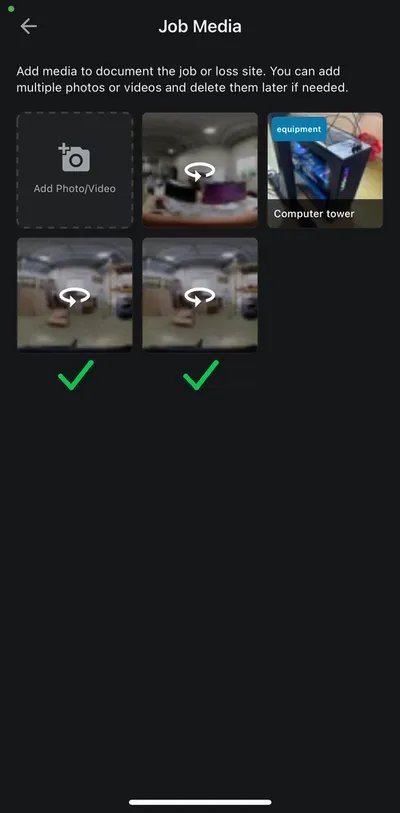
- Once uploaded, the photos display a 360° icon and are ready to view
💻 Uploading 360° Photos from a Computer
Section titled “💻 Uploading 360° Photos from a Computer”You can also upload 360° photos you’ve copied off the camera, from the web app’s Documentation tab (Media view) or a room’s edit dialog:
-
Upload the camera’s finished (stitched) JPG — the wide 2:1 image, not the camera’s raw file. ContentsPal recognizes it automatically and adds it as an interactive 360° photo.
-
360° photos can be up to 20MB each. Other photos are limited to 10MB.
-
If a photo is added as a flat photo instead, ContentsPal didn’t recognize it as 360°. Make sure it’s the camera’s stitched 2:1 JPG, exported with its 360° information kept — some photo editors and export tools remove it. Exporting again from the camera’s own app usually fixes this.
Prefer the mobile app for photos you already took? You don’t need to retake them. Connect to the camera in the app (steps 3–5): photos already stored on the camera appear in the list, grouped under Today, Last 5 days, and Older, and you can import them from there.
👀 Viewing 360° Photos
Section titled “👀 Viewing 360° Photos”-
Mobile: tap a 360° photo in Job Media or a room’s gallery to open the interactive viewer — drag to look around the room
-
Web: open the job and go to the Documentation tab (Media view) — 360° photos open in an interactive viewer you can pan with the mouse
-
360° photos are also included when you share the job, so adjusters and policyholders can look around the loss site themselves
✅ Best Practices
Section titled “✅ Best Practices”-
Use room 360s for room documentation — attaching the photo to its room keeps before/after documentation organized per room
-
Place the camera in the center of the room at roughly chest height for the most useful coverage
-
Step out of the shot (or stand close to a wall) before capturing — the camera sees in every direction
-
Turn on the lights — 360 cameras need good lighting for sharp results
-
Disconnect from the camera Wi-Fi when done — uploads can’t start while your phone is connected to the camera
🧩 Troubleshooting
Section titled “🧩 Troubleshooting”The app can’t reach the camera:
-
Make sure the camera is powered on and its Wi-Fi is enabled
-
Confirm your phone joined the camera’s Wi-Fi network
-
If the camera’s Wi-Fi password was changed from the default, enter the new one
Run the Connection check first:
-
Whenever the camera won’t connect, tap Connection check on the connect screen
-
It reports which Wi-Fi your phone joined, the address it was given, and exactly how the camera answered each request — then tap Share the result to send it to support
“Joined … but the camera isn’t answering”:
-
Your phone is on the camera’s Wi-Fi, so the Wi-Fi name and password are correct — the camera itself isn’t responding
-
Wake the camera (it may have gone to sleep) and check its Wi-Fi mode is still switched on, then tap Connect again
On iPhone, the camera is never reached even though Wi-Fi shows connected:
-
Open Settings → Privacy & Security → Local Network and make sure ContentsPal is switched on
-
iOS asks for this permission once. If it was declined, every connection to the camera is blocked from then on, while the Wi-Fi still looks connected
On Android, the camera is never reached even though Wi-Fi shows connected:
-
Turn mobile data off while you import
-
The camera’s Wi-Fi has no internet, and some phones respond by sending the app’s traffic over mobile data instead — so it never reaches the camera
Connecting keeps failing even though the details are right:
-
The saved Wi-Fi password may be out of date. On the 360 Cameras screen, tap the trash icon next to the camera, confirm Forget camera, then add it again with the current password
-
On Android, also remove the camera’s network from your phone’s own Wi-Fi settings — the phone can keep retrying with the old password
Capture fails on Ricoh Theta:
- Make sure the camera is set to Photo mode (video mode can’t be used for 360° photos)
Photos are stuck on Uploading…:
-
Check that you disconnected from the camera’s Wi-Fi — your phone needs an internet connection to upload
-
Uploads resume automatically once you’re back online; you can keep working in the meantime
🔑 Key Takeaways
Section titled “🔑 Key Takeaways”-
360° photos can be added to Job Media or to individual rooms — the flow is the same
-
Your cameras live on one 360 Cameras list, where you can add, open, or forget a camera
-
Ricoh Theta, Insta360, and Akaso 360 cameras are supported over Wi-Fi
-
Uploads run in the background — you can save and exit
-
360° photos are interactive on mobile, web, and shared job pages