
How to Split an Item
Esta página aún no está disponible en tu idioma.
This guide explains how to use the Split Item feature to separate a single inventory item with multiple photos into multiple individual items.
When to Use This
Section titled “When to Use This”Use Split Item when a single line item contains photos of different objects. Common scenarios include:
-
Multiple distinct items were photographed and grouped under one line item during capture
-
Additional photos were added to an item that actually show different objects
-
A quick capture session resulted in unrelated photos being attached to the same item
Note: The Split Item option is only available for items that have more than one photo attached.
Step 1: Open the Split Item Dialog
Section titled “Step 1: Open the Split Item Dialog”-
Open your job’s Inventory view
-
Find the item you want to split
-
Click the … (more options) menu on the item row
-
Select Split item
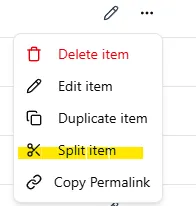
Note: The “Split item” option is disabled for items with only one photo, since there is nothing to split.
Step 2: Organize Photos into Groups
Section titled “Step 2: Organize Photos into Groups”The Split Item dialog displays all photos from the item in a single group. Each group represents a separate item that will be created after the split.
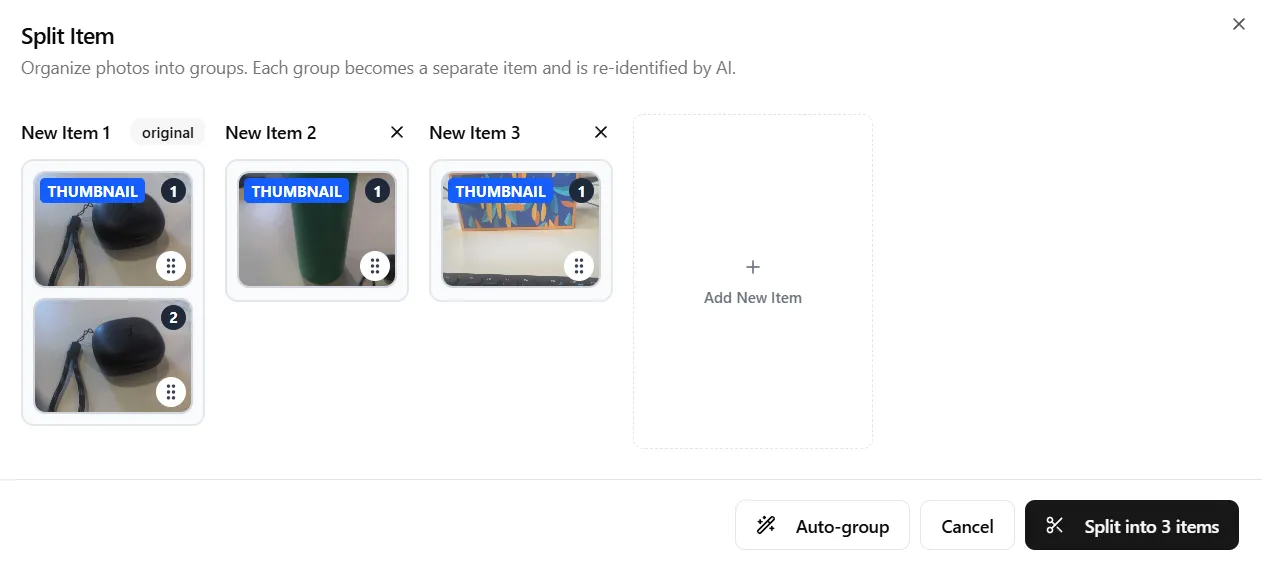
Moving Photos Between Groups
Section titled “Moving Photos Between Groups”There are two ways to move photos between groups:
-
Drag and drop — Click and drag any photo from one group to another. You can also reorder photos within a group by dragging.
-
Arrow buttons — Hover over a photo to reveal arrow buttons that let you send it to the previous or next group, or to a new group.
Adding and Removing Groups
Section titled “Adding and Removing Groups”-
Click Add New Item (the dashed button to the right of your groups) to create an empty group
-
Click the X button on a group header to remove it — its photos will return to the first group
Photo Order
Section titled “Photo Order”-
The first photo in each group becomes the thumbnail for the resulting item (marked with a blue “Thumbnail” badge)
-
Reorder photos within a group by dragging them to change which photo is used as the thumbnail
Step 3: Use Auto-Group (Optional)
Section titled “Step 3: Use Auto-Group (Optional)”Instead of manually organizing photos, you can let AI suggest how to group them:
-
Click the Auto-group button at the bottom of the dialog, next to Cancel
-
AI will analyze the photos and suggest groupings based on visual similarity
-
Review the suggested groups and adjust by dragging photos if needed

Step 4: Confirm the Split
Section titled “Step 4: Confirm the Split”-
Ensure you have at least 2 groups, each with at least 1 photo
-
Review that photos are in the correct groups
-
Click Split into N items to confirm
After splitting:
-
The original item is updated with the photos from the first group
-
New items are created for each additional group, inheriting the original item’s room, box, label, and salvage/cleaning categories
-
AI re-identification runs automatically on all resulting items — each item enters an “Identifying” state while AI fills in the name, brand, description, and pricing. If your organization has reached its monthly AI limit, the items are still split but AI identification doesn’t run, and you’ll see a message saying so
Tips for Best Results
Section titled “Tips for Best Results”-
Review before splitting — Make sure each group contains photos of the same object before confirming
-
Use Auto-group first — Let AI do the initial sorting, then manually adjust any misplaced photos
-
Check results after splitting — Once AI identification completes, review the newly created items to verify accuracy and make corrections if needed
Troubleshooting
Section titled “Troubleshooting”Q: The “Split item” option is grayed out A: The item only has one photo — split requires at least two photos on the item. The option is also unavailable when the job is locked.
Q: The “Split” button is disabled A: Every group must have at least one photo, and there must be at least two groups. Check that no group is empty.
Q: AI identification seems wrong after splitting A: AI re-identifies each resulting item from scratch. Open the item and manually correct the name, description, or other details as needed.
Need Help?
Section titled “Need Help?”If you encounter issues:
-
Go to Help and Support in the sidebar
-
Visit our support portal: https://support.contentspal.com
-
Use the chat widget for further support
Last Updated: April 2026