
Forms Overview
Esta página aún no está disponible en tu idioma.
Send PDF forms — disposal authorizations, releases, custody acknowledgments, anything that needs a customer signature — to your policyholders straight from a job. ContentsPal walks you through filling in your part, sends the rest by email, tracks …
Table of Contents
Section titled “Table of Contents”Setting Up a Form Template
Section titled “Setting Up a Form Template”Templates are managed at the organization level. Only org admins and owners can upload, edit, archive, or delete templates.
Open the template library
Section titled “Open the template library”-
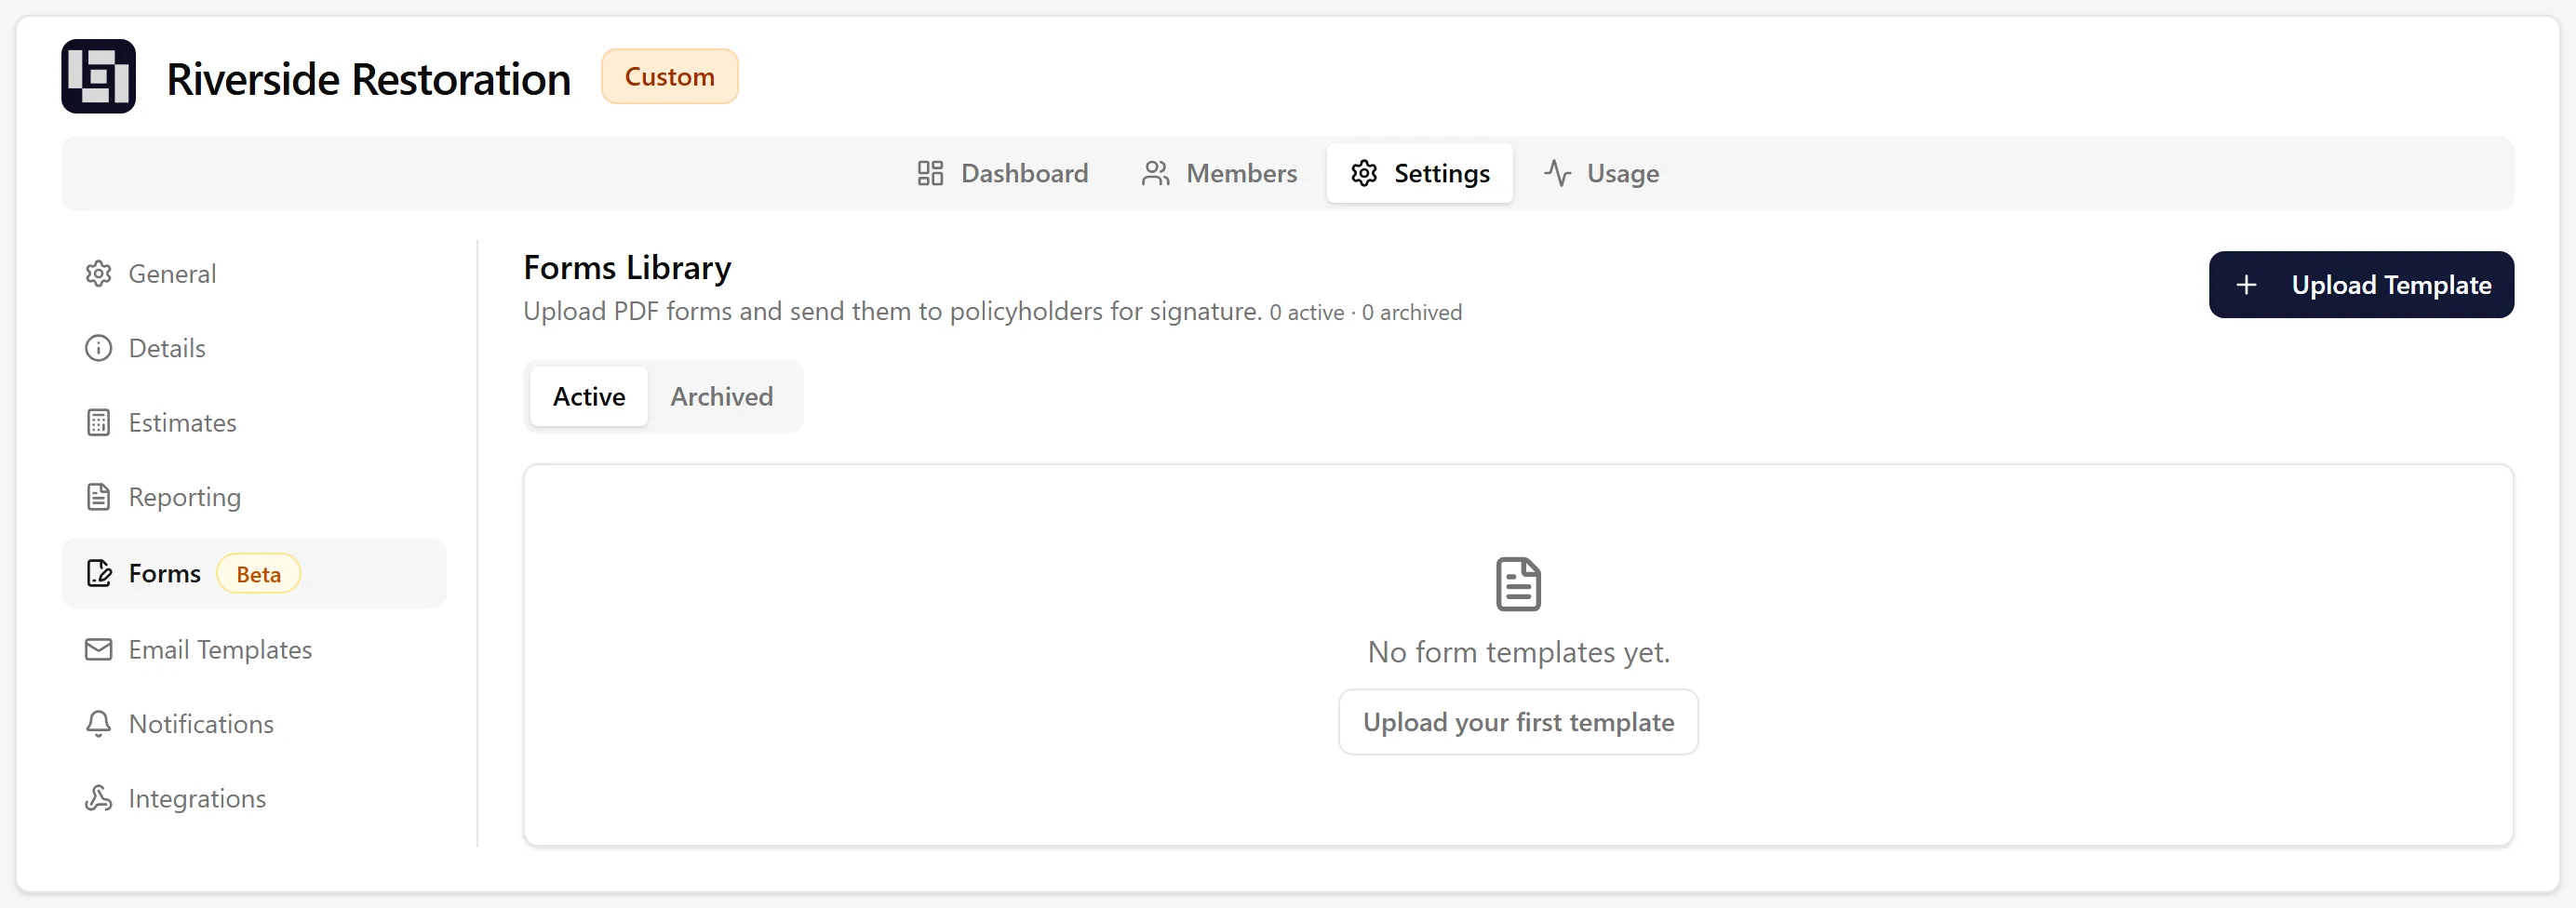
Click Organization in the side menu
-
Go to Settings → Forms (yellow Beta tag)
Upload a template
Section titled “Upload a template”-
Click Upload Template
-
Pick the PDF file (max 10 MB) and give the template a clear name — this is what your team sees when sending it
-
Click Continue
Place fields
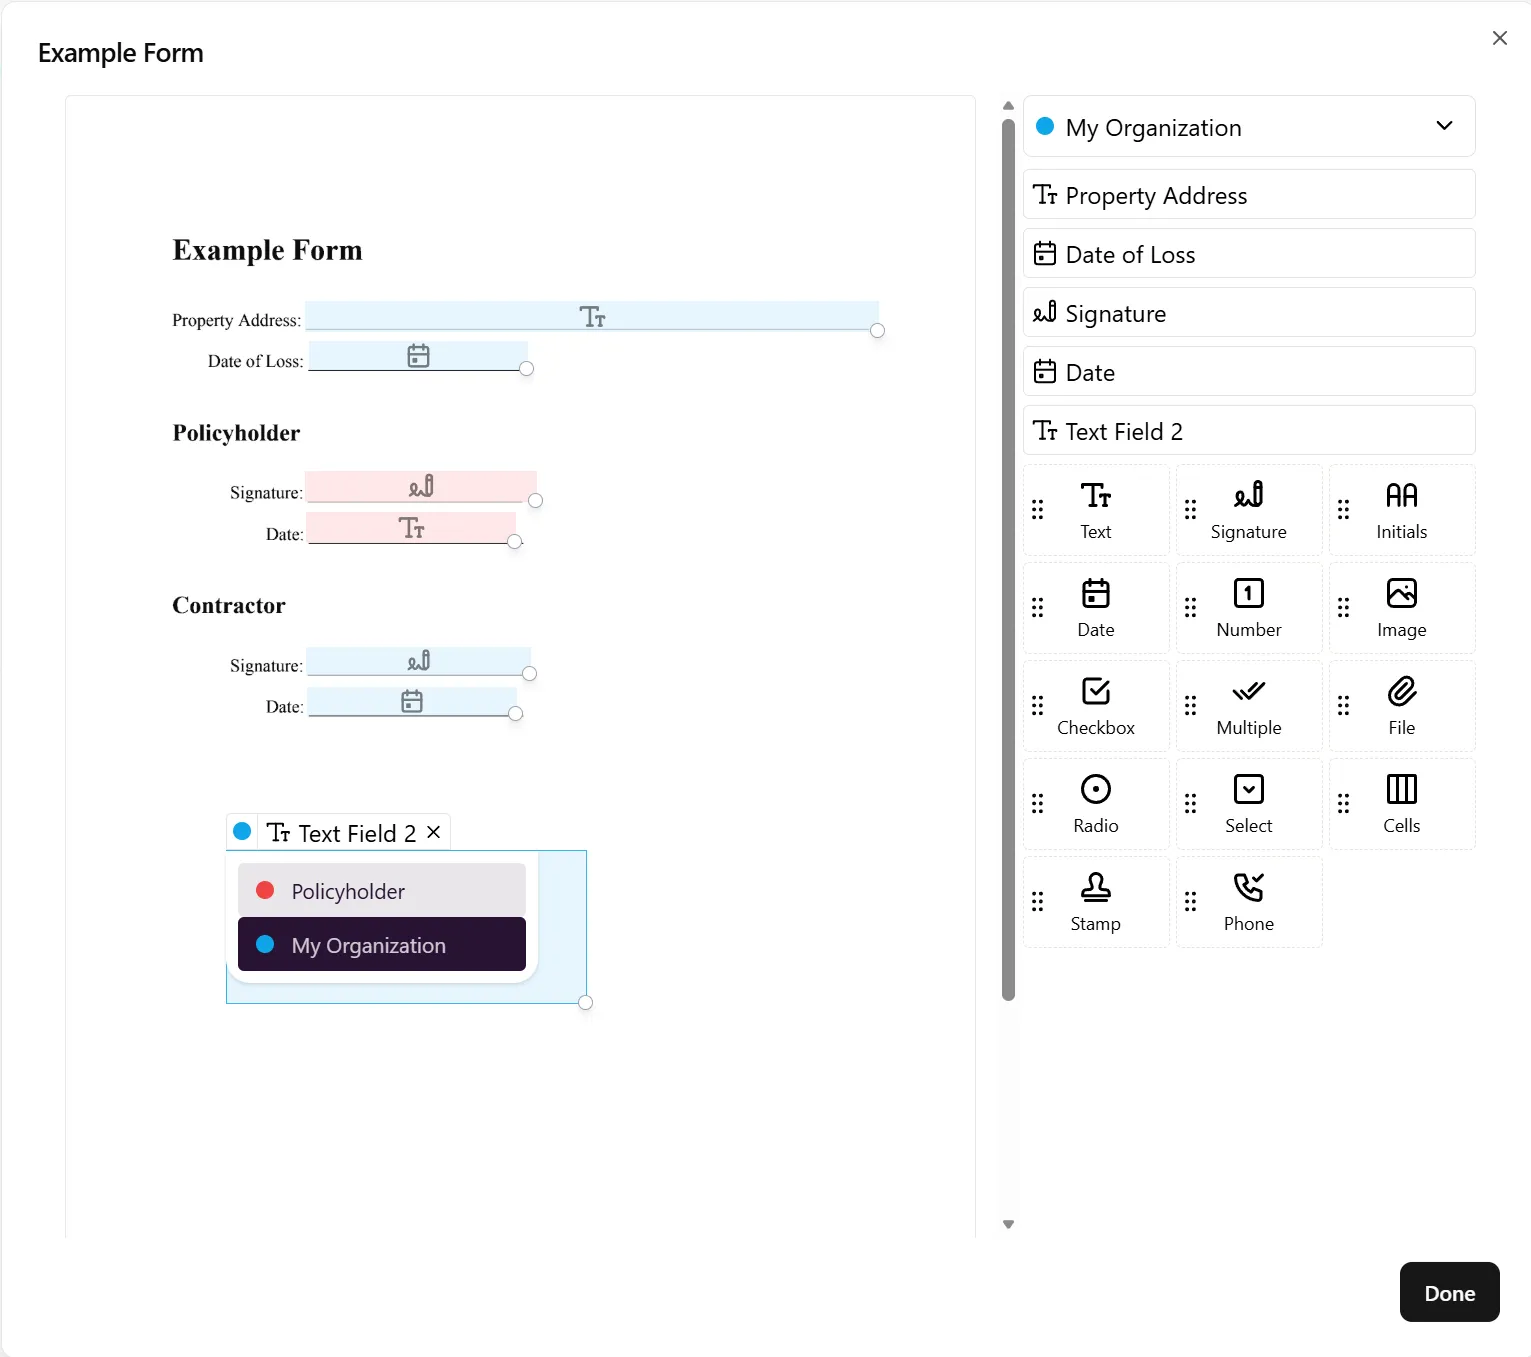
Section titled “Place fields”After upload, the field editor opens with your PDF on one side and a toolbar of field types on the other. The editor is preconfigured with two signer roles: Policyholder and My Organization — every field gets assigned to one of them.
Add a field
Section titled “Add a field”Drag a field type from the toolbar onto the PDF where you want it to appear. Resize by dragging the corner; reposition by dragging the body. Add as many fields as the form needs.
Pick the right field type
Section titled “Pick the right field type”-
Signature — captures a signature on a signature pad
-
Initial — captures initials
-
Date — captures a date
-
Text — free-text input
-
Checkbox — yes/no
Name your fields
Section titled “Name your fields”Every field has a name. The signer (you or the policyholder) sees these names as labels next to each input when they fill out the form, so give them clear, plain-English names — “Policyholder Name”, “Claim Number”, “Date of Loss” — instead of leaving the auto-generated defaults like “Text Field 1”.
When a field name resembles something the job already knows, ContentsPal will try to pre-fill it for the signer using the job’s settings — so the policyholder (or you) opens the form with those values already in place.
The fields that reliably pre-fill, and the kinds of names that trigger them:
-
Policyholder name — “Policyholder Name”, “Customer Name”, “Insured Name”, “Client Name”
-
Policyholder email — “Policyholder Email”, “Customer Email”, “Insured Email”
-
Policyholder phone — “Policyholder Phone”, “Customer Phone”, “Insured Phone”
-
Adjuster name — “Adjuster” or “Adjuster Name”
-
Adjuster email — “Adjuster Email”
-
Adjuster phone — “Adjuster Phone”
-
Claim number — “Claim Number”, “Claim No”, “Claim #”
-
Policy number — “Policy Number”, “Policy No”, “Policy #”
-
Insurance carrier — “Insurance Company”, “Carrier”
-
Property address — “Property Address”, “Loss Address”
-
Date of loss — “Date of Loss”, “Loss Date”
A few things to know:
-
A plain Name, Email, or Phone field pre-fills with the customer’s details only when it’s assigned to the Policyholder role. Generic fields on the My Organization side are left blank for you to complete.
-
Initial fields are filled automatically from the signer’s name (e.g. “John Smith” → “JS”).
-
Signature fields are never pre-filled.
-
The editor’s toolbar offers more field types than the five above — Phone, Dropdown, File upload and others. They work fine for the signer, but ContentsPal never pre-fills them, whatever they’re named. In particular a Phone field asks the signer to confirm a code that DocuSeal texts to the number they enter, so the number has to be theirs to type. Use a Text field named “Policyholder Phone” if you want the job’s number filled in for them instead.
-
A field is only pre-filled when the job actually has that value in its settings. Anything that can’t be matched is simply left blank rather than guessed — so it’s worth confirming the job’s customer and insurance details are filled in before sending.
Assign each field to the right signer
Section titled “Assign each field to the right signer”After placing a field, look at its color — the role determines who fills or signs it. Switch between Policyholder and My Organization depending on which side of the form the field belongs to.
This is the single most important step to get right: a Policyholder field left assigned to “My Organization” will end up filled (or signed) by you instead of by the customer.
When you’re done
Section titled “When you’re done”Changes save automatically as you work — there’s no “Save” button to press. Click Done to close the editor when the form is ready to send.
You can come back later (Configure fields on the template card) to add, remove, rename, or reassign fields. Existing in-flight forms keep working with the version of the template they were sent with.
Edit, archive, or delete a template
Section titled “Edit, archive, or delete a template”From the library:
-
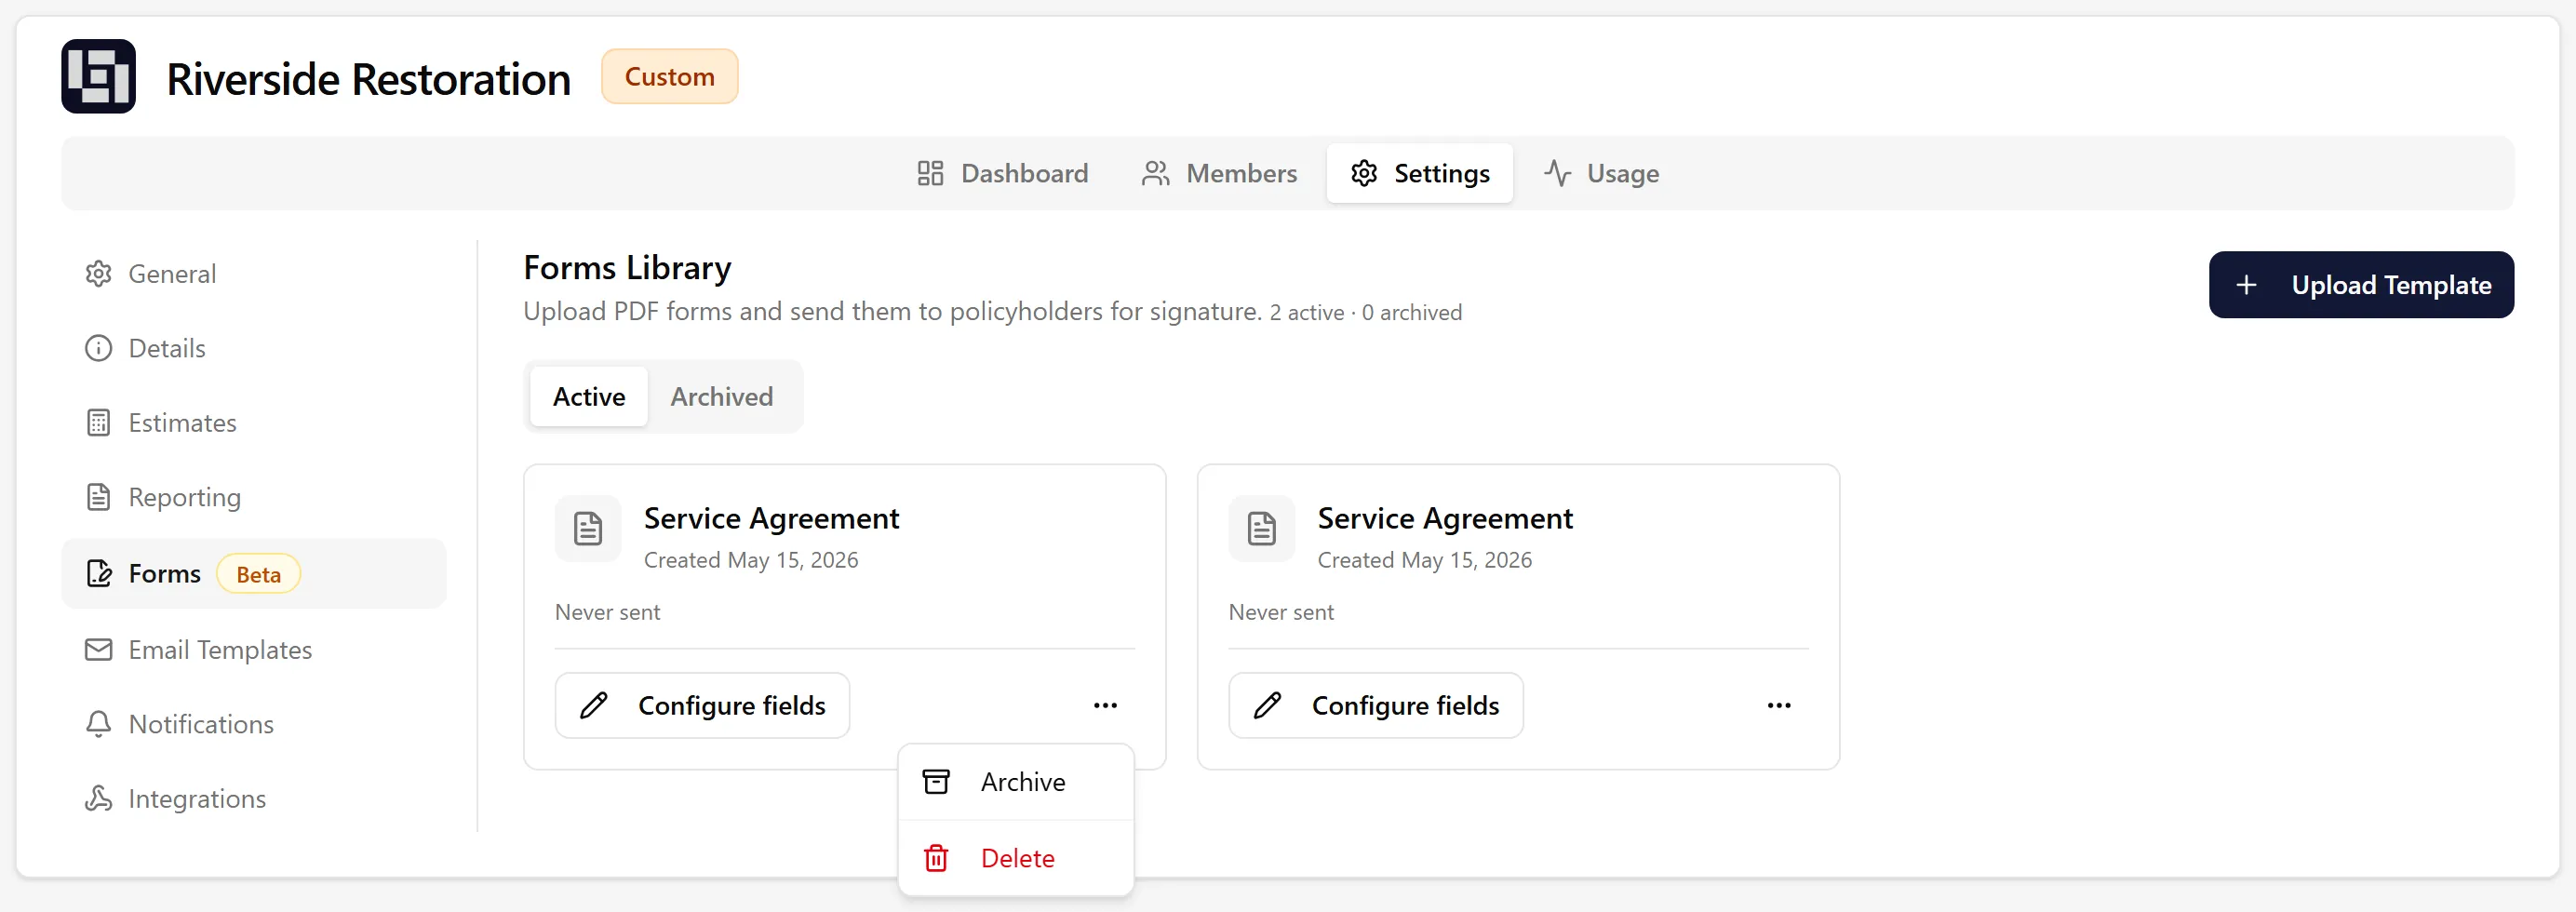
Configure fields — reopens the field editor to add, remove, or reassign fields
-
More menu (⋯) → Archive — hides the template from the send dialog without deleting it. Existing submissions keep working.
-
More menu (⋯) → Delete — permanently removes the template from your library. Already-sent forms keep working in DocuSeal and completed forms remain viewable on their jobs.
Click a template card to see every job that template has been sent on, with a status for each submission. Click any job name in that list to jump straight to that job’s Forms view.
Sending a Form on a Job
Section titled “Sending a Form on a Job”Editors, admins, and owners can send forms on any job they can access. Members can see a job’s forms but can’t send or manage them.
-
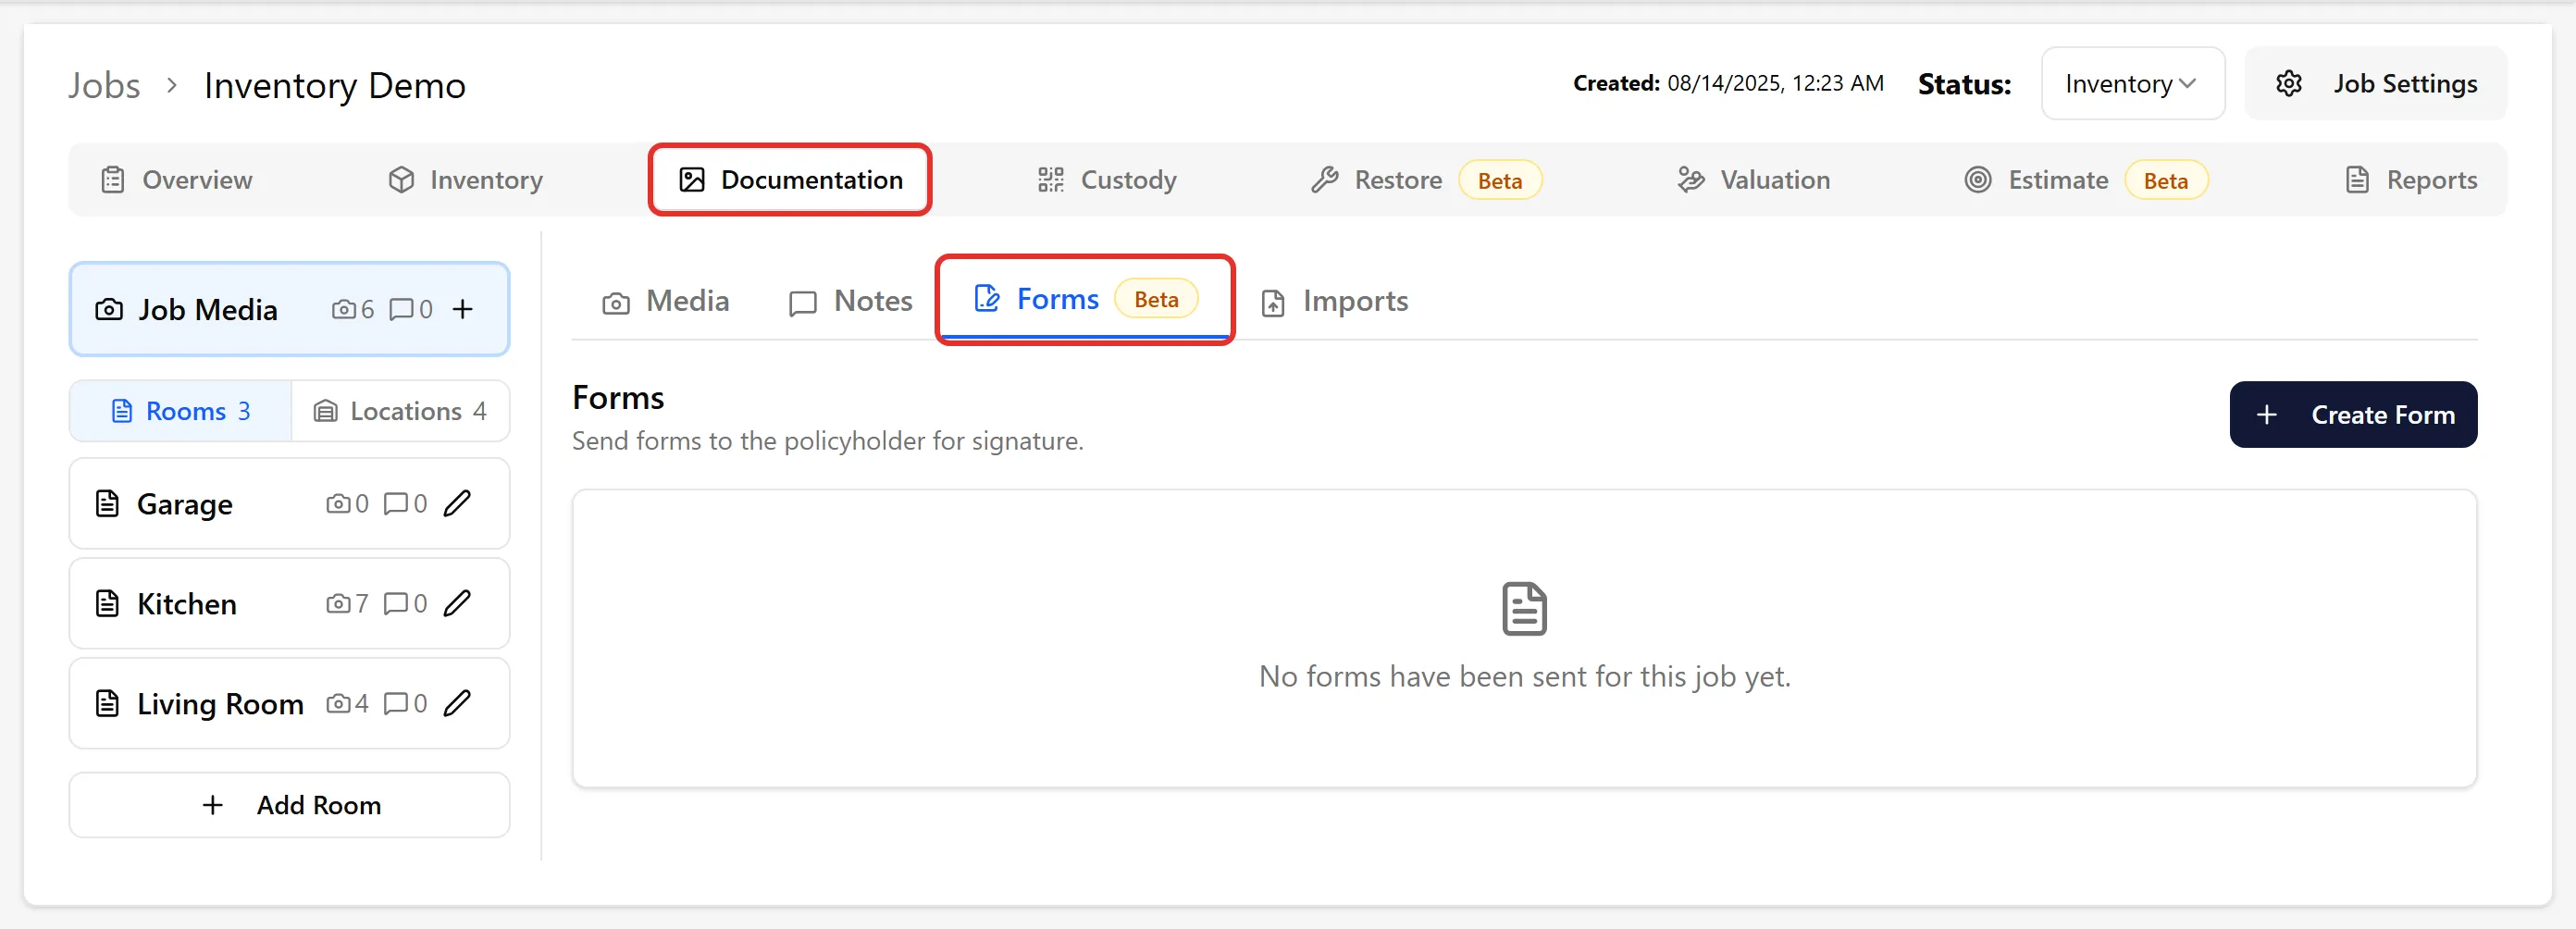
Open the job
-
Click the Documentation tab
-
Click Forms (yellow Beta tag)
-
Click Create Form
In the mobile app, open the job’s Job Report, tap Note & Form, then Forms, and tap Send Form.
Pick a template and recipient
Section titled “Pick a template and recipient”The Create Form dialog shows your organization’s active templates. Templates that need a signature from you carry a “Requires your signature” tag.
The policyholder’s name and email come from the job’s customer settings. If they’re missing, add them through the job settings before sending.
Attach a report (optional)
Section titled “Attach a report (optional)”Once you’ve picked a template, you can attach one of the job’s PDF reports under Attach a report. Its pages are added after the form, so the policyholder signs a single document. If the job doesn’t have the report you need yet, generate it first — see Reports Overview.
Fill in your part
Section titled “Fill in your part”If the template has text, date, or checkbox fields assigned to your organization, they appear under Pre-fill values, already filled in from the job’s details where we can match them — claim number, policy number, adjuster, loss date, property address, and so on. On templates with more than a handful of fields the section starts collapsed; tap or click its header to open it.
Edit anything that’s wrong, and clear anything that should stay blank on the signed document. Signature and initial fields aren’t shown here: signatures are captured when you sign, and initials are derived from the signer’s name.
Create, then send
Section titled “Create, then send”Clicking Create form creates the submission and opens its detail view. Nothing is emailed at this point.
From the detail view you choose what happens next, in any order:
-
Sign on this device — sign your organization’s part now, or hand the device to the policyholder to sign in person.
-
Send by email — email the policyholder their signing link. The button becomes Resend email once an email has gone out.
Because signing runs in parallel, the policyholder is never blocked waiting on your signature. A common flow is to fill in your part, sign it on the device, then email the policyholder for theirs.
Tracking Submissions
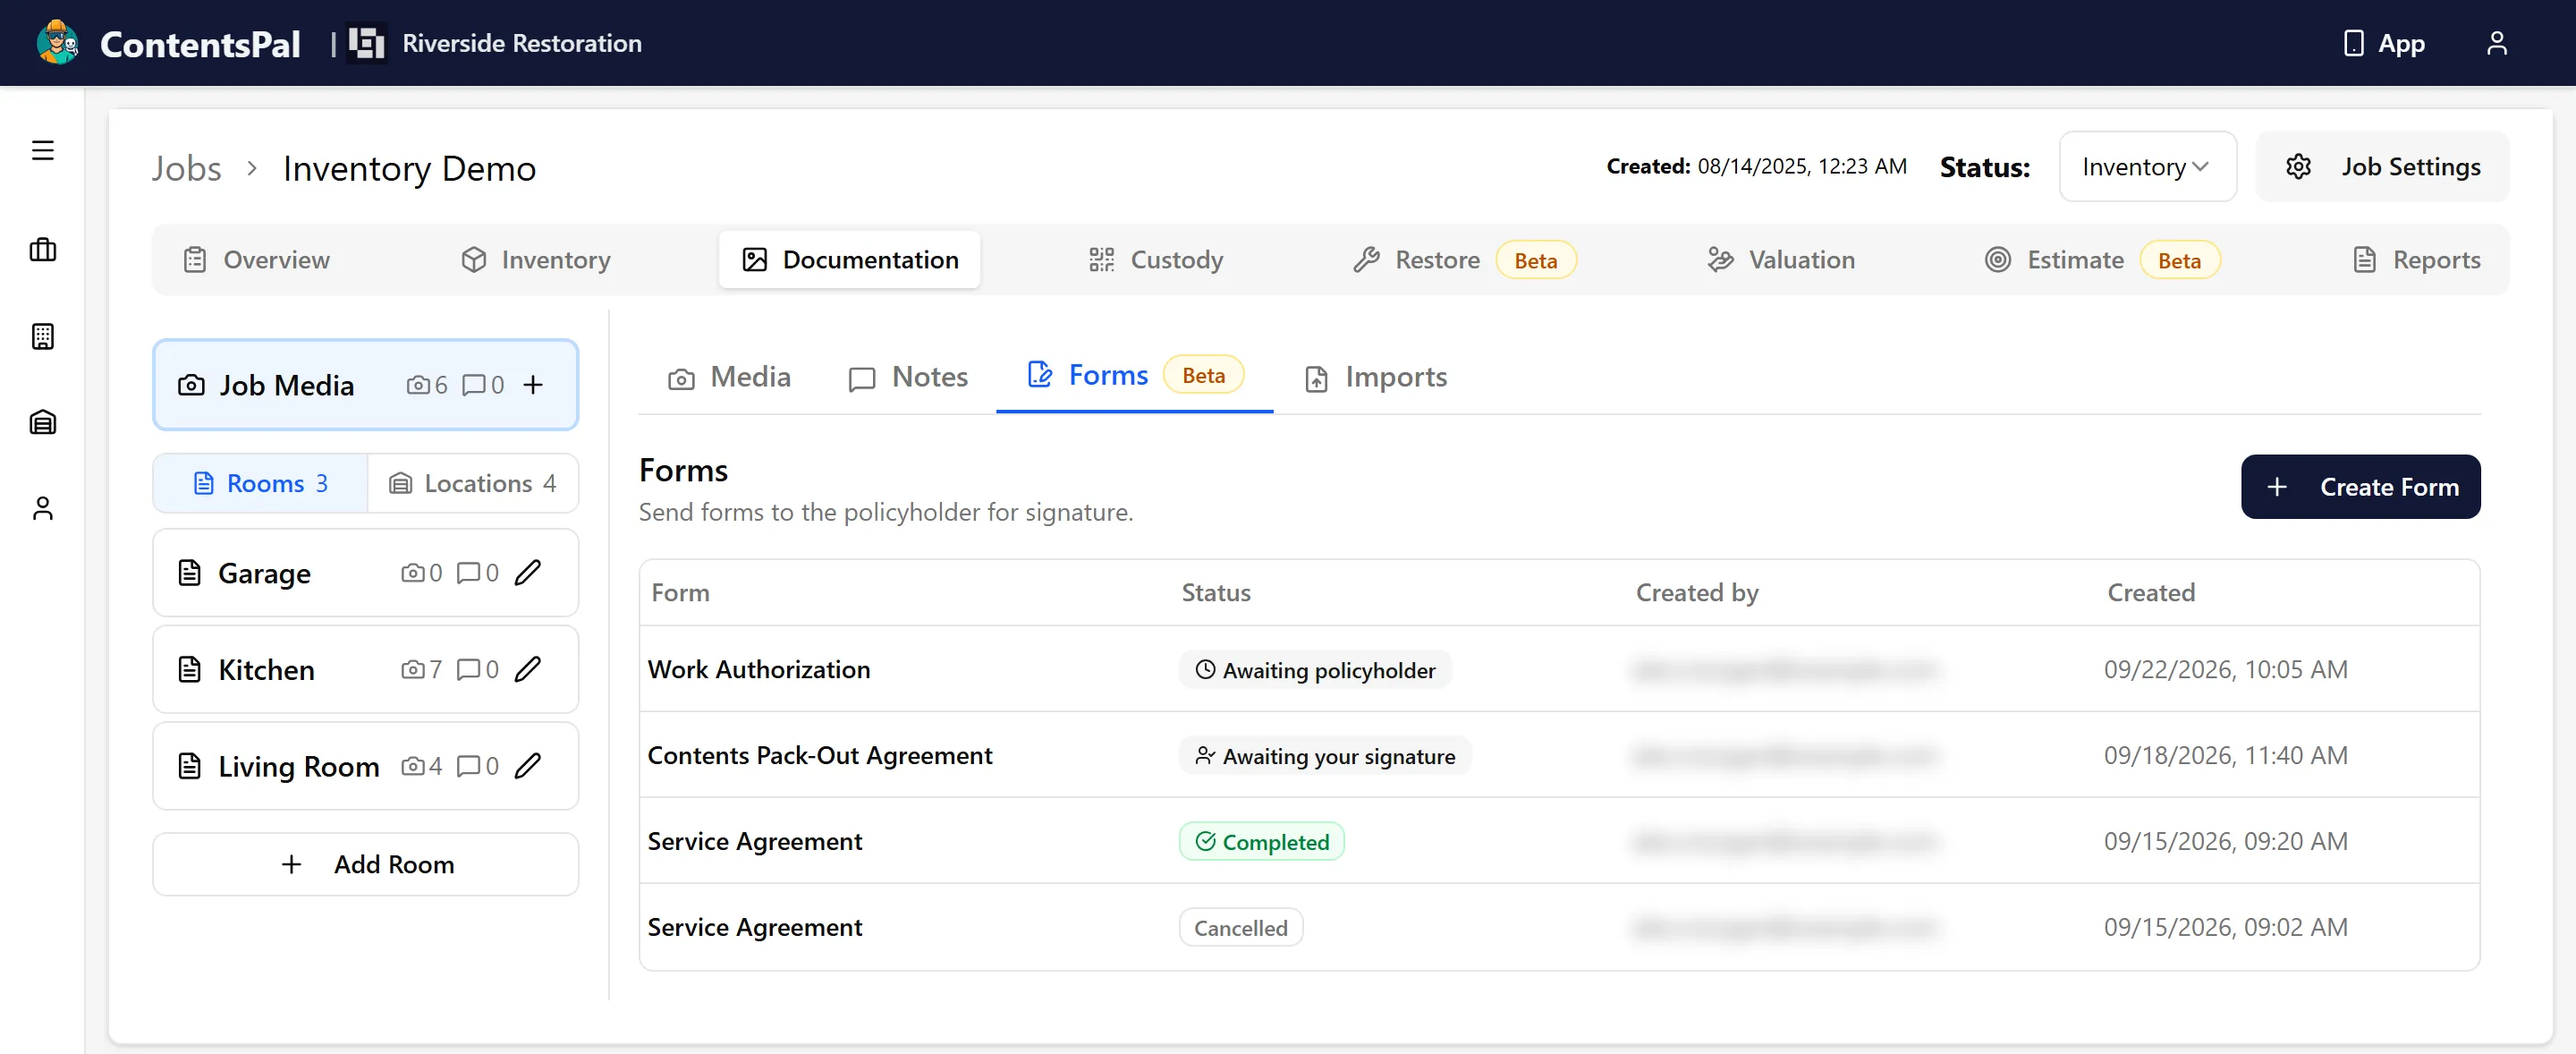
Section titled “Tracking Submissions”Every submission lives on the job’s Forms tab. The table shows:
-
Form — template name
-
Status — current state (see below)
-
Created by — the email of the team member who created the form
-
Created — when the submission was created
Statuses
Section titled “Statuses”| Status | Meaning |
|---|---|
| Not sent | The form has been created but nobody has been emailed yet. Click the row to sign your part or send it. |
| Awaiting policyholder | The policyholder still owes a signature. |
| Awaiting your signature | The policyholder has signed and only your organization’s signature is outstanding. |
| Completed | All signers have signed. Signed PDF + audit log are available for download. |
| Declined | A signer declined. The form can’t be completed. |
| Expired | The form passed its expiry date before everyone signed. |
| Cancelled | Someone on your team canceled the form before it was completed. |
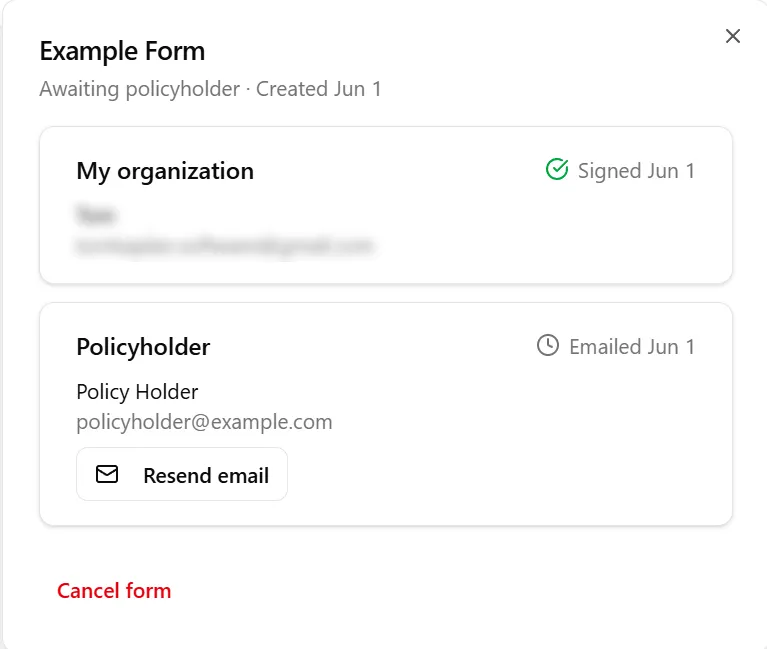
Click a row that is not sent, in progress, or completed to open the submission detail dialog and take actions (resend the email, sign on this device, cancel, download).
Resend the policyholder’s email
Section titled “Resend the policyholder’s email”In the detail dialog, click Resend email next to the policyholder row. Use this if they say they didn’t receive the link or it got buried in their inbox.
Canceling a Form
Section titled “Canceling a Form”If you sent the wrong template, the policyholder backed out, or you just need to start over, you can cancel any ongoing submission:
-
Open the submission from the Forms tab
-
Click Cancel form at the bottom
-
Confirm
The submission moves to Cancelled and any pending signing links stop working. Cancellation can’t be undone — start a new submission if you need the form again.
Downloading the Signed PDF
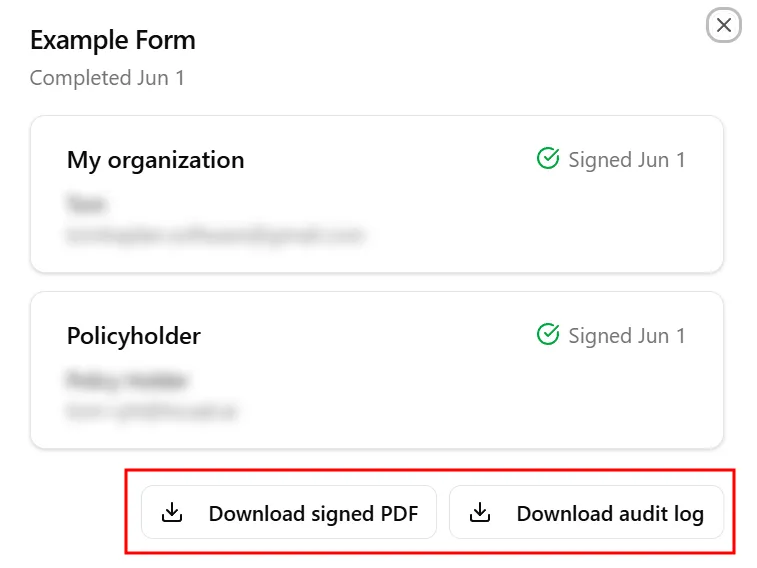
Section titled “Downloading the Signed PDF”Once a submission reaches Completed, two documents are available on the detail dialog:
-
Download signed PDF — the fully-signed form
-
Download audit log — a separate PDF with the signing timeline, IP addresses, and verification details for each signer
Both documents are stored permanently on the job and can be downloaded any time after completion.
Forms Outside the App
Section titled “Forms Outside the App”Everything above can also be driven from another system, so a form can go out the moment your CRM or job-management tool says it should — nobody has to open ContentsPal.
-
REST API — list the templates available to send, create a form on a job, email each signer, check where it has got to, download the signed PDF, and cancel one that went out wrong. See the API reference for the full endpoint list.
-
AI assistants (MCP) — ask your connected assistant things like “send the work authorization to the customer on job ABC-123” or “has the policyholder signed yet?”. See Connect to AI Assistants with MCP
-
Webhooks — ContentsPal calls your endpoint with a
form.completedevent once every signer has signed, carrying a link to the signed PDF, and aform.declinedevent if a signer refuses. See Webhooks — API Reference
Two things work differently outside the app. Creating a form does not email anyone — signers are invited in a separate step, so an integration can check the pre-filled values before anything reaches a customer. And templates stay read-only: they are uploaded and have their fields placed in the web app, because a template with no fields on it can’t be signed.
Troubleshooting
Section titled “Troubleshooting”Policyholder didn’t get the email
Section titled “Policyholder didn’t get the email”-
Ask them to check their spam folder
-
Use Resend email from the submission detail dialog
-
If the email address on the submission is wrong, cancel the form and start a new one with the corrected customer email on the job
Cancel button is missing
Section titled “Cancel button is missing”Cancellation isn’t available once a submission has reached Completed, Declined, Expired, or Cancelled — the form has already been completed or voided.
Template doesn’t show up in the send dialog
Section titled “Template doesn’t show up in the send dialog”-
It may be archived — check Settings → Forms → Archived tab
-
It may have no fields configured yet — templates without placed fields aren’t sendable. Click Configure fields on the template card.
Need Help?
Section titled “Need Help?”If you run into something this guide doesn’t cover, reach out to support through the chat widget in the bottom-left corner.