
📦 Adjuster Mode Overview
Esta página aún no está disponible en tu idioma.
Learn how to use ContentsPal as an adjuster — from creating a claim to reviewing policyholder inventory, approving items, and requesting additional information.
🧭 Summary
Section titled “🧭 Summary”ContentsPal gives adjusters a single place to manage contents claims from start to finish. You can create claims manually or have them flow in automatically from your company’s systems, collect inventory from policyholders through a self-service link, review AI-powered replacement pricing, and communicate directly with policyholders — all without them needing to download an app.
This article walks through the full adjuster workflow, starting with creating a claim and ending with reviewing and approving the policyholder’s inventory.
⚙️ Prerequisites
Section titled “⚙️ Prerequisites”-
You must have an adjuster account with ContentsPal.
-
If your company is integrated with ContentsPal, claims may be created automatically — check with your admin.
🚀 Step-by-Step Instructions
Section titled “🚀 Step-by-Step Instructions”1. Create a Claim
Section titled “1. Create a Claim”-
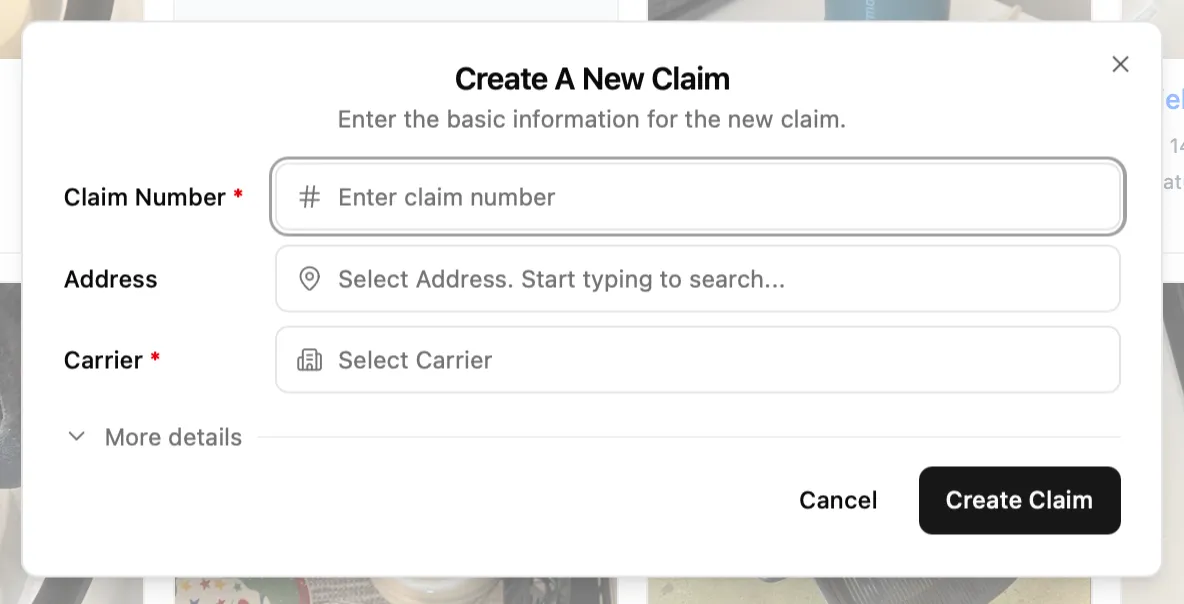
Click New Claim from your dashboard.
-
Enter a Claim Number or a name you’d normally use to identify the claim (required).
-
Select the Carrier (required) and optionally add the property Address. Expand More details to add the adjuster email, policyholder name, claim sharing, depreciation table, or default rooms.
-
Click Create Claim. ContentsPal saves the claim and opens its dashboard, so you can start adding contents right away.
2. Choose How to Collect Inventory
Section titled “2. Choose How to Collect Inventory”Once a claim exists, there are several ways to build the inventory:
| Method | When to use |
|---|---|
| Policyholder self-service link | You want the policyholder to report their own items |
| Field app | An adjuster or technician goes on-site to photograph and inventory items |
| Restoration vendor | Your contractor is already using ContentsPal and shares their inventory with you |
| Upload a list or images | You have an existing spreadsheet or photos to import |
3. Share a Link with the Policyholder
Section titled “3. Share a Link with the Policyholder”-
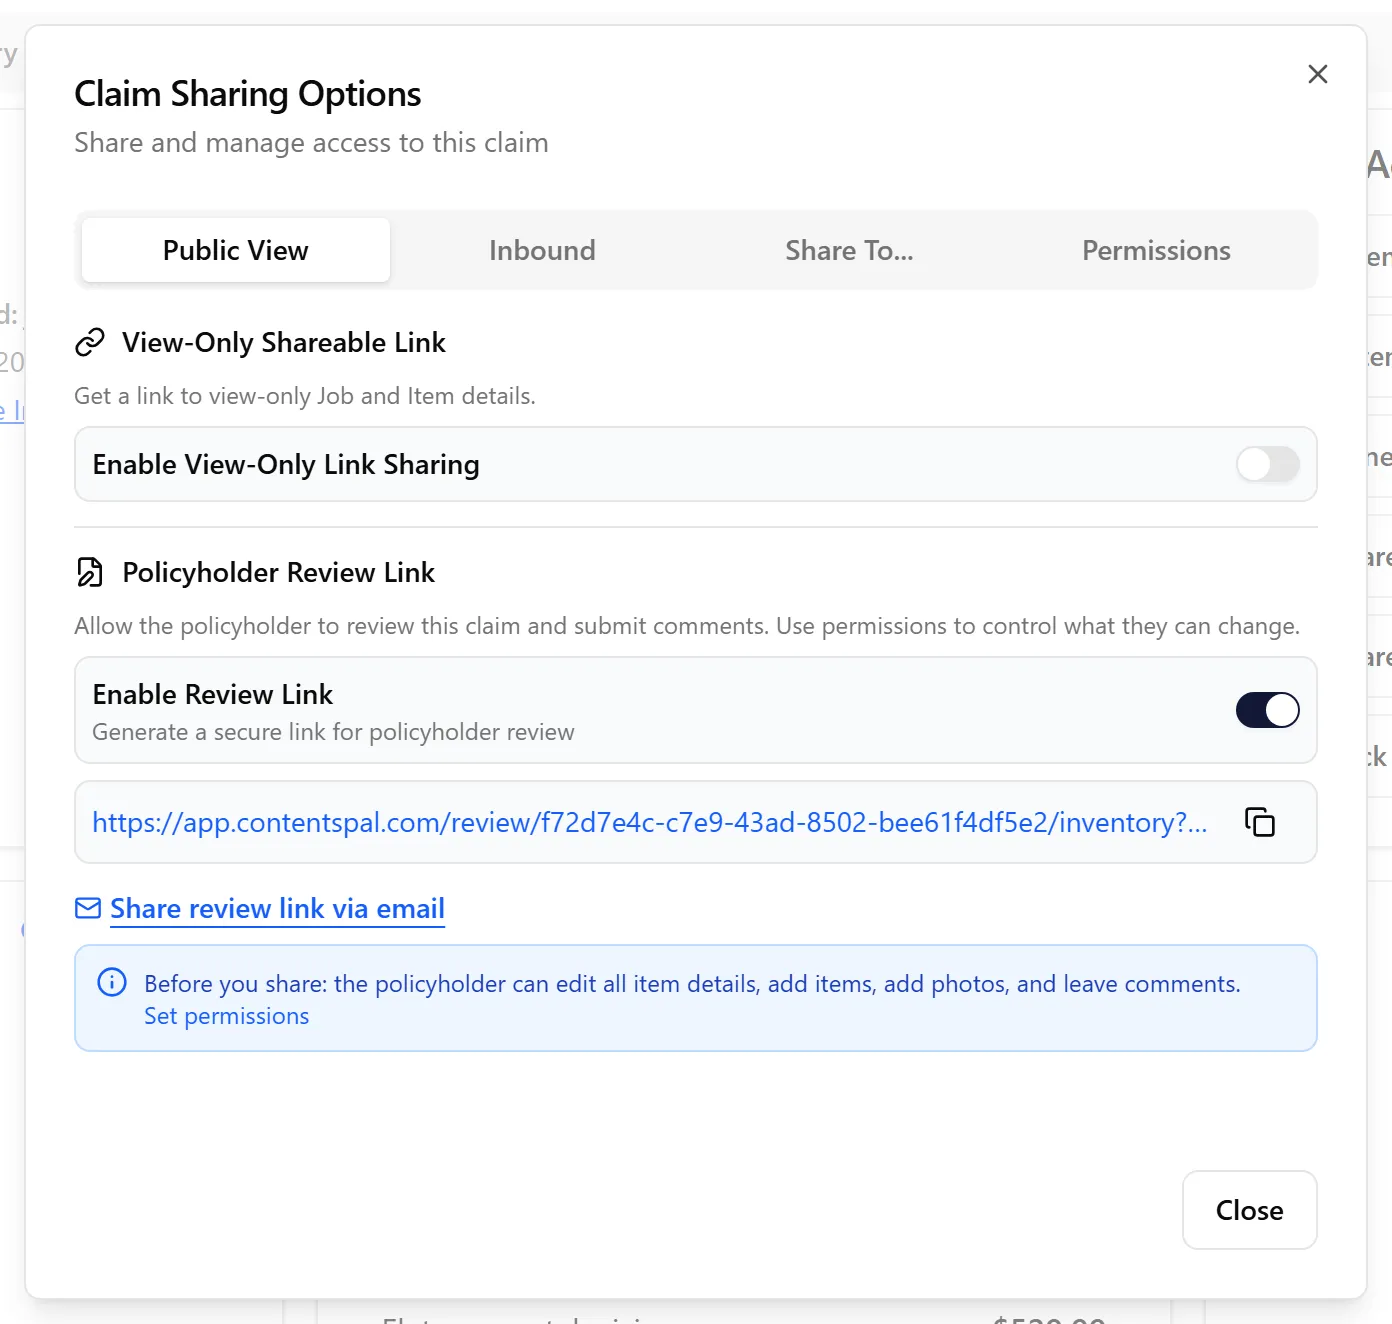
Inside the claim, click Share with Policyholder.
-
In the Public View tab, find the Policyholder Review Link section and toggle on Enable Review Link.
-
A shareable link is generated. Copy it and send it via email, SMS, Hi Marley, or any messaging tool you use — or click Share review link via email to send it from ContentsPal.
The policyholder opens the link on their phone or computer — no app download required.
Set Permissions
Section titled “Set Permissions”Before sharing, open the Permissions tab to control exactly what the policyholder can do:
-
New items (under Policyholder can add) — turn this on if you want them to self-report their inventory.
-
Photos to existing items — useful when you need proof of purchase or additional documentation.
-
New rooms — lets them create a room while adding items.
-
Allow editing item details (under Policyholder can edit) — turn this on, then tick each field they may change (name, quantity, brand, model, condition, age, vendor, submitted price, URL, room).
4. Policyholder Adds Items
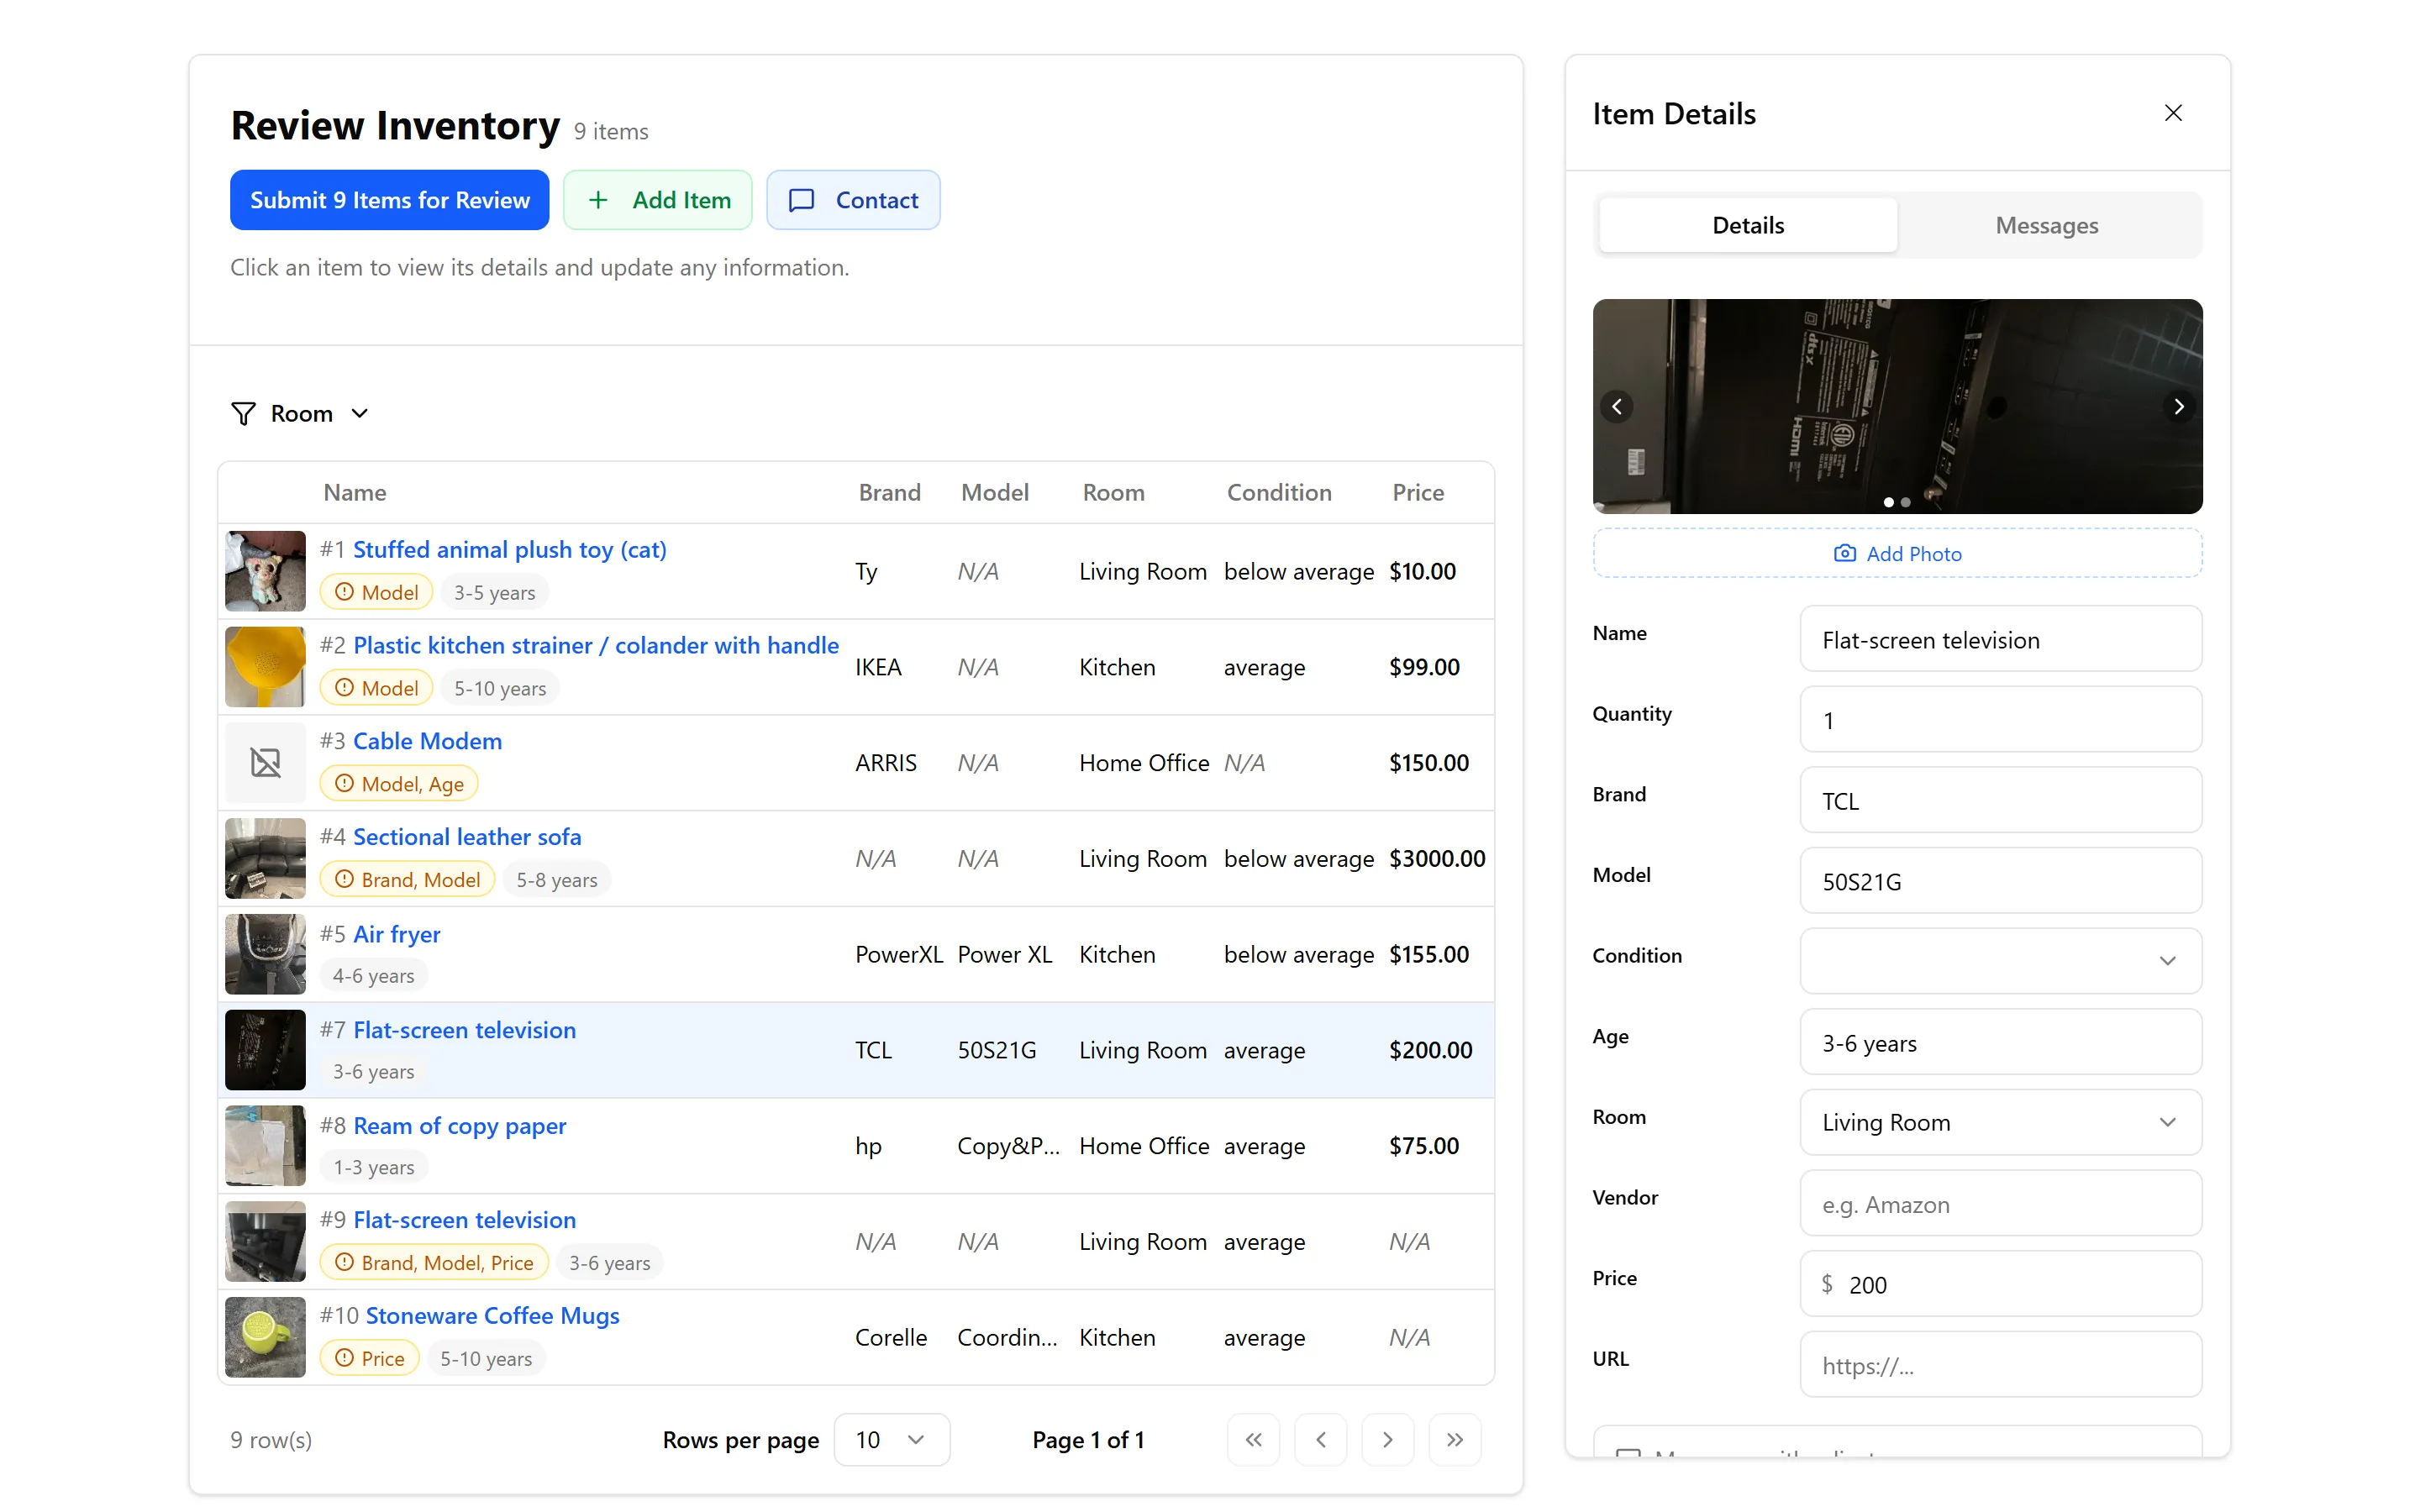
Section titled “4. Policyholder Adds Items”The policyholder opens the link and can add items in two ways:
-
Manually — type in the item details directly.
-
Upload photos — select images from their photo library or take new photos (multiple at once), optionally assigning them to a room.
When photos are uploaded, AI automatically identifies the items and creates the inventory. By default the policyholder does not see pricing — only you, as the adjuster, have access to replacement values (unless you turn on Display item prices in public view in the sharing options).
When adding items, the policyholder can choose which room each item goes into (and, if you’ve enabled New rooms, create a new room on the spot). The inventory list is grouped by room so it’s easy to see what belongs where.
Depending on your settings, the policyholder may be asked to provide the age, condition, and price of each item. They fill in those fields and submit the inventory to you when they’re ready.
5. Review the Inventory
Section titled “5. Review the Inventory”Once the policyholder submits, you can review everything from the web app.
Inventory Tab
Section titled “Inventory Tab”See all items that have been identified. Click on any item to view its details, photos, and the information the policyholder provided.
Documentation Tab
Section titled “Documentation Tab”View overview photos of the property and any additional images uploaded by the policyholder.
Reviewing Replacements (Valuation Tab → Single View)
Section titled “Reviewing Replacements (Valuation Tab → Single View)”Open the Valuation tab and switch from Table to Single to review replacements one item at a time. For each item, you’ll see the AI-selected replacement with a price distribution from low to high. The currently selected price is highlighted in red.
-
Every replacement option carries its own confidence pill (High, Medium or Low). Click any pill to see why that option scored the way it did — whether it’s the same product as the item, whether its price sits with comparable listings, and whether its pack size lines up with the quantity being replaced. You can compare the options on that before you pick one, rather than only seeing a score after the fact.
-
Press 1, 2, 3 (up to 9) to quickly select a different price option.
-
Press N or P to move to the next or previous item.
-
Click Rerun AI (or press R) to have AI search again.
-
Adjust the search query and click Search to find a different match.
-
Click Manual to enter a replacement yourself — product name, price, pack size, vendor and link. Paste a product URL into the link field and click Extract to read the product name, price, vendor and image off the page automatically. You can also click From URL to paste a product link and use it as the replacement directly.
To shift many items at once, go back to the Table view, select items (or none, to apply to all), and choose Edit rows → Optimize. Use the Price Level slider to move between cost-efficient and luxury replacements — useful if the property is a higher-end home — or choose Match Submitted to pick the option closest to the policyholder’s reported price.
Valuation Tab
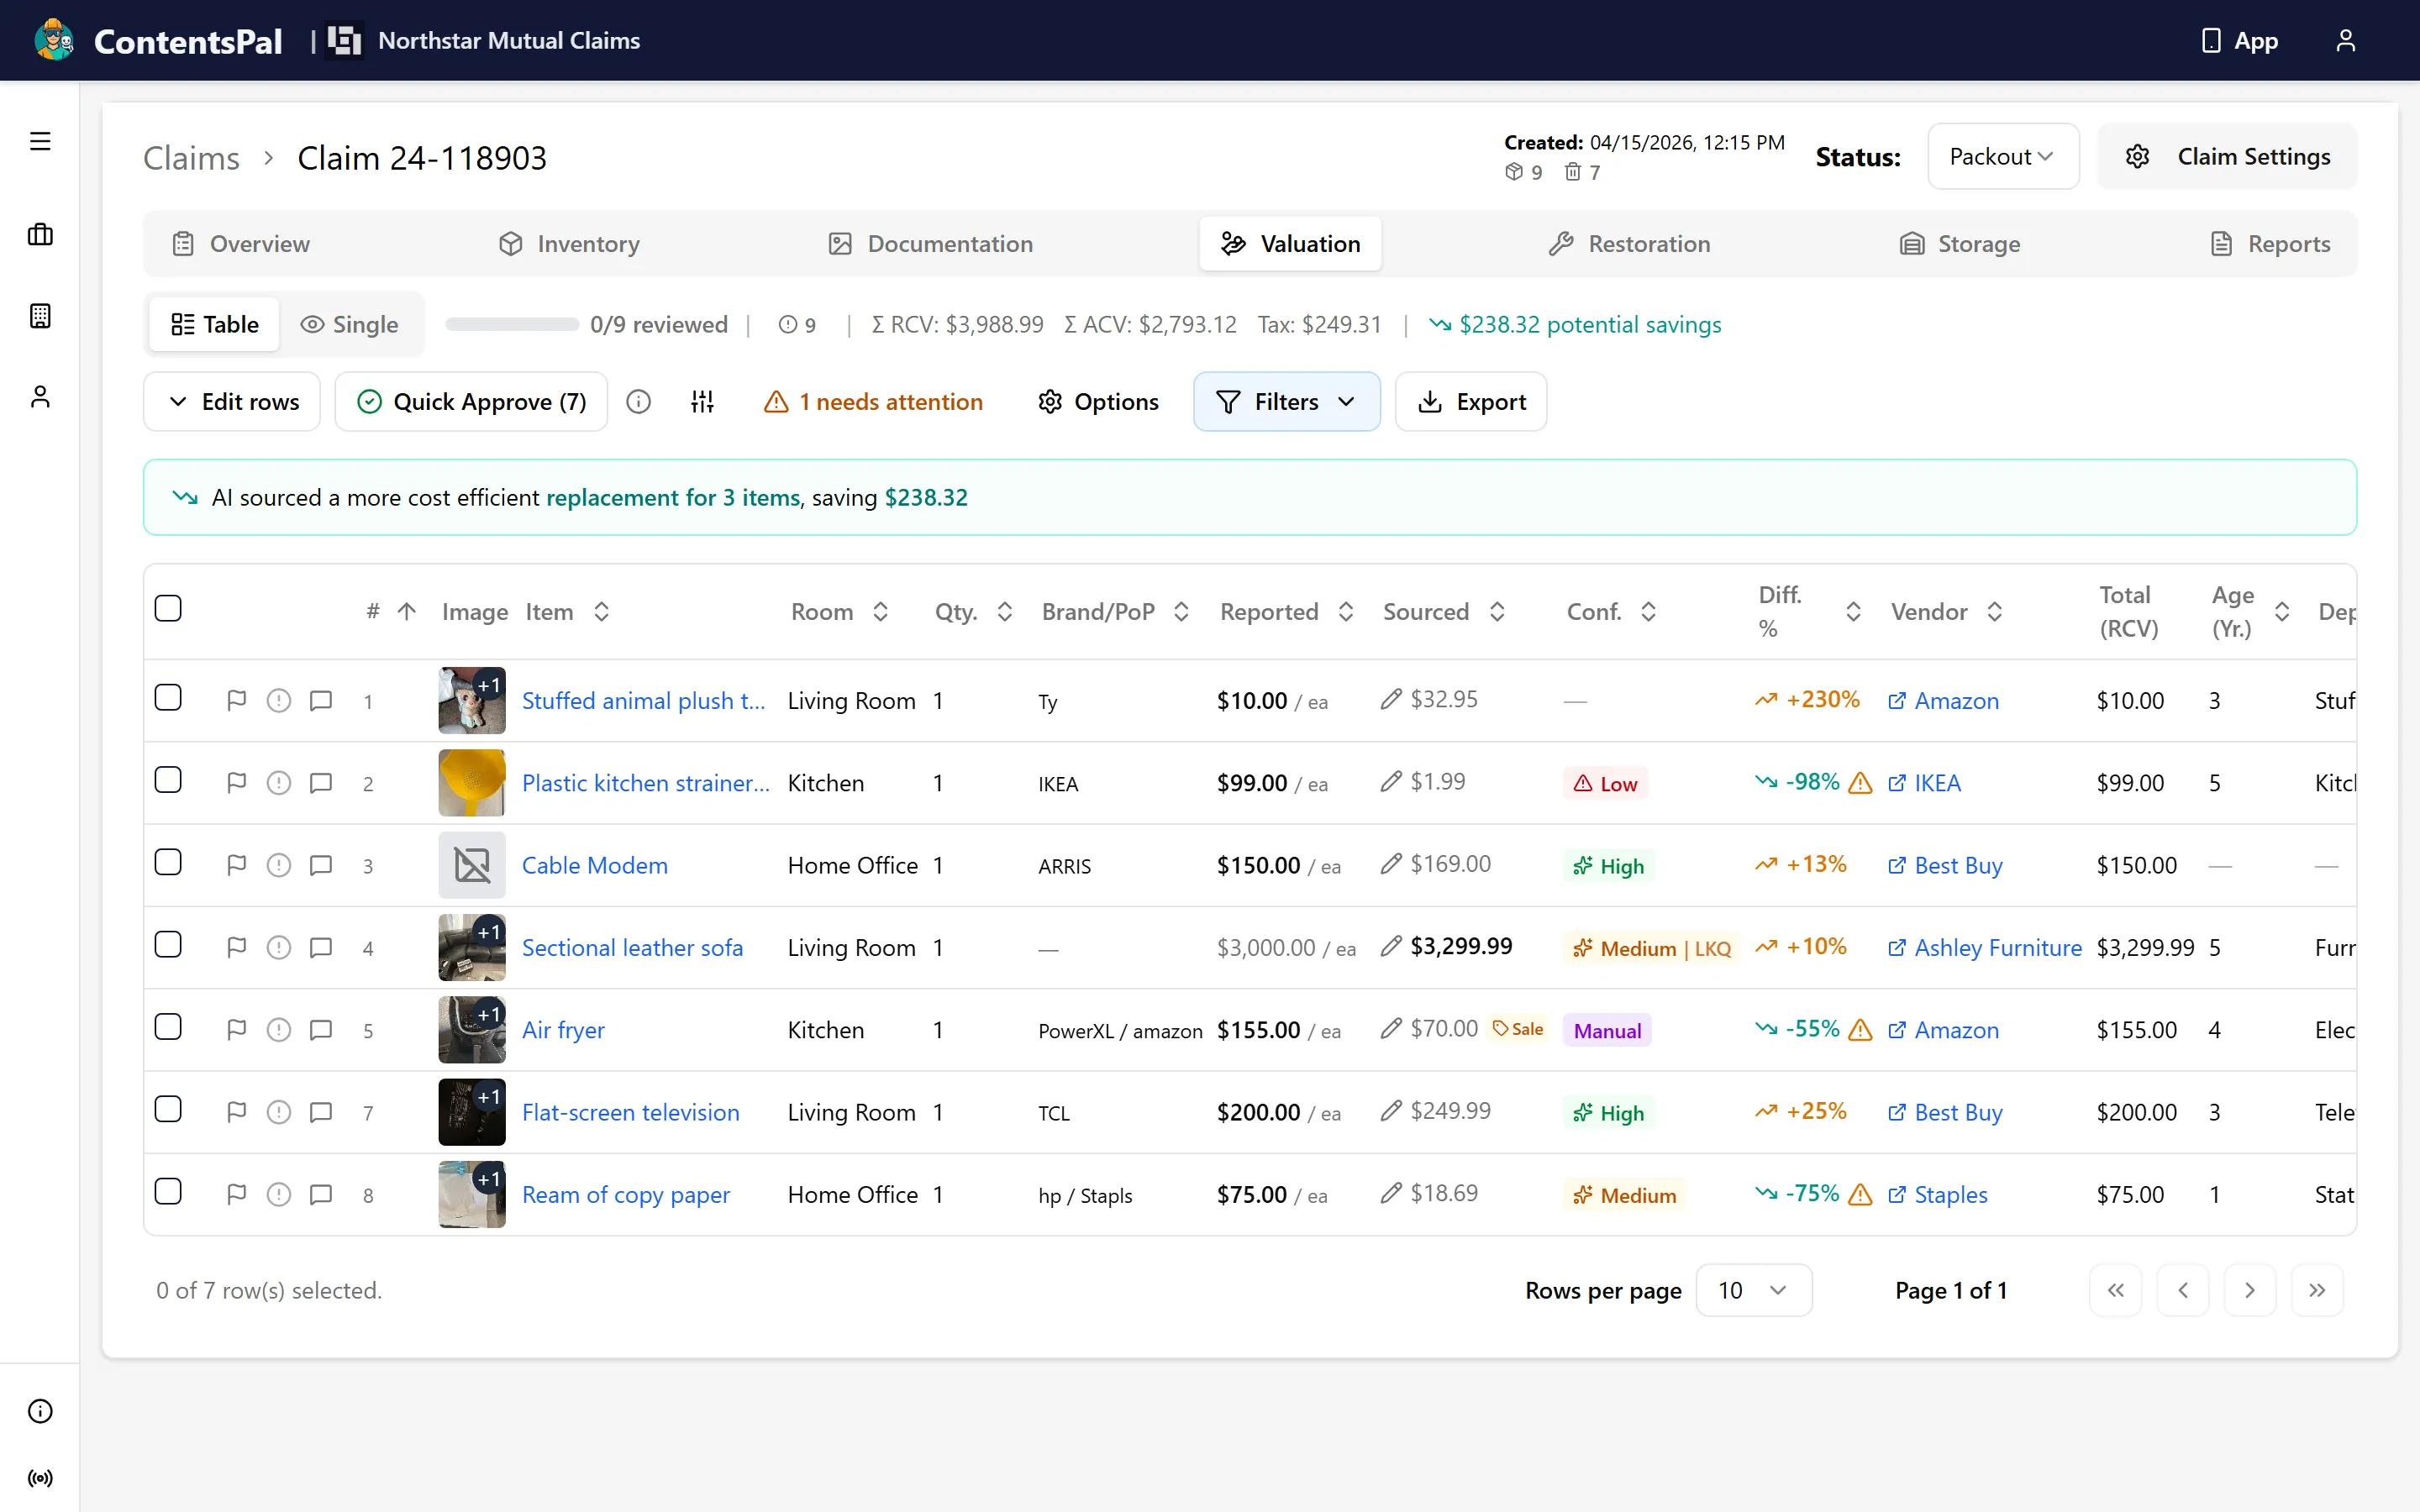
Section titled “Valuation Tab”A detailed view of all items with:
-
Item image and name
-
Quantity and Reported — the price the policyholder submitted
-
Sourced — the AI-found replacement price — and a confidence pill (High, Medium or Low) for that match. Click the pill to see the breakdown.
-
Price difference (e.g., AI found an item 67% cheaper)
-
Vendor, RCV, age, depreciation, and more
Which price an item is valued at follows your Quick Approve thresholds: an item whose reported price is at or under its threshold is valued at that reported price, and everything above the threshold is valued at the sourced price. If your organization has no Quick Approve threshold set, every item is valued at its sourced price. Approving an item never changes its price.
Click the column settings icon to show or hide columns based on what’s useful for your workflow.
6. Approve, Reject, or Request More Information
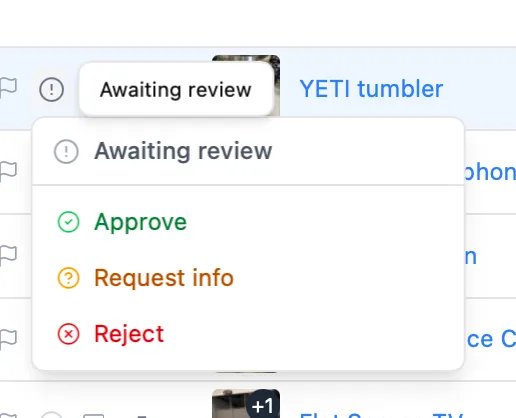
Section titled “6. Approve, Reject, or Request More Information”For each item, you have three options:
Approve
Section titled “Approve”Click Approve on the item. It turns green in both the valuation view and the inventory list.
Reject
Section titled “Reject”Click Reject, choose a reason from the provided options (or write your own), and submit. The policyholder will see the rejection reason when they return to their link.
Request Additional Information
Section titled “Request Additional Information”Click Request Info, type your message (or use one of the suggested templates), and send it. The policyholder will see an unread notification on their item and can respond with additional details or photos.
7. Track Activity and Changes
Section titled “7. Track Activity and Changes”ContentsPal keeps a full audit log of every change the policyholder makes. Click the activity icon on any item to see a timestamped history — for example, “policyholder changed the age and price.”
Use the Activity filter in the inventory view to quickly see all items that have recent updates or unread messages.
Opening the activity panel marks its messages as read. If you want an item to stay in your queue, click Mark as unread at the top of the panel.
✅ Best Practices
Section titled “✅ Best Practices”-
Set permissions before sharing the link — decide upfront which fields the policyholder can edit to avoid confusion later.
-
Use Optimize’s Price Level slider to align replacements with the property’s value tier before finalizing.
-
Approve items as you go rather than all at once — the green status helps you track progress and spot what’s still pending.
-
Request info early if you need proof of purchase — the sooner you ask, the faster you can close the claim.
-
Check the Activity filter regularly to stay on top of policyholder updates without manually scanning every item.
🧩 Troubleshooting
Section titled “🧩 Troubleshooting”The policyholder says they can’t add items: Check that New items is toggled on in the policyholder Permissions tab. They can only do what you’ve enabled.
AI identified the wrong item: Use the search field in the Valuation tab’s Single view to adjust the query and rerun the search. You can also manually select a different price option from the distribution.
I don’t see the policyholder’s submissions: Make sure the Enable Review Link toggle is on. If it’s off, the link won’t be active and submissions won’t come through. Also confirm the policyholder clicked Submit Items for Review after adding their items.
I need to change which fields the policyholder can edit: Return to Share with Policyholder → Permissions and update the permissions. Changes take effect immediately for that link.